|
|
|
|
|
|

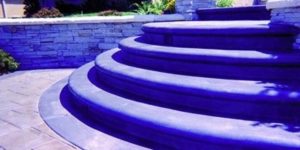
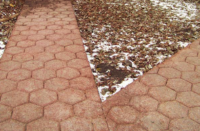
The photos seen here illustrate a job I did a couple of years back involving a massive radius staircase connected to a 3,000-square-foot veranda which sprawled from a 21,000-square-foot home in northeastern Pennsylvania (see photo 1).
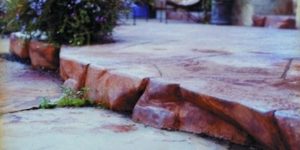
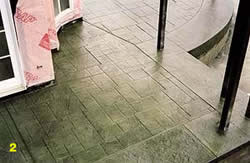
The bluestone-ashlar veranda (see photo 2) features stamped concrete using Brickform TM-100 texture mats from Rafco Products’ Creative Images line. The job also included using SS-100 Sierra Seamless texture skins — which allow texture to be imprinted over large areas without bond lines — for the borders and integrating them to wrap in with the steps. The color hardener is CH-825 Slate Green and the release agent is RA-600 Light Gray, both from Rafco Products. The sealer used on this job is Glaze ’N Seals’ “Wet Look” lacquer, a crystal-clear, high-solids acrylic coating designed to protect concrete surfaces.
As for the massive stairs, the tread is 18-inches deep and the rise is 4-inches high. The top step is 53 feet in radius and the bottom step is 76 feet in radius. Each individual tread was produced from a continuous pour.
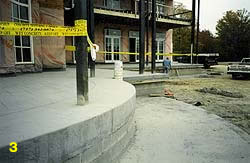
The general contractor had already provided the below grade work and the associated block work (see photo 3) to ensure there would be no movement with the freeze-thaw weather conditions in the region. The staircase started out well below the frost line with solid footings and piers.
A block sub-frame of the steps (see photo 4) was built to a smaller dimension of the shape of the final staircase to allow enough room for an adequate amount of concrete on top and in front of the block work. Then the blocks were filled solid with concrete. This gave us a solid surface to which we could mount our concrete formwork and enabled us to hit our desired grade with accuracy and keep the perfect radius. This method also allowed us to build the final product from the top step down, instead of from the bottom step up. Building from the top down permitted us to produce a very clean-looking vertical riser with a perfect 90-degree angle at the rear of the tread and the bottom of the riser.
|
|
|
|
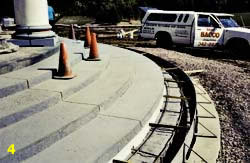
The formwork was custom made to suit the job (see photo 4). We used 3⁄8-inch flat stock cut into 21⁄2- by 18-inch strips for the brackets. The metal was bent on a metal break to leave a 10-inch flange for the bottom and an 8-inch flange for the upright. We offset a #3 rebar and welded it to one side of the bracket for support. (I think the flat stock alone would have been strong enough, but I wanted to make sure there was no deflection once the concrete was placed.)
The rebar was offset on the brackets to allow enough room for our drills to get in, drill the pilot holes and set the masonry fasteners. The face of the formwork was standard grade 1⁄8-inch flat stock metal, cut 8-inches wide and 20 feet long for the faceplate or the bulkheads. We would have used longer lengths if we could have to minimize our splices, but 20 feet was the longest available.
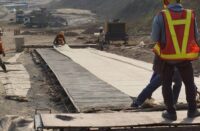
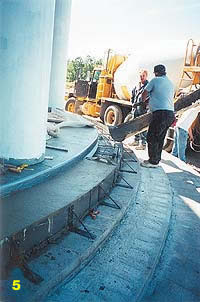
We vice gripped the 20-foot lengths of the formwork to each other and to the brackets during setup. The concrete was placed at a 2- to 3-inch slump. (I don’t like concrete that’s lazy or material that promotes bleed water. A higher slump may have been easier to work with but we would have a loss of strength in the concrete and the job would have suffered in the long run.) The concrete had to be shoveled down the chute of a mixer truck due to the slump at placement.(See photo 5)
When the perfect height and radius was achieved, the brackets were then fastened to the block work below and the faceplate was drilled as needed and bolted to the brackets with 1⁄8-inch round-head machine bolts. We added more length to the faceplate with each pour as the step length increased. The machine head bolts were keep finger tight for easy removal once the concrete was set enough to pull the forms and texture the face.
The concrete thickness over and in front of the block sub-frame is a solid 6- to 10-inch, 4,000-pound mix reinforced with #4 rebar. Each decorative step is drilled and pinned to the preceding step.
|
|
|
|
|
|
We used Poli-Void, a flexible expansion joint material from Stegmeier that is placed prior to pouring the concrete, at the back of each stair tread so we could easily remove the top 1⁄4 inch of foam to make room for the caulking crew to do their job once our work had been completed. The Poli-Void also gave me a good reference point for the placement height of the concrete.
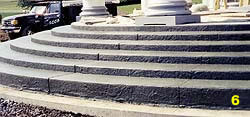
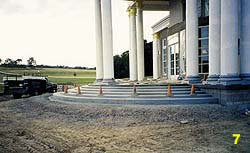
Each step was poured and allowed to set, then it was stripped, finished and saw-cut the same day (see photo 6). Using a step groover, we grooved in control joints at 18- to 20-foot intervals to allow for shrinkage upon drying. This was done in case the set time of the concrete was accelerated due to the weather conditions. (It was summertime and the temperature was warm, plus the site was wide open (see photo 7) and winds could have caused the concrete to dry rapidly.) Every crack-control joint was cut in approximately 10 to 12 hours after placement with a 14-inch high-speed cut-off saw fitted with a diamond blade designed for cutting green concrete.
We always make a small test slab with each pour to check for timing on the early saw-cuts. If the test slab cuts clean without spalling, there is a good chance the main piece will cut clean as well. Test slabs also are handy to have if you are trying different sealers or using acid stains to see what your outcome will be before executing the work on the main piece.
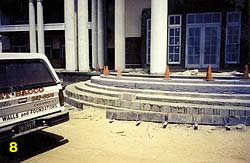
The one dilemma we encountered during construction was when we installed the bottom step and had nothing to mount our form brackets to. We may not have achieved as perfect a radius as with the other steps if we only used pins to hold the formwork. To make our forms fit the work, we simply poured a temporary footing to attach our brackets to and discarded it after use (see photo 8).
All decorative concrete work in photos seen here was produced by Bart Sacco of Concrete Texturing Tool and Supply, a training center and supply house for decorative concrete tools, supplies and products based in Throop, Pennsylvania. Concrete Texturing Tool and Supply mainly does business via its online store.