
A far cry from the seas of monochromatic squares that comprise too many terrazzo installations, thistechniques give you a taste of what terrazzo can really do.
If you’re a sucker for complex geometrics, take a look at our first technique – a happy combination of color and complexity.
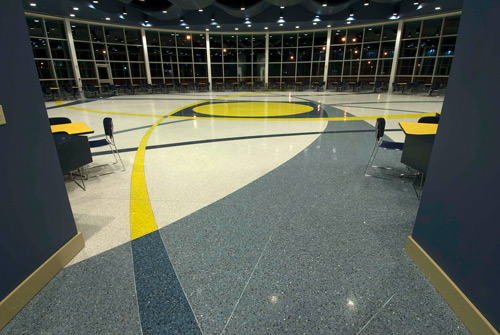
Helicopter Heaven
Richard Dreyfus, Missouri Terrazzo Co. – St. Louis, Mo.
(314) 361-8090
Inspired by the rotors of the helicopters the client manufactures, this intricate, precise design shows off not only the contractor’s technical aptitude but also terrazzo’s design versatility.
Ingredients:
- Terrazzo & Marble Supply Terroxy Iso-Crack Epoxy Membrane
- Fiberglass scrim material (to use in case of cracks in the substrate)
- T&M Supply Terroxy Primer
- T&M Supply Signature Divider Strips (3/8 inch by 1/8 inch)
- T&M Supply Terroxy Resin Matrix
- T&M Supply Terroxy pigments: Dizzle Yellow, Sun Valley,
- Mayan, Navy Wool
- Cactus Canyon Quarries marble chips
- Heritage Glass recycled glass aggregate
- T&M Supply recycled one-sided mirror glass aggregate
- Sherwin-Williams Terrazzo ATF 20 Filler
- T&M Supply Terroxy Water-Based Acrylic Sealer
- Special equipment used: Blastrac shotblaster with 390 shot, AutoCAD computer software, laserjet cutter, hot glue gun
- or epoxy adhesive, Terrco Model 2000 floor grinder with
- 40-, 80-, 100-, 200- and 400-grit diamond discs
Directions:
- Design your pattern in AutoCAD and, using a laserjet cutter, cut out full-size cardboard templates for each element.
- At the site, prep your surface by shotblasting and grinding to get a smooth, flat profile to ensure the epoxy will bond well to the substrate.
- Fill any exposed cracks with small, unpigmented amounts of Terroxy Resin Matrix. Then create a patch by covering the filled cracks with the Terroxy Iso-Crack Epoxy Membrane and a scrim.
- Using the cardboard templates, lay out your design on the surface and trace the edges of each element. Remove the templates and, using hot glue and epoxy adhesive, affix your divider strips to the lines of the design.
- Put down a coat of Terroxy Primer over the entire area to ensure a proper bond.
- Mix your batches of the Terroxy Resin Matrix, one batch for each pigment. Each batch gets 180 pounds of aggregate – 75 percent marble chips, 15 percent recycled glass and 10 percent recycled mirror – plus a small amount of ATF 20 Filler.
- Fill in the pattern with the appropriate colors according to your design, and let it set completely.
- With your floor grinder, do multiple dry passes, first with 40-grit diamonds and then with 80-grit.
- After this is completed, grout the entire floor using the appropriate colors of epoxy matrix and let it set.
- Use the grinder to remove excess grout and polish the surface. Do several runs of wet grinding, first with 100-grit diamonds, then 200-grit and then 400-grit for the finish.
- Clean the surface thoroughly and seal the floor with the Terroxy sealer.