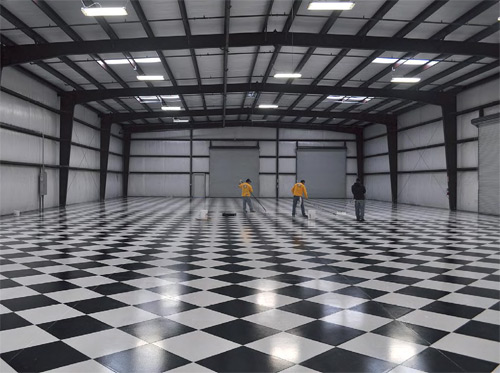
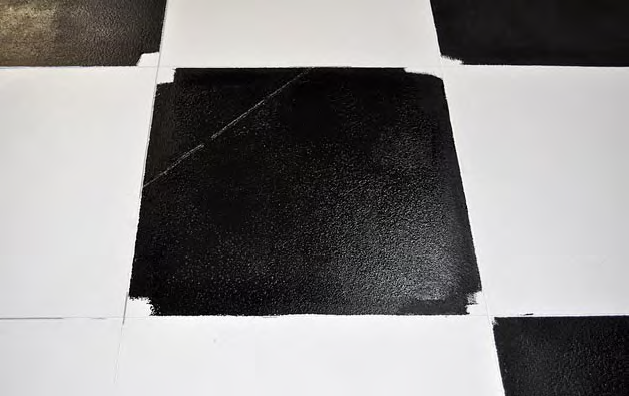
The first thing you’ll notice about this private garage in Modesto, Calif., is how incredibly flawless the checkerboard pattern looks.
It looks perfect, says contractor Julio A. Hallack, because it is. He and two of his staff took two days to lay out the pattern in an area that’s roughly 130 feet by 80 feet, beginning at the center of the slab and working their way to the perimeters. They got a little help from an engineer hired by the client, but Hallack and his crew did the work. “We took measurements the old way, using a square and a chalk line,” says Hallack, president and CEO of Concrete by Hallack in Turlock, Calif.
Each of the 2,400 squares was precisely cut 2 feet on center – no more, no less – using a walk-behind lightweight concrete saw now known as the Husqvarna Soff-Cut 150. “You’re only supposed to use this little machine on freshly poured concrete, but we used it on this old concrete just scoring lines 3/8 inch deep, not opening new control joints,” Hallack explains.
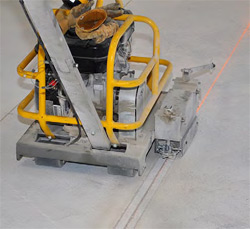
“We kept our lines straight when we saw-cut by using our experience and knowing what equipment to use,” he says. “Concrete blades were changed and replaced for new ones as often as needed. And we used orange chalk powder to mark the floor and prevent color contamination.”
Besides experience and proper equipment, Hallack credits the success of this project to borrowing tools and techniques from other trades such as tile installation, painting and janitorial services. He also says it was imperative to have a professional crew who was happy to be on the job and completely focused on getting the job done right.
Prepping the surface
Before the garage, nicknamed “The Toy Box,” glistened in its present glory, it was an ordinary 10-year-old machine shop with a machine-troweled, extremely tight surface. The well-to-do private owner of the garage happens to love fast cars and even sponsors auto racing.
 The 10,400-square-foot floor – which consisted of your typical gray, high-gloss concrete with appropriate control joints – was covered with curing compound and oil stains.
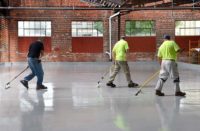
The first step of the job involved removing all the accumulated debris from the 1,451 feet of existing control joints and vacuuming up the fine dust.
“We then filled in (the control joints) with tile grout using a very slurried mix and let them dry for a day,” Hallack says, so that moisture couldn’t travel inside the slab during the surface preparation.
The following day, they removed all surface contaminants with strippers, lots of water and a neutralizer. A scrubbing machine with nylon grid brushes was used to remove the oil, grease and the stubborn curing compounds used when the slab was poured.
“By encapsulating (the control joints) ahead of time, we made sure all the water and strippers used to clean the floor stayed on the surface and didn’t go inside the concrete slab,” Hallack says. “Instead, we could pick them up and get them out of there. This is one of the most important steps contractors should follow and most don’t pay attention to. They don’t understand what moisture can do. But it can be a nightmare.”
 The slab, he explains, is composed of a 6-mil plastic underlayment covered with 2 inches of sand and then 6 inches of concrete – “a very common way of placing commercial slabs in California.” Eventually, he continues, trapped moisture will come up to the surface, causing delamination of toppings and sealers.
Since the slab was machine-finished, the crew used #60 sandpaper and an economically priced product called Preserva Crete to clean and open the floor for the bonding application. “The cleaner/etcher is comparable to muriatic acid but it doesn’t have a smell. It is a green product that doesn’t contaminate the environment,” Hallack says, adding that he bought it at Home Depot. It’s also available from janitorial product distributors, as well as other big box stores.
They hit the floor with a second pass from the scrubbing machine and cleaned it with a concrete neutralizer.
This initial cleanup took a crew of six four days to complete.
Creating the design
 Once the floor was cleaned and opened, a four-man crew applied ML Primer by Miracote as the bonding agent. When it was dry, they put down a coat of white Miracote Colorbond XL with 18-inch rollers. “Now the whole floor was white and seamless,” Hallack says, noting that Colorbond is a coloring agent and a sealer combined. They let it dry for 24 hours.
Miracote Colorbond XL, a single-component self-crosslinking acrylic finish coating, can be used in new or recoat work. Hallack says he chose the product because of its durability, excellent weathering qualities and ease of use. “Colorbond is an excellent product to use on this kind of application,” he says. “Besides being easy to apply, it allows us to create art.”
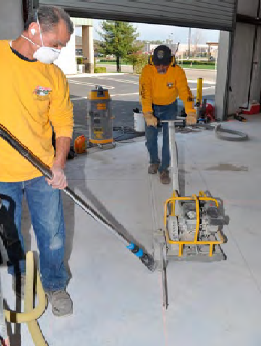
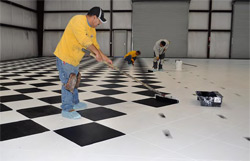
With a clean canvas before them, Hallack and his crew chalked out the checkerboard pattern, a design with natural appeal for auto-racing fans like the owner of The Toy Box. It then took a crew of four two days to saw-cut the design, using the walk-behind saw and 4-inch Makita grinders. They cleaned as they went along.
 A six-man crew returned the next day to vacuum up the remaining dust and clean the surface with water. This cleanup took one day.
Next, a crew of five applied a second coat of white Colorbond with an airless sprayer. “We borrowed this technique from the painting industry,” Hallack says. “The first coat was rolled on. The second coat was sprayed on to make sure all the saw-cut lines were colored white. We didn’t want any gray concrete to be seen.” This took a day too.
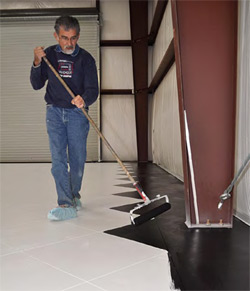
 “The best and most challenging part was to apply the black Colorbond,” Hallack says. For this step, he says, they borrowed many techniques from the painting industry to get the job done right. They also used plenty of its tools, including brushes, trays and rollers. It took a crew of six two days to complete the arduous task.
“We used special brushes to do the borders and then used rollers to paint the insides of the squares,” Hallack says. “We had to be extremely meticulous for this part of the job. It was very demanding.” He concedes that a few mistakes were made but nothing that a little touch-up Colorbond wouldn’t fix.
Hallack says he engages with his employees to make sure they are mentally and physically ready to do this type of task. “I create an environment of relaxation. If someone is not in the right frame of mind, I’ll remove them from the job site. I expect my employees to be smiling and happy. When employees are happy, they produce more.”
 Sealing the deal
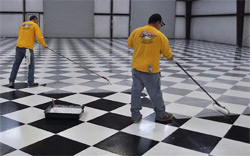
When the painting was completed, Hallack sealed the floor with three coats of Miracote Mirapoxy WB, a two-component, chemically resistant, water-based epoxy floor coating system. Applying the epoxy with 18- and 24-inch rollers took a six-man crew two days to complete.
After the floor was buffed, they applied four coats of floor wax “because the owner wanted to see his face’s reflection on the floor,” Hallack says. “And he can.”
The entire restoration job took Hallack’s company 470 staff hours to complete. The cost of materials, blades, strippers, pads and equipment was 75 cents per square foot. The company’s cost to do the entire job – including labor and materials – was $2.85 per square foot.
“I like to create unique things and I like to challenge myself,” Hallack says. “We have to be creative and pay attention to details and, most importantly, listen to our clients. That’s what you have to do in this industry to stay alive.”

Project at a Glance
Client: A well-to-do private owner who likes fast cars and sponsors auto racing.
Contractor: Julio A. Hallack, president and CEO of Concrete by Hallack, Turlock, Calif. | www.concretebyhallack.com
Scope of project: To convert a machine shop into a private garage for high-end automobiles to preserve their condition and show them to invited guests.
Most challenging aspect: Using white and black Miracote Colorbond XL to create a perfect checkerboard pattern with crisp lines and no bleeds.