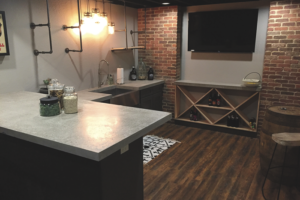

Building the perfect pool deck starts with the subgrade. How am I going to keep this pool deck from settling and cracking, when they just finished digging it and want me to pour it next week?
There’s already water in the pool, the color hardener and release agents are going to get everywhere, and the owner wants concrete edge coping!
Where am I going to run the rainwater? I’m boxed in by the house and retaining walls.
I have ladder and handrail supports, a diving board and basketball hoop jigs that have to be put in, and they have to be right.
I know as soon as somebody falls I’m going to be getting a call because the deck was too slippery!
Most of these pools are salt water. Salt is bad for concrete. What do I seal them with?
If you have poured concrete around swimming pools, you know that it provides unique challenges that you usually don’t have to deal with on normal patios or sidewalks. This article is the first in a series that will explore proven tricks and tips to help ensure a successful installation for you and your clients.
The subgrade
Unstable subgrade is the primary culprit in cracking, shifting and settling in concrete around pools. We can all agree that concrete is only as good as what you put it on top of.
Let’s explore the reasons for unstable subgrade around pools. When a pool is installed, the top of the finished walls all have to be level. However, 95 percent of backyards have some type of slope to them. This leads to a situation where you’re going to have large areas with several inches, and in most cases, several feet of fill. I realize that this varies depending on the terrain where you work, but out of the 75 to 100 pool decks I have done, I can only remember one that has not had to have grade cut or filled.
With that in mind, you have three options.
Option one for building the perfect pool deck
Let all the fill settle. This option is generally not feasible, because it does not go over well when you tell a family that has decided to put a pool in that they will have to wait for the dirt to settle. Not to mention, the pool builder doesn’t want you holding up their money. Could you compact it in lifts? The answer to that is yes, but in my experience, when they dig the pool they’re utilizing that dirt to fill in low spots as they excavate. So, it leaves questions. Is the dirt going to compact well enough? Are you going to be on-site when they’re digging and get in their way to make sure it does compact? This is not very realistic.
Option two
bring in stone or some type of premium fill. This works well if the deck is small, but on a bigger job this option can quickly get very expensive. It is usually difficult to get to the areas you’re trying to fill, so this option can also present problems with access.
Option three
Support the deck some other way. In my experience this has been the best way to solve these problems. We know that every type of pool, whether it is concrete, metal or fiberglass, has walls that are hopefully never going to move. The concrete sitting on top of the pool wall won’t settle. What we need to worry about is the concrete outside of this support.
Measuring out the grid
On steel-wall pools, which are typically a vinyl lining pool, the kit usually comes with deck supports. These are triangular pieces of metal. One side gets bolted to the wall and the other side gets poured in with the foundation of the walls. They stick out 3 feet from the deck, spaced about every 4 feet, and are 5 inches down from the finished concrete height. These will support the first 4 feet of concrete around the perimeter of the pool. If the customer just wants a normal walk around the pool, simply utilizing the deck supports in combination with some horizontal rebar will do the job.
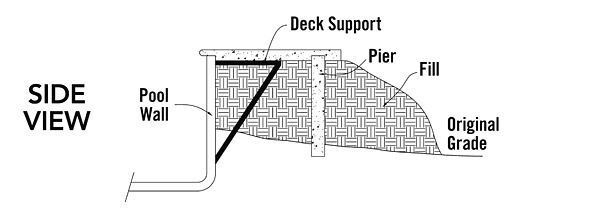 Concrete pools have no deck supports. You will need to create your own supports. For this, and for the concrete beyond the reach of the deck supports on steel wall pools, I use piers.
The most important part of this is the placement of your piers.
Visualize a 6-foot-by-6-foot grid around the pool. Start counting off from the edge of your last solid support. For example, on the steel-wall pools that have the deck supports, you would go out from the pool a maximum of 6 feet from the end of the deck support, with 6 feet of spacing between each pier. To be clear, your deck supports typically support the first 4 feet of the deck, so the farthest you should go out from the pool edge is 10 feet.
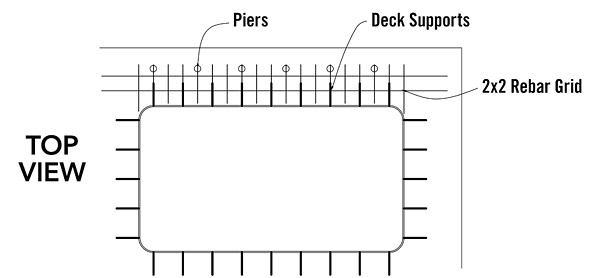
Use marking paint to mark all the pier locations before you start drilling. Remember the deck supports only carry the first 4 feet, so anything further out than that needs a pier. For concrete pools, your spacing starts 7 feet out from the walls. It is important that, no matter how big the area of concrete, you stay with a maximum 6-foot-by-6-foot pier spacing.
|
|
|


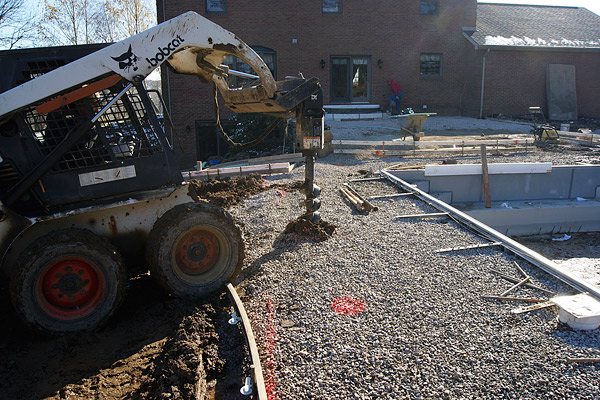
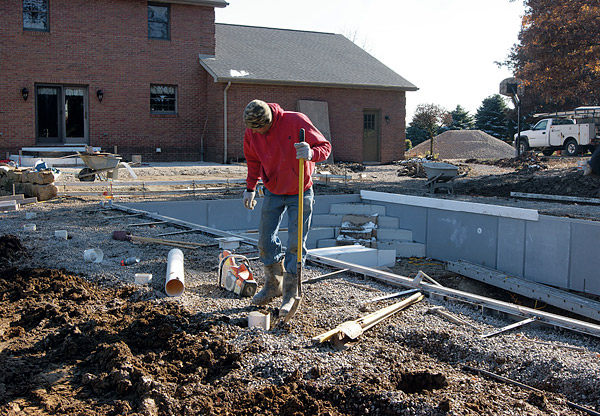
Drilling the holes
Now that you have your holes marked out you’re ready to start drilling. I have an 8-inch auger attachment for my Bobcat that makes quick work of the job. If you don’t have an auger attachment or access to the site is limited, a two-man auger will do the job, though it will be a bit slower and harder on your back. Or if you just enjoy blisters, have several days to kill, and don’t want to go home to the wife, you can dig them by hand (not recommended). All you need it to be is 8 inches in diameter.
Auger the holes down until you hit virgin dirt. This is usually 3 feet to 8 feet deep. If the fill is deeper than that your best bet is to put the piers in during the backfill. You can tell when you have reached virgin ground when drilling becomes harder. Another good sign that you’re to the right depth is if you start to pull sod out from grass that was covered up when it was backfilled. Once you’re there, get all the loose dirt out and compact the bottom of the hole with the end of a spud bar.
Drop in the pier forms
Utilize any 6-inch PVC pipe for the pier forms (the cheapest, thinnest-walled material you can find will do the job just fine). To determine the length of the pipe for each pier you will measure from the bottom of the hole to the top of the concrete and subtract 5 inches. Cut a piece of pipe to that length and stick it in the hole. The pipe prevents cave-ins. At this point you will want to keep dirt and stone from falling into the pipe. Do this by either taping the top with duct tape or putting a piece of plywood on top of each pipe.
Forms, final grading and rebar
Complete your formwork and final grading. Now we are ready for rebar placement.
All I have ever used is #3 bar and I have never had a problem with it. If you use #4 on everything else you do, use that. We install a 2-feet-by-2-feet rebar grid and make sure the rebar is placed on top of the piers, the deck supports, and the top of the pool wall. I realize that different parts of the country have different codes. You may have to adjust this to meet your local codes. Hopefully you get the picture.
Fill the piers with concrete
Finally, when you are pouring the concrete deck, fill your piers up and vibrate to ensure consolidation inside the piers. By using this method, the fill can settle and the concrete deck will still be structurally sound. The rebar will carry the weight of the concrete deck as the subgrade settles under it. It is essential when building the perfect pool deck. I have gone back to see jobs where we implemented this technique. You can see a void under the concrete, but the concrete deck is in great condition because the piers in conjunction with the rebar are holding it up.
Over the years I’ve given it a lot of thought. I believe for those of us in freeze-thaw states, the installation method I describe here is better for the concrete. This is because the ground can’t freeze underneath it and make it move. After you use this method, the fill can literally settle underneath the deck and it will still be structurally sound. I pity someone who decides they don’t want a pool anymore and tries to tear out a pool deck done like this.
Questions from readers
Question
I live in central Massachusetts and have just had my pool installed. Our concrete contractor told us to wet down three feet around the perimeter. While doing that, we found areas that “caved in.” Since then, we have been both backfilling and soaking the area.
We have always heard that people wait through the seasons before installing the deck, but we’ve been told by our contractor that we can do it now. It’s a $25,000 deck and we want it to last. What should we do?

Answer from Concrete Decor
The area around your new pool will see some settling of the soil after an installation like this. Wetting the soil does help with consolidation but running a plate compactor over the gravel base is also essential. It’s likely your concrete contractor will bring in additional base material so he has a graded, level base around the pool. He should also compact the base material to minimize any further settling of the soil.
Lastly, make sure that he installs rebar reinforcement throughout the area that concrete will be installed so that too can assist in mitigating any settling or random cracking in the months and years that follow.
It is also important that he installs control joints so that future cracks stay within those joints. The American Concrete Institute provides guidelines and specifications for all aspects of this type of concrete installation. If your contractors is honoring those guidelines you should be in good hands. Furthermore, if he does not do that, those guidelines ensure your legal protection.
You should talk to your contractor about these things and make sure his contract includes all of these details before beginning.