
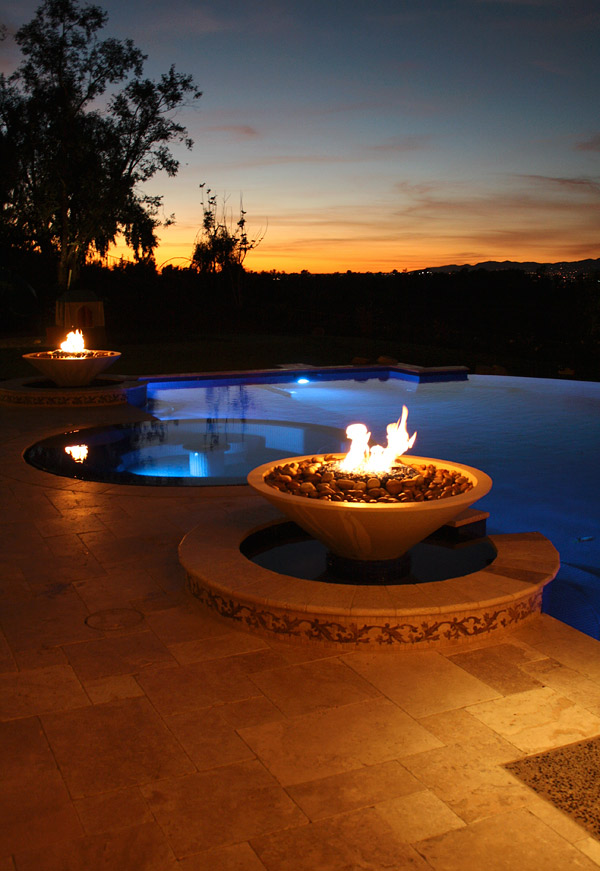
As is the case with so many exterior design issues, hitting the right marks is mostly a matter of common sense. As a contractor with extensive experience with all types of fire features, and as an expert witness in situations where something’s gone terribly wrong, I’d like to share some of the basic guidelines I refer to when I build a concrete fire pit while maximizing both safety and enjoyment.
Let’s take a brief look at some basic measures that help minimize operational risks. It bears mentioning that with fire, as is true with water, there is always an element of risk and it’s impossible to design with every remote possibility in mind. The fact is, sometimes people do careless things that lead to injury. That said, we can still set things up so that there is less risk for people who use their features appropriately.
Fire-Ready Materials
A big issue I see in fire pits is that they are often built only using CMUs (concrete blocks), which are not designed for use with fire. The aggregates will heat up and expand and might potentially pop or explode. I assert that all fire pits should be lined with fire brick and fire clay mortar. These materials are the same as those used in a kiln and various types of furnaces. They are fired during the manufacturing process and are designed to provide insulation over a range of temperatures.
The same holds true for the materials you use to fill the fire pit. Whether you use stone or glass, you should always use materials designed for high temperatures. Keep in mind, not all recycled glass is suitable to be installed in a fire pit.
Manual Control
In spite of the fact that fire feature systems can include automated control, I still advocate the old-fashioned manual key valve to control the flow of gas. The reason is that the person holding the key is responsible for the height of the flames. He or she can set the flames relative to the wind conditions or how many people will be around the flame or the nature of the gathering. (It’s probably smart to maintain low flames when hosting a gathering of small children or inebriated adults.) The idea is to prevent the flame from blowing into the surrounding area, which might, for example, set fire to a woman’s sundress, singe a child who comes too close or set someone’s hair on fire.
For fire features that are set in locations where there’s very little chance of human contact — a fire bowl set on a pilaster on a vanishing edge, for example — there’s less of an issue with having a preset flame height or on/off schedules. There, an automated control may be appropriate. But with a fire pit where people come within a few inches of the flame, having the ability to manually raise and lower the flame on the spot provides an extremely important element of safety.
I advise both residential and commercial clients to designate someone responsible for operation whenever the flame is lit. Possession of the key itself is a nice, clear way to establish that expectation.
Proper Spacing
The dimensions of the pit will go a long way in determining the proximity of people to the flames. You should always maintain at least 4 inches clearance between the burner assembly and the edge of your coping. For rings where people will put up their feet or set drinks, I recommend a minimum 12-inch-wide coping.
I also like to build raised pits to 10 to 12 inches above the deck, perfect footrest height. There’s a tendency for some to raise the coping surface to 18 inches, standard bench height. When you put your feet up on an 18-inch raised surface, it’s likely that your toes will get numb. This can present a safety hazard if your shoes overheat or catch fire. Only build your fire pits at 18 inches tall if it is your intention that guests sit on the coping of the fire feature. In that instance, the coping width should be 16 to 18 inches wide (standard seat depth) to ensure clearance from the flames.
Burner Installation
Fire elements have changed over the past few years. Not long ago there was a debate whether you installed fire rings with the holes pointing up or down. Pointing up could lead to water entering the manifold. Flipping the ring over solved that problem but led to uneven flame distribution.
Fortunately, these days, manufacturers make units that you can install upward but also allow water to drain from the tubing.
An important caveat: Don’t try to make your own burner assembly. Manufacturers follow specific guidelines critical to proper function and safety. Because of this, make sure you buy a good burner assembly and adhere to the manufacturers’ installation instructions carefully.
Scott Cohen’s article was originally published in Aqua magazine in October 2012.