Glass-fiber reinforced concrete (GFRC) lets you explore many aspects of design that are not possible with the more traditional precast methods. While GFRC is often used for countertops, we’ll delve into how it can be used to construct a GFRC base for an outdoor patio table. Although the table base is a fairly simple piece of furniture, it will illustrate the material’s three-dimensional characteristics and will give you an idea of how far you can take a design without giving up strength and durability.
My focus here is in using GFRC, rather than going into mix designs or what GFRC is. My hope is that this project will inspire professionals to branch out and try new things, and will encourage those with no experience to try it for themselves.
Sizing up the table
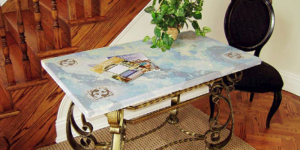
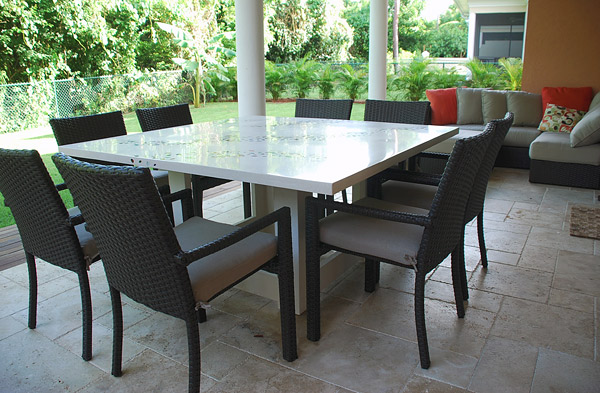
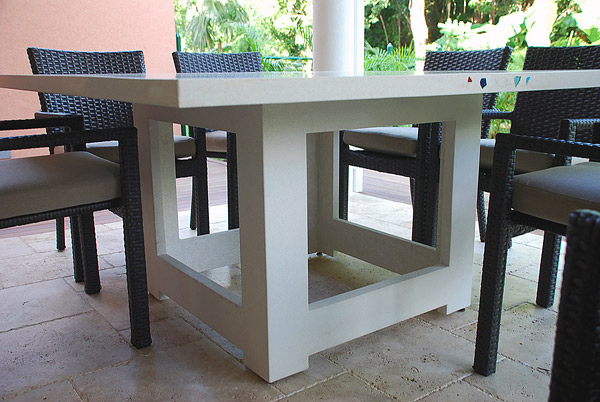
The project, called the Cube Table Base, was for clients in the Cayman Islands. The polished GFRC tabletop had already been fabricated, and they wanted something that would complement it. There were also considerations as to size and height, since the clients were tall and needed a little extra leg room.
The table was designed for a frequently used outdoor patio. In the Caymans such spaces are really extra rooms that are used daily, so the table was going to have to withstand a lot of wear and tear.
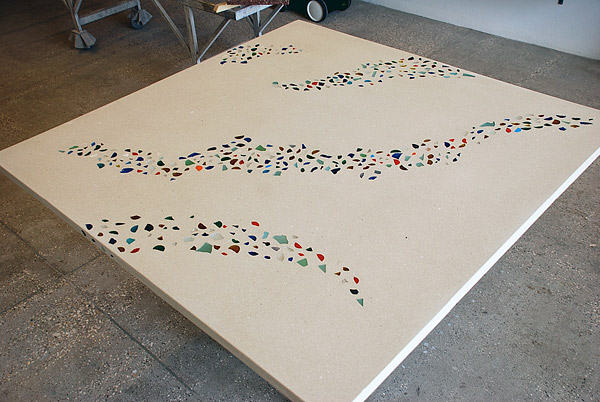
The clients wanted a seating area for eight people. To accommodate that, the top was just a little more than 5 feet across and 1.5 inches thick. Ordinarily GFRC, which is very strong, is used for weight savings. Pieces that would normally be thick can be made much thinner and subsequently weigh much less. However, this tabletop was solid and weighed around 450 pounds. Since it wasn’t going to be moved around, and because hurricanes are a constant threat on the island, the weight was a positive rather than a negative.
My alumnus Terry Wilson, who lives in the Cayman Islands, brought the tabletop form to the clients so they could arrange the glass embedments themselves prior to it being cast. This is one of the great things about concrete: clients can take part in the fabrication. It was great to find clients who really loved concrete, loved the look and realized its possibilities.
Originally, the clients had hoped to incorporate jatoba wood as the base, since they are from Jamaica and own a jatoba factory there. However, the time frame to complete the project was limited, and the materials were not readily at hand, so we decided to use GFRC instead.
Day 1 – Design and forming
I had exactly four days from commission to completion to get this project done. On Monday, I conceptualized the design and sketched out the idea on paper before inputting it into a design program.
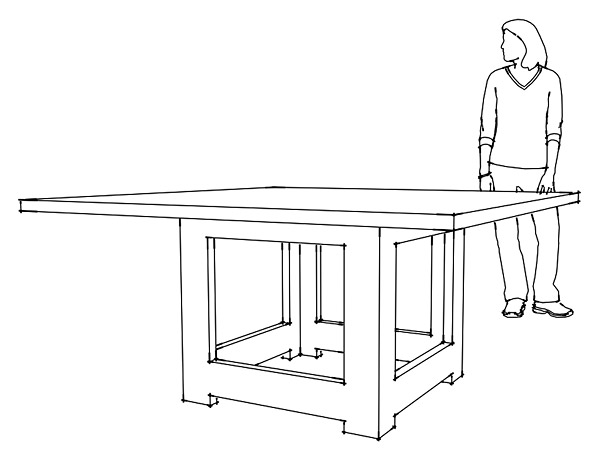
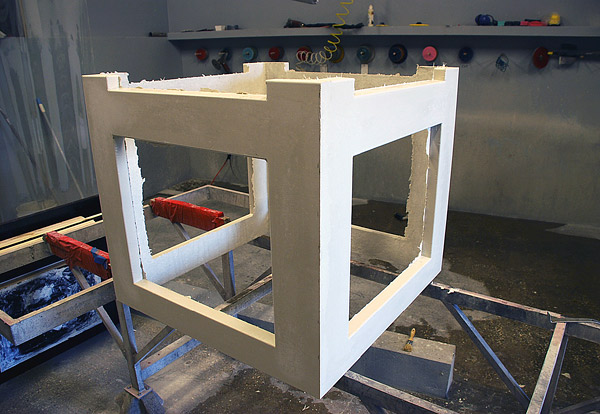
I decided on an open-frame construction style, only out of GFRC instead of wood. When you’re designing a piece of furniture you need to think about standard sizes and shapes because you don’t want to give the customer something that looks great on paper but is impractical in reality. I shaped the base so the table would be about 30 inches off the ground and had “toe room” at the bottom.
Once the design had been finalized, the form took about three hours to build out of formply, which is a structural plywood designed for casting concrete. In the Caymans, it’s the common forming material since the available melamine is of very low quality. I enjoyed working with the formply as it’s more water resistant than melamine and doesn’t swell or split.
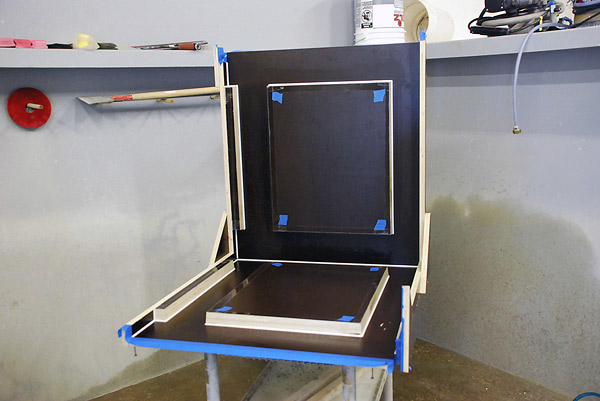
Painter’s tape was used to cover the screws to make it easier to take the mold apart and to mask the edges where the two halves were joined together (front edge in photo). Spraying GFRC is quite messy and it gets everywhere. The easiest thing to do is tape any part you don’t want sprayed and peel it off when you’re done.
Each of the four sides of the mold was identical and two were braced together to make two L-shaped halves. It was easier to build the mold on its side instead of straight up. The toe gap pieces, visible at the bottom left of the photo, were beveled at 10 degrees to give the base’s feet their shape.
All edges were caulked, which does two things. First, it waterproofs the form. Second, it gives the finished product nice rounded edges, saving a lot of time instead of finishing them by hand.
The GFRC mix was standard, without any special additives or modifications. I used white portland cement and 2 percent titanium white pigment for brightness, along with gold-colored sand. This made the piece a really soft, warm white.
Day 2 – Casting and curing
We weighed everything out and got our batches ready. It’s important to have everything ready to go before starting a project, because you’re not going to have a lot of time once the ingredients are mixed together, especially in hot weather.
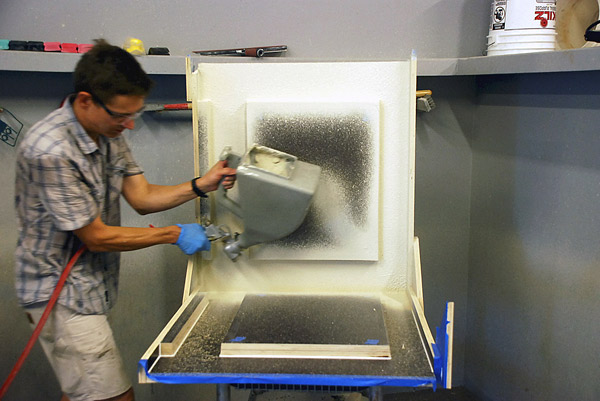
We applied the mist coat using a hopper gun, at a fairly thin thickness of 1/16 inch. Some areas, particularly the corners, were impossible to spray, and we had to apply the mist coat by hand.
Because the Caymans are very hot, I chose to spray first and then assemble the two halves instead of spraying first and then assembling four individual sides. The work must be done very fast, and preassembly makes it much easier.
Once the eggshell-thin mist coat was applied, the form was assembled as one piece. We simply pulled off the tape and attached the two halves. Where the joints came together, the mist coat had to be brushed by hand to make sure there weren’t any gaps or voids (see photo). The mist coat was like soft butter, still tacky but not soft enough to push through it.
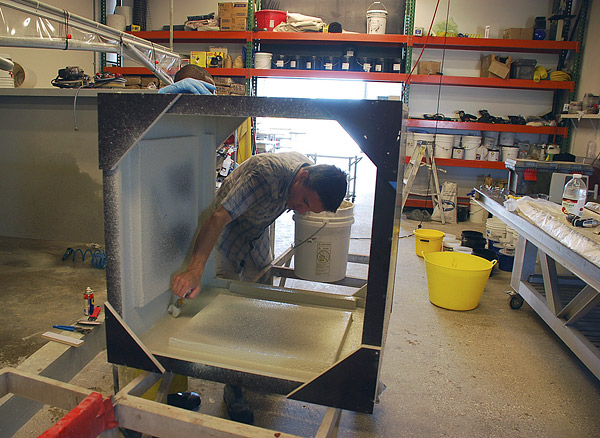
Unlike the sprayed mist coat, the GFRC backer coat with its high-fiber content was placed by hand, rolling it until it was packed solidly. The first coat had to be put on before the mist coat dried out, so we were more concerned with speed than anything else. We did one face at a time, rotating the form as we went.
We were concerned that the backer might fall out when the piece was turned vertically, but it held on beautifully. The layers were thin, about 1/4-inch thick, and the next layer had to be applied before the one before it dried out. The mist coat was the glue that held the backer to the form.
A common error when working with GFRC is taking too much time between applying the mist coat and backer layers. That’s why it’s important to have all your materials ready to go ahead of time. Also, if the backer isn’t compacted into every nook and cranny, it will leave air between the backer and the mist coat. When they dry, there will be a large void under a very thin layer of concrete, which will be exposed as soon as you begin polishing. The mist coat is incredibly thin and can break quite easily — so it’s important to treat that step very carefully.
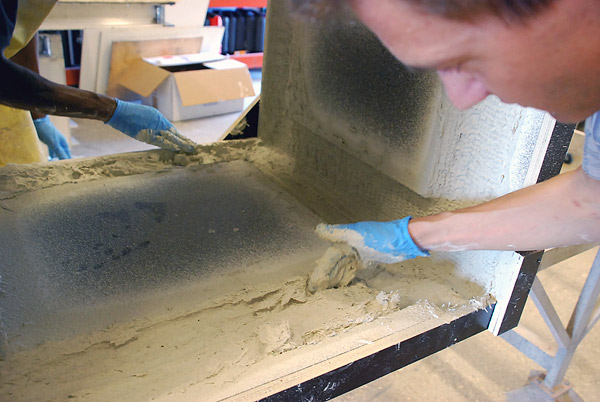
We were careful packing the backer but did it quickly. The layers must be thinner than the fibers are long. The specialized compaction rollers used with GFRC have teeth that help to pack the backer and align the fibers. Proper compaction is a sure-fire way to achieve GFRC’s strength and flexibility.
The backer was built up in layers until the forms were full and the top of the backer was flush with the form’s block outs. The backer’s surface was troweled smooth.
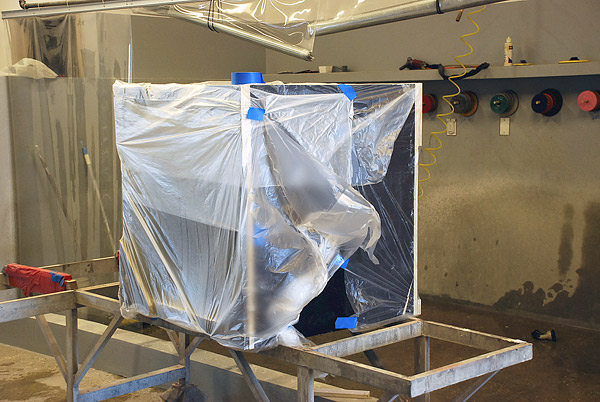
The last step involved wrapping the form in plastic and letting it cure overnight. GFRC has a polymer in it which holds moisture and lets the concrete cure, but the chemical reaction of cement and water needs to get going so the polymer can form that internal curing membrane. Therefore, it’s important to cover the piece with plastic for about 24 hours.
In this case, we didn’t have the time to let it sit for a full 24 hours, but it really wasn’t necessary. It was 90 degrees outside, and GFRC materials have a high green strength. If it’s really cold, say 40 or 50 degrees F, give it an extra day as concrete needs warmth to cure.
Day 3 – Stripping and processing
Day three was stripping the form and processing. The form popped right off; there were no problems. I was glad we’d decided to use the formply, even though it was more expensive.
The piece had a little bit of flash (excess material that extends beyond the edge of the mold), but the outside was pretty much done. I honed it to a 200-grit finish using a wet diamond pad, since the concrete was too soft to polish to a high sheen.
The inside of the table wasn’t finished to the same degree as the outside. While the outside didn’t have exposed fibers, the inside did. This didn’t matter since the inside wasn’t going to be very visible. For the inside, I used a pneumatic diamond polisher with a 50-grit pad, then 100 and finally 200.
Minimal grouting was performed, since minor pinholes weren’t a big deal. There were a few voids from the areas where the mist coat was put in by hand. Those were filled with grout.
V-Seal 101 densifier was applied twice to the base to help keep it clean, but that was the only sealing treatment used.
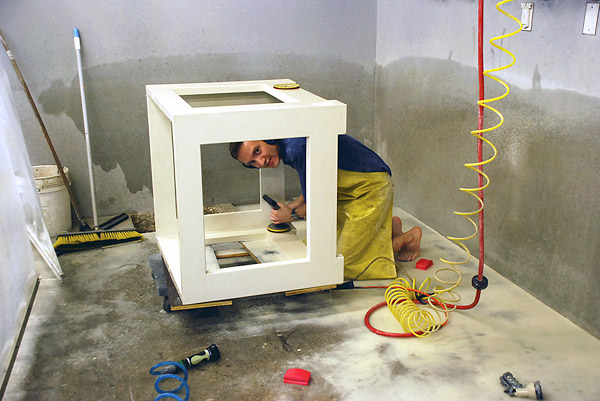
The hardest part was processing the inside, since I had to be on my hands and knees most of the time, but the piece was very easy to move around. Any time you’re working with a rotating diamond tool and you have edges to process, it’s very important to be careful. If you slip, it will cut a notch into the edges.
The last step was adding leveling feet to the bottom of the table at the apex of the corners. It would protect the base’s feet from chips and allow it to sit better on the patio’s tile surface. I used a non-hammer drill with a conventional mason’s bit to drill a hole in the bottom of the base leg and insert some stainless-steel chair gliders. I didn’t use a hammer tool because it can blow out the concrete. GFRC drills very nicely and it took only about 1 minute per hole.
Day 4 – Delivery
The clients had their employees move the piece onto the property. After leveling the base, they ran a bead of acrylic caulk along the base’s top edge to secure the top and the base together. Final installation involved centering the top on the base and standing back to enjoy the clients’ reaction.
This was a very rewarding project! I gave the clients a very functional piece with a material that will remain looking like new for years. Unlike wood, the GFRC base won’t need maintenance. The owners don’t have to worry about rot, rust or anything else. It’s a seamless piece that will be hassle free. GFRC is perfect for outdoor spaces. That’s what it was designed for, after all.