
To enhance newly-poured concrete or to rejuvenate existing concrete, stenciling is a decorative application worth considering. It may seem like a simple process, but a few fine points separate nice-looking, profitable stencil jobs from the rest. We’ve asked some experienced stencilers for tips to elevate your stenciling jobs from so-so to spectacular.
Planning the job
First, when you’re planning your pours, consider where your crew will walk and stand during the job. If you’re doing an indoor floor with walls all around, you’ll need to break it up into two pours. First, do a strip all around the edge so that you’ll have someplace to stand when you do the center. For an outside patio that abuts a fence or wall, perhaps the client will agree to strategic placement of a flower bed. Or you may be able to erect a scaffold to stand on.
As with all decorative work, you and the client must agree on the final effect. Sample boards let you fine-tune which shades of color hardener to use and show the client exactly how deep the grout joints will be and what the texture will be like, avoiding unpleasant surprises. But, “don’t make your mock-ups look better than what you’ll be able to do out on the job,” warns Frank Piccolo of the stencil manufacturer Art Crete. “When you’re doing a little 4-by-4 board, you can always do detail work that’s difficult to do when you’re out there doing hundreds of thousands of square feet of the stuff.
Stenciling new concrete
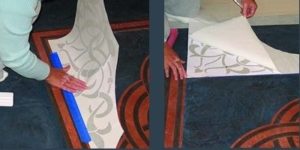
Stenciling newly poured concrete takes a little finesse. Once you pour the slab, finish the concrete with a bull float and edge it. Then lay the stencil on the wet concrete, unrolling it from the top of the roll so that it will lie flat.
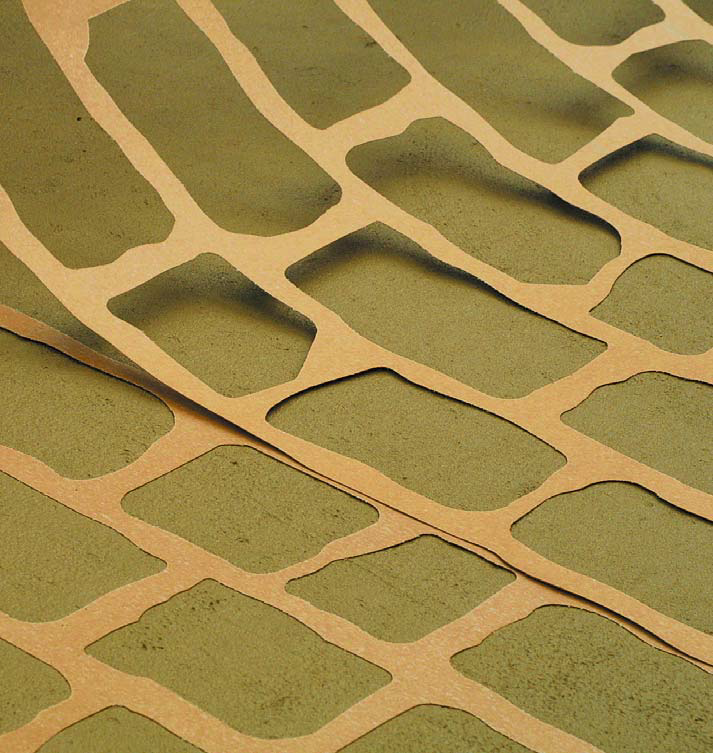
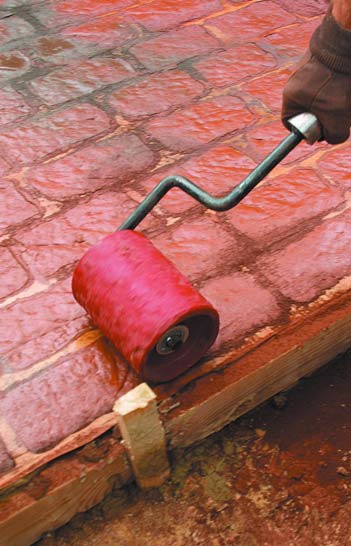
Clark Paepke of DC Concrete in Salt Lake City, Utah, a distributor for Stencil Systems, suggests embedding the first roll of stencil into the surface with a stencil roller, a napped roller about 18 inches wide that fits on a bull-float handle. Apply the roller from the center to the edges to press out any bubbles. Then smooth the surface with a fresno. “You get more control out of the fresno because it’s lighter than a bull float.” Then lay, roll in and fresno the next course of stencil, placing the trailing grout line of the second course on top of the leading grout line of the first. Trim the stencil with scissors.
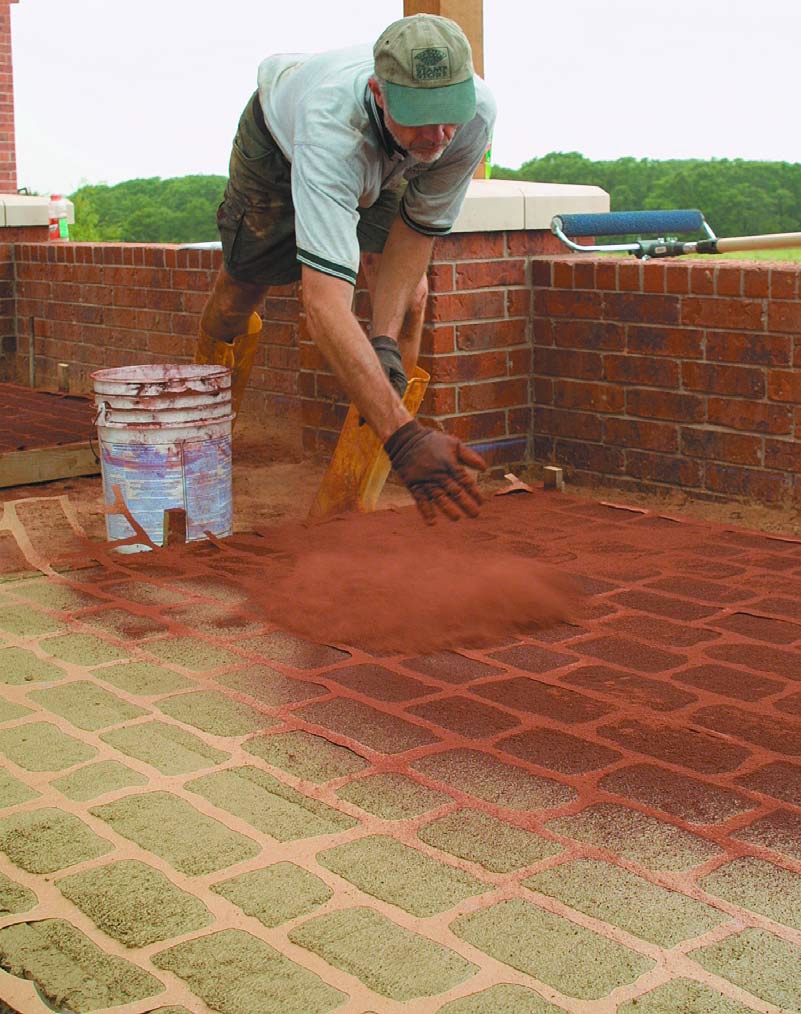
Next, broadcast color hardener on the surface. Using more than one color creates a realistic effect. When you’re broadcasting powdered material, toss it up so that it rains down onto the concrete. Don’t throw it into the surface, which can make the surface uneven. Bull-float the surface after you apply the color according to the color manufacturer’s directions.
At this point, you can apply a liquid or powdered release material in a third color, then texture the surface with a heavy texture roller or a texture mat. Wear texture shoes to walk on the concrete when it’s at this stage.
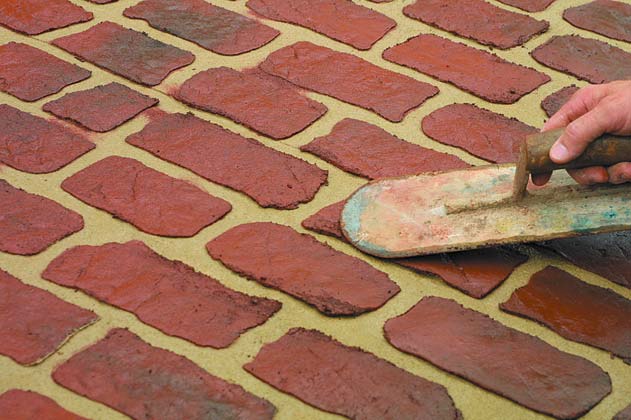
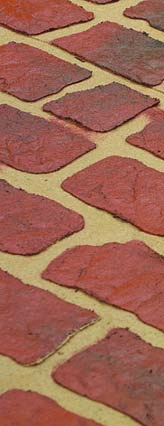
When the concrete no longer yields to the pressure of a thumb, remove the stencil, walking on the concrete in stocking feet or texture shoes. The longer you wait, the crisper the edges of the faux masonry. If you want to remove the stencil earlier, when the concrete is still soft, you should have two people lift it, one on each end, making sure that it doesn’t drag on the concrete. No matter when you remove the stencil, before walking on the area from which the stencil has been removed, blow off the surface with a leaf blower so that chips don’t get ground into the surface. Then rinse the area with water.
As soon as the surface is clean and dry, apply a cure-seal compound. As with any decorative concrete surface, make sure the client understands the need to apply sealer regularly.
Stenciling an overlay
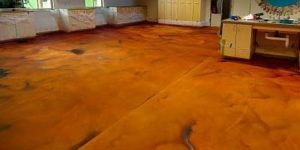
Stencils aren’t only for use on new concrete; they can be used with overlays, which consist of cementitious material mixed with a polymer component so that it spreads thinly and adheres to the underlying concrete. Not all overlays can be colored or stenciled; so, make sure you use a product advertised as a “stampable overlay.” These products won’t run under your stencil or stick to it prematurely. They can be integrally colored, then treated with acid stain or colored with color hardener or iron oxide pigments to create natural-looking effects.
Overlays can be troweled on, or sprayed on with a hopper or spray texturing system. Benron Equipment and Supply offers the most advanced system currently available. Their system delivers total operator control and flexibility in achieving the most desired textured finishes. If you trowel, use adhesive-backed stencils that won’t be dislodged by the trowel.
Prepare the slab according to the overlay manufacturer’s directions. In addition to repairing cracks, you must thoroughly wash and degrease it. Some overlay manufacturers offer a primer that improves the adhesion of their product to the slab. When the slab is ready, apply the stencils, and then spray on a 1⁄8-inch to 1⁄4-inch layer of overlay material. You can walk in the wet overlay wearing golf spikes. The marks will be erased when you knock down the overlay with a trowel. Overlays can also be textured with mats or rollers, and then sealed as concrete is.
If you want the grout lines of your faux masonry to be some color other than that of the underlying concrete, you’ll have to apply two overlays — one applied over the whole surface to provide the grout color; then another layer over the stencils in the desired color of the stones or tiles.
You can also stencil walls with overlay product. Use adhesive stencils, and trowel or spray on your overlay just as on a floor.
Reusable stencils
If you find yourself doing a lot of the same overlay patterns and designs, high density plastic stencils are worth considering. “You get the same results [as with paper stencils],” observes Ken McKinnon, vice president of operations at Seamco Laboratories Inc., the Tampa, Florida-based company that introduced neoprene stencils. “The big advantage is that our stencils are reusable — indefinitely.”
Because they are a little thicker than paper stencils, they produce more pronounced grout lines and they lay down flat without glue — eliminating the glue-down step associated with paper stencils. The down-side to plastic stencils, reports McKinnon, is that they are difficult to trowel over. They also have inherent problems if you’re working on a vertical surface; they don’t stick on their own. But, on the up-side, because there’s no glue involved, you can easily reposition plastic stencils on horizontal surfaces. They also don’t leave a glue residue.
Uneven surfaces shouldn’t present a problem since, in most overlay situations, you would apply a scratch coat in the grout color, which will smooth the surface. And don’t worry about what happens to plastic when it gets cold. You shouldn’t be applying acrylic or cementitious overlays when the temperature falls below 45 to 50 degrees.
Another plus is that the plastic stencils just peel off and cleaning them is a cinch. McKinnon explains, “After the cement material dries, just hit them together and the cement pops right off.”
 Stencils and color
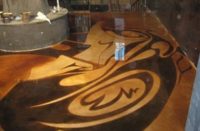
In addition to creating faux masonry surfaces, you can use stencils to apply color to concrete and create logos, signs or decorative designs, but forget liquid acid or acrylic stains with stencils because the stain creeps under the edges of the stencil. Adhesive stencils allow you to use brush-on gel-type acid stains. The accompanying photo feature shows another technique: using stencils for geltype acid etching.
Adhesive stencils intended for sandblasting offer other options. However, that subject is worthy of an article in itself, so we won’t cover it here.
Stencils vs. stamps
Stencils offer a few advantages over stamps. “With stencils, you can cover two-thirds more area in a day with the same crew compared with stamps,” says Piccolo. “You can get on the concrete sooner with your texture and color, right after you bull-float it, where with stamped concrete you’ve got to wait till the concrete gets to a certain set phase before you can get on it with your tools.”
Merrick Pierce of Specialty Concrete Services in Natchitoches, Louisiana, has worked with both stencils and stamps. He says that the choice a matter of personal preference. “The way I see it, with the stamps, the patterns like slate and the stone patterns look really good. However, the brick patterns look better with stencils because they look like they have a real mortar joint.” You can combine stamps and stencils on a job if you need a realistic “stone” patio surrounded by a realistic “tile” border. And if neither you nor your rental shop owns the particular stamp that a job calls for, stencils can fill the bill.
Perhaps the biggest advantage of stencils over stamps is that you can order custom stencils. Stencil manufacturers will cut custom stencils for you to create a particular pattern, logo or artwork.
Neither method offers a big price advantage over the other. In a given region, stenciling and stamping cost the client about the same.
If stenciling interests you, attend one of the workshops offered by the makers and distributors of stencils and overlay compounds. Look for training opportunities by visiting Concrete Decor’s Training & Event Calendar. With training and some practice on your own, you’ll soon be ready to add this versatile technique to your repertoire.