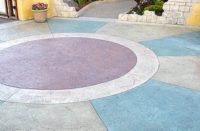
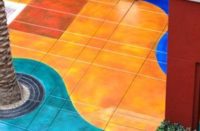
In my opinion, concrete is at its best when it’s being concrete, not when it’s simulating or mimicking another material. As an ex-employee of L.M. Scofield and Bomanite/QC Construction Products, as a consultant to Brickform and Proline and as the guy who developed the design package that included custom Roman Stone stamps for The Forum Shops at Caesars Palace in Las Vegas, this may seem a bit disingenuous. And yes, it’s critical for a contractor in the decorative concrete business to be able to coordinate concrete finish colors and textures with nonconcrete materials. But you’ll notice that I say “coordinate,” not “simulate.”
 It’s possible for concrete to have stone-like qualities without trying to be stone. It’s possible for concrete to be random and variegated like the knots and grain in wood without trying to be that wood. It’s possible for concrete to develop a visually active graphic patina like copper without it being, you guessed it, copper.
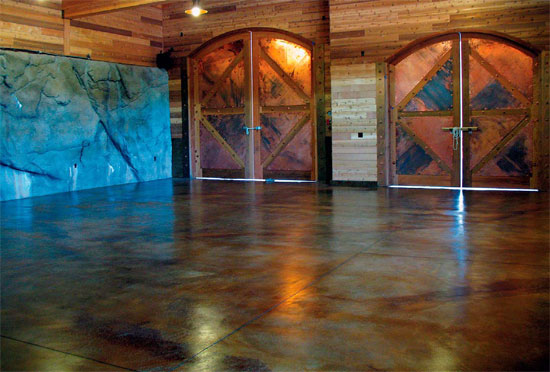
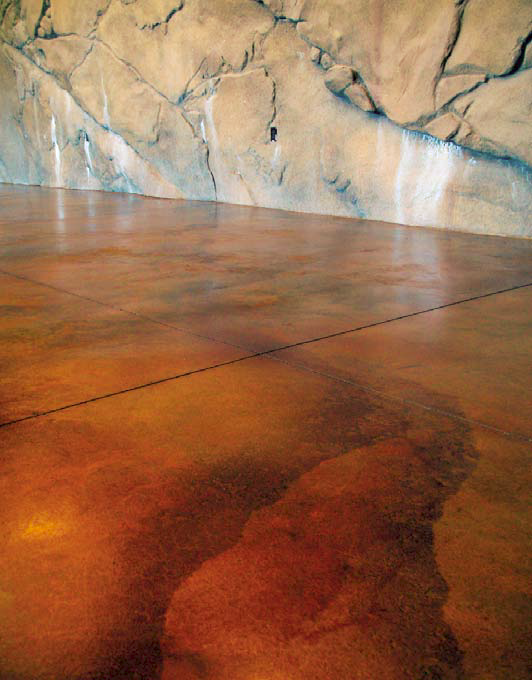
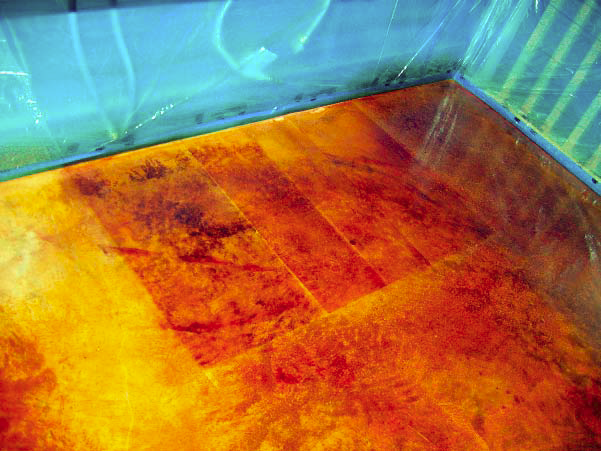
Here is a staining project featuring relatively honest “sensory concrete” in a semi-themed environment, utilizing some of my favorite techniques: screening to accent highs and lows in the troweled substrate, sporadic rust spotting with Ironite lawn fertilizer, and suggestions of the qualities of stone shelves and strata with application of stains and dyes against torn paper edges.
The venue is a new residential project in progress, in the grassy and oak-forested hills just outside of the Bay area town of Martinez, Calif. After site work was completed, the first order of business was constructing a structure in the style of a grand railroad barn. The structure is partially buried in the side of a hill and includes retaining walls of sculpted concrete as artificial rock. Other walls and ceilings are of unsealed raw lumber. Ceilings are really high and are supported by massive wood beams. The vehicle entry doors are equally massive, made out of wood and custom-wrought, copper-plated steel hardware. When I say massive, I mean that each door weighs in at about 3,000 pounds. The first story of the 3,000-square-foot-footprint structure was ultimately to function as a project garage, with a mother-in-law unit above. As we arrived, the owners and their kids were living in the second story, while construction continued on the main house.
The Process:
Day 1
Produce representative on-site samples
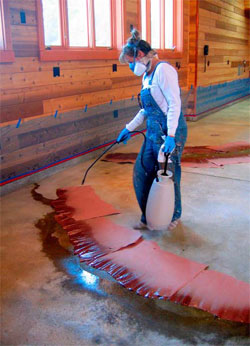
It’s important that samples are consistent with and produced with as much care as the project itself. These samples are not to be reproduced verbatim, but are, instead, to establish a range of acceptable (and desirable) variability. While we’re promoting variability, we’re very careful with our measuring and record keeping. We keep ourselves well stocked with barium cups, which measure in 1/4-ounce or 1-ounce increments, as well as calculators, pencils, pens and notepads. Here we diluted our stains and dyes (Patinaetch stains and Deso Dyes from Colormaker Floors) with a water and acid solution, or water and acetone, as appropriate, to achieve appropriate color saturation levels.
Mask adjacent surfaces
We like to use pretaped plastic rolls in disposable applicators. Plastic is applied over an initial strip of blue, stucco or duct tape (as appropriate, depending upon the substrate) and their taped intersection is taped one more time. You may want to double-mask some especially vulnerable surfaces, such as unsealed raw wood. We remind our client that we will do our best to protect these adjacent surfaces, but that this is not always 100 percent possible. For example, stains or water wicking up unsealed wood is quite likely.
We don’t make promises we can’t keep to our clients. We keep them informed and let them make choices (especially those that are tricky). Despite what you read in some people’s guides, not everything in this business is fail-safe. I don’t believe in taking responsibility for things that are impossible to take responsibility for. We’ve never lost a client on the basis of providing foresight and being honest.
 Clean and prepare substrate, as appropriate
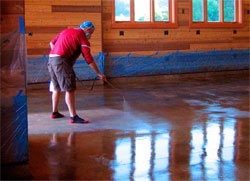
Our proposals require a dry concrete substrate. It’s a good idea to have previously done some kind of a moisture test to check on just how dry things were. We use an electronic hand-held meter and recheck at this point. This may not be the most accurate testing method, but the results are, in any case, instant and relatively close. Our proposals also require that our client provides a cleared, clean, bare substrate, unless otherwise defined, in which case the client pays extra for these services. We won’t clear, but if we need to broom or vacuum, we broom or vacuum. If we need to wet-clean, we wet-clean. If we need to degrease, we degrease. We don’t spot-treat. For consistency, whatever method we’re using is applied everywhere. Here, this is followed by screening with a 17-inch floor polisher with a pad driver, a white pad and 80-grit (plus or minus 20 grit) screens. Aesthetically, this screening visually enhances the subtle highs and lows of the original troweling. This really looks great! Simply screening a smooth, or not so smooth, troweled concrete is visually similar to natural honed limestone and brings out the slab’s most basic and innate qualities. If dust control is critical, we have vacuums attached to the polisher. Whether a vacuum is attached or not, we follow with a thorough vacuuming. And however we intend to treat the floor, we have also treated the on-site samples the same way. Be sure to pay attention to cleaning joints at this stage as well.

Day 2
Stain and dye concrete
Spray-flash orange-brown acid stain (such as Colormaker’s Amber) along torn paper edges. Tear paper in 2-foot to 4-foot lengths for ease of handling. Sometimes flash along a single edge and then ease out. Sometimes flash along a double edge for more defined strata. Step inside or outside the paper, or move to a new location and reflash with a purple brown stain (such as Colormaker’s Ebony). Consistently spray the entire floor with a first coat of purple-brown acid stain.
Sporadically apply Ironite lawn fertilizer. This produces interesting rusty spots and is graphically similar to the sporadic negative “wormholes” in natural travertine.
Spray the entire floor with a second coat of orange-brown acid stain. Apply less, then more of this to increase color variability. This second coat will encourage additional “melting” of the fertilizer granules. When the surface is dry, or mostly dry, repeat stain flashing with torn paper edges. The first round of flashing and the second will be either visually softer or crisper, depending upon their order. Respray the entire floor with water, if required, to encourage additional “melting” or a looser, more watery graphic. When dry, or mostly dry, thoroughly rinse using a hose with a trigger nozzle, a 17-inch floor polisher with a soft brush, a double-bladed neoprene squeegee and a wet vacuum. Go home, enjoy a good meal, a glass or two of wine and a good night’s sleep. You’ll have earned it!
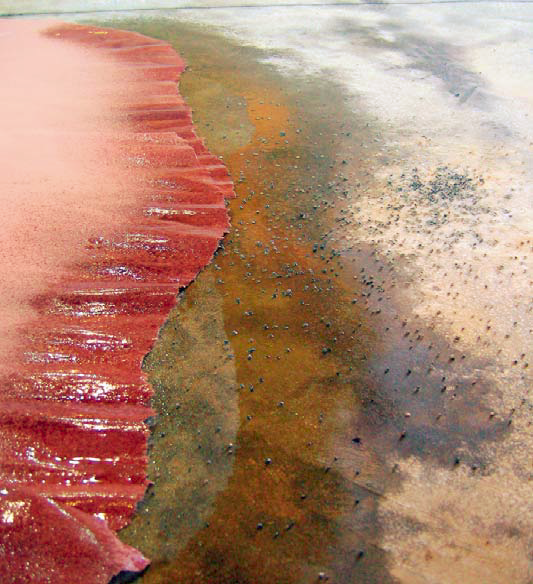
Return the next day, when all is dry, and repeat the process, less the spotting, wetting and rinsing parts, replacing stains with dyes (such as Colormaker’s Deso Dyes in combinations that produce orange and purple browns), diluted in either water or acetone. If using acetone, pay particular attention to proper ventilation (acetone is not only flammable, but explosive) and to potential softening and bursting of sprayer hoses. These dyes contribute to interesting controlled spot variegation with overall better field consistency.
The idea here is to create layers of serendipitous variegation that combine to produce a consistent, rich fabric. Tight craze cracking and screening to accent troweled highs and lows were the original concrete components of this layered fabric.
Day 3
Sealing
When dry (and for The Concretist, this would almost always be the day after staining), seal with approximately three coats of a duller solvent-based acrylic lacquer. If you’d prefer another sealer, be sure that your acid-stain rinsing process was flawless. Solvent sealers are generally more tolerant of some residual salts and acidity. We do a great job of rinsing, but are still leery of other sealers (water-based acrylics, urethanes, epoxies and so on) over acid stains. Now, it’s time to demask, demobilize, pick up that big fat check and bask in the adulation.