I received a call last week from someone asking why the sealer that had been applied on their stamped concrete a few days earlier was white, powdery, and rubbed off when they wiped their hand across the surface.
I proceeded to ask the standard four questions I use when dealing with any decorative sealer issue:
- What type of sealer was used?
- How was it applied?
- When was it applied?
- What were the environmental conditions (temperature, wind, sun, etc.) when it was applied?
Answers to these four questions are critical to understanding why the problem occurred, but better yet, they provide a road map to a fix. In this case it was a water-based acrylic sealer somewhere in the 25-percent solids range. It was applied with a 1/2-inch nap roller in the late afternoon. The temperature was 40° F (8° C), and dropped into the mid-to-low 30°s F (2° C) that night. The temperature never rose above 40° F (8° C) in the days after application. The white powder appeared the day after application and had progressively gotten worse.
While the reason the sealer turned white is pretty straightforward, and has everything to do with cold temperatures, let’s take a closer look at why.
As we transition from fall to winter, the days get shorter, the leaves fall into the concrete we are trying to finish, and the temperatures start dropping. The concrete blankets come out and cold-weather concrete practices start to take place. The changes in how concrete is placed should also trigger changes in how sealers are applied. In some areas (mainly northern climates) the onset of cold weather means the ability to seal exterior decorative concrete is greatly reduced, or in some cases totally comes to an end, until the ground defrosts, the snow melts and temperatures rise — think next spring. I personally encourage all applicators that place concrete after October 15 in a hard freeze-thaw climate to postpone sealing their concrete work until the following spring.
Both air and surface temperatures play a role in proper curing when applying sealers in both cold and hot weather, but surface temperature is typically more critical. After application, sealers undergo a chemical reaction that causes them to cure and form a film. Temperature plays a critical role in how fast or even whether this reaction occurs.
The best temperature range for applying sealers is 50° F to 90° F. Temperature can be influenced greatly by sun, wind, and time of day the sealer is applied. This is why monitoring weather conditions and looking at a thermometer should be mandatory before every sealer application. Other factors to consider when sealing in cold-weather conditions are humidity, dew point and whether the temperature is rising or falling. As with most anything in nature, cold temperatures slow things down, sealer cure time included. As the temperature gets closer to the 50° F minimum, the time needed to properly cure increases. Also keep in mind that as humidity (moisture content in the air) increases, it will cause a cooling effect on the surface, similar to how sweat works to cool our skin. Wind blowing across the surface also affects how sealers cure. This is known as the wind-chill factor, and sealers feel the effects of cold air blowing across them as they cure, just like we do.
Drop below the minimum temperature on a surface, and you run the risk that the sealer will never cure. Every sealer has a minimum film-forming temperature (MFFT). This is the minimum temperature needed for the sealer to properly form its film, cure, and get hard. For most sealers, this temperature is around 45° F. To be safe, most sealer manufacturers specify 50° F to provide a buffer zone. If the temperature is at or slightly below the MFFT, the chemistry of the sealer is affected, the reaction slows down, and you get partial to no film development. Bottom line: The sealer is weak and will not hold up very long. If the temperature is really cold, film development stops altogether and all you are left with is a white powder on the surface after the carrier (solvent or water) evaporates.
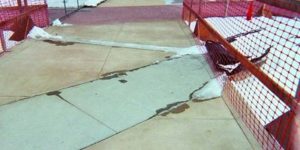
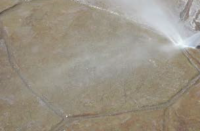
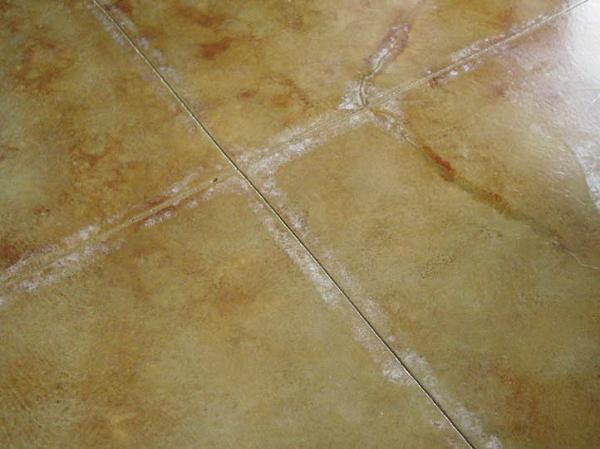
In the case outlined at the start of this article, the temperature never rose above minimum film-forming temperature, and all that was left on the concrete surface was the acrylic resin once the carrier (water) evaporated. Classic signs that a sealer did not cure properly due to cold temperatures (and not achieving MFFT) include white powdery residue, similar to powdered sugar, remaining on the surface. This white residue is very easy to remove, and in most cases can actually be removed by scratching a fingernail across the surface. Another common indication of temperature-related sealer failure is when white residue occurs near or in cracks, joints or saw cuts. Remember that water can and will reduce the temperature of concrete. Cracks and saw cuts will hold water, even when the rest of the surface is dry. The water in the cracks and saw cuts will reduce the temperature in those areas, leading to low-temperature sealer failure, indicated by the white powdery scale and residue.
How to respond
The amount of sealer that gets applied is always critical, but it is even more critical when temperatures start dropping. Multiple thin coats are always better than one heavy coat. When temperatures are low, the more sealer on a concrete surface, the longer it takes to cure and the more time available for cold-weather issues to take place. Not that we want to rush the curing process, but when temperatures are cool, we do want to help the sealer cure as efficiently as possible.
Now that we understand why and how these cold-weather sealer issues occur, the logical next question is how to fix them if they happen to you. Since the sealer film never developed due to cold temperatures, there really is no sealer to fix. The good news is that in most cases, the white residue is easily removed with a stiff broom or walk-behind scrubber with a medium pad. If the surface is only exhibiting cold-temperature issues in certain places, spot-treating those areas by removing the white residue and resealing when the temperature is warm enough is a common fix. As a last resort, a chemical stripper or solvent may be needed if scrubbing does not remove the damaged sealer.
When the temperatures start dropping, taking the time to understand the cold-weather limitations of the sealer you are using will save you time, money and headaches. When sealing exterior in the fall, winter and spring, pay attention to what the weather is doing, not just on the day you are sealing, but three to five days after you seal too.