While reactive stains offer all kinds of design possibilities, they are a tricky subject for a collection of recipes. The central claim of a recipe is that if you use the specified products and follow the directions to the letter, the result will be something, if not identical, then at least very similar to the original. Well, reactive stains will have none of that. Gaye Goodman, owner of New Mexico-based Faux Real Floors LLC and one of our contributors for this section, points out that acid staining simply can’t be done by following a formula.
Bart Sacco, of Concrete Texturing Tools and Supply, a Pennsylvania store, agrees. There is a huge list of factors – mix design, finishing method, dilution ratio, application technique – that affect how the stains react and what colors you’ll end up with, Sacco says.
This anecdote from Goodman is a perfect illustration: “If it turns out that the builder’s slab has a plasticizer added to the mix, and he wants a medium-walnut floor,” she says, “we might have to dilute the stain 12 times over with acid water to keep it from going black!”
Taking all of this into consideration, our goal with these recipes is not to encourage you to reproduce specific acid-stained floors – which would be impossible – but rather to illustrate effects that utilize acid stain as well as other materials. These techniques will be applicable from one slab to the next.
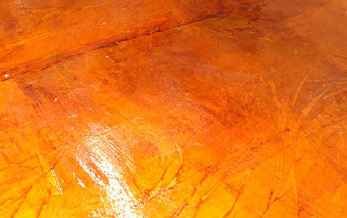 Trash Aesthetic
Simon Motamed, Triple-S Chemical Products Inc. – Los Angeles, Calif. www.concrete-stains.com
Just one color of acid stain delivers bold, dynamic patterns thanks to the use of a secret ingredient: trash bags!
Ingredients:
- Triple-S Chemical Products AL-70 lacquer, gloss
- Jet Coatings Elasticrete Magnesite Cement microtopping (EMC-60): White
- Triple-S Concrete Acid Stain: Tan
- Ammonia solution, 1 cup ammonia to 1 gallon of water
- Triple-S UT-70/30 One-Part Polyurethane sealer, diluted 9:1 with acetone
- Triple-S UT-9500 Two-Part Polyurethane, diluted 3:1 with acetone
- Special equipment required: Plastic garbage bags
Directions:
- Over a thoroughly clean and dry substrate, apply a single coat of the AL-70 sealer and let dry completely.
- Put down two layers of white microtopping and let set completely.
- Apply one coat of acid stain and let dry completely.
- Tear the garbage bags open at the seams, so you have flat sheets of plastic.
- Clean any residue off the surface and apply a second coat of acid stain. While this coat is still wet, lay the plastic bags over the wet floor haphazardly. Scrunch and wrinkle the bags as much as you like, as the creases will collect the stain and give the finished floor the random patterns we’re after with this technique.
- About 2 hours later, when the stain is partially dried, removed the garbage bags, then let the stain dry completely.
- Neutralize the floor by scrubbing it down with your ammonia solution, rinse thoroughly and let dry.
- Apply one coat of the one-part polyurethane sealer and let dry.
- Apply one coat of the two-part polyurethane and let dry.
- Apply a second coat of the one-part polyurethane and let dry.
- Finish the floor with a final coat of undiluted two-part polyurethane and let dry completely.