

Climbers say there is a point on Mt. Everest where most climbers fail. I’m guessing the reason why is similar to the reason most contractors don’t succeed in the decorative industry. Many have good intentions and like the idea of saying they are artists, but few have what it takes to truly take it to the next level.
Make no mistake about it — there are several steps required in order to pull off a successful stamped job, and leaving one out will leave you looking for the nearest demolition contractor.
Profit is the byproduct of a high-quality decorative job. Believe me in saying there is a big difference between learning to stamp concrete and learning to stamp profitable concrete. In this article we will discuss how to set your job up, as well as the installation process. If you combine all of these steps together you will cement your success in the decorative concrete industry.
 |
 |
 |
Step One
Take time to lay out, by paint or chalk, the outline of the stamped area. Be sure to show things like fire pits, planters, seat walls, drains, steps and anything else that can help the decision-maker commit to a design. Believe me when I say that it always looks like a good design on paper, but field marking will save a lot of form moving while your mud is getting hot. My foreman will go so far as to chalk-draw planned score lines and accent banding to help eliminate confusion. This will also be a good time to double-check pattern and color choices for the third time. No mistakes.
Now is also the time to field measure to make sure your new square footage is on budget with your bid. No one likes surprises and this kind of surprise will make a good job seem bad.
Step Two
The afternoon before preparation is when your crew will do the most important tasks it has for the pour. Have all material loaded and double-checked for accuracy. Confirm concrete arrival, mix design, pump time, and anything else that might cause your blood pressure to spike. Take control of your job well before the first rock hits the ground. Organize your crew to see who will arrive early to wet down the base.
I want to spend a little time on the mix design, because it is my opinion that most stamping contractors use the wrong mix design. You should not and do not have to use pea gravel for your stamped concrete. Many contractors use pea gravel because it is more affordable to pump. However, mixes with bigger aggregate are stronger and will stamp as well with good concrete practices. Try blending aggregates until you find something comfortable for you and your crew.
The other concrete issue is the amount of water added to your load. Adding too much water will weaken your mix and make your stamped concrete much more likely to crack. Folks don’t like to pay $8 a foot for cracked concrete.
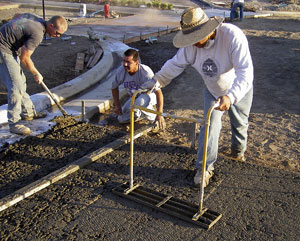
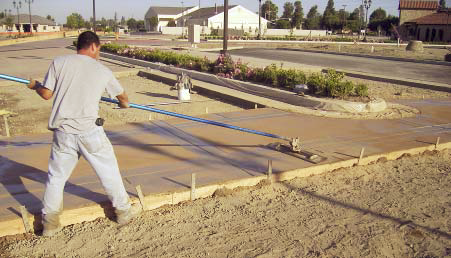
Let’s assume you have the mix issue straight and it is time to lay down concrete. We are pouring at a 4-inch slump and striking off the surface true to slope as necessary. We have a 4-foot level working behind the rod to confirm slope and the pour is going as planned. We have one man falling behind to tamp (or jitterbug, for the guys in the South), making sure the largest aggregate is seated just below the cream surface. This will be critical when it comes time to displace the surface with imprint tools. The surface should be floated smooth with a bull float as the edges are edged. Deep scores should be placed as planned to separate the rock in order to control cracking.
Up to this point your pour is not unlike any other concrete pour, decorative or not. By now you should see the bleed water at the concrete surface, depending on weather, temperature, humidity and wind. This is the point where your job will take a turn to the decorative side. From this point to completion every person on your crew must have the same goal. No distractions and no excuses.
 |
 |
 |
Step Three
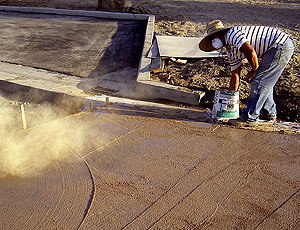
The next step is to add the color to the surface and then float it in. The level of difficulty is directly related to the color choice. Your wet concrete canvas is dark gray, so the lighter the color, the more difficult to cover. Please keep this in mind. Regardless of color, your first broadcast of color should be timed just as the bleed water has dissipated. Color too soon and you will lose expensive color and wear out your arm. Wait too late, and I bet you can guess what the outcome will be. Picture it like this. You and your crew will have several windows of opportunity in the overall stamping process. We covered the first and most forgivable window with the concrete placement. The second window is the coloring window, and this will take practice to perfect. The third window is the actual imprinting window, and this will be the most timing-sensitive.
Try to cover the surface but not stack the color hardener on the first pass. You will have two or more chances to fill in uncolored areas, so don’t worry. Let your color hardener “wet up” before floating it into the surface. A wood float will work the best at this stage. You will find your score lines filling in and overflowing, and this is fine, because we will need to open them up several times before the stamping process. Continue to color (with a respirator on your face) until you are satisfied with the surface color. Remember that your secondary color, in the form of release, will help cover some areas as well.
Continue to trowel color, open score lines, and edge outer edges as your surface dries. Depending on your pour size, you may have to start the imprinting process as other areas dry. Try to keep your release powder from fogging over wet areas that have yet to be troweled completely smooth. Many beginners spend too much time overworking the unstamped surface when they should be stamping it.
Step Four
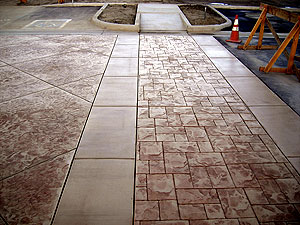
The stamping process and its degree of difficulty are directly related to the pattern choice. Texture patterns are much easier to handle and will cover more area sooner. Interlocking patterns require more planning and will take more time to imprint. Keep all this in mind when planning your pour because the amount of square footage you pour should be directly related to the pattern choice.
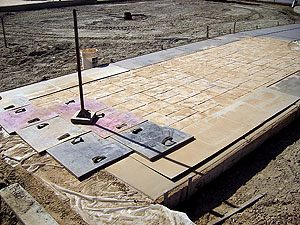
The imprint tools should rest over the untroweled powder release that now covers the colored concrete. The stamp tools should be resting on the concrete surface, and they should be picked up and moved after they have been consistently pounded. Be sure to keep a close eye as each tool is lifted and moved to make sure the concrete is imprinted and not just the release powder. Your window to stamp will dictate the urgency and speed of the stamping process. Again, keep pours small until your crew becomes comfortable with this process.
Areas along vertical surfaces such as walls will need to be hand-detailed and will take some time. Most tool manufacturers will sell a flex-style mat to help with these areas. Even with one of these mats, hand detailing may still be needed, so it may be necessary to leave a few stamp tools behind to work off while some of your crew moves on with the stamping process. There are many rollers, touch-up mats and detail tools to assist with this form of detailing.
The end of the day should leave you with a job that looks like one solid release-colored surface. Be sure to warn your customer that the base color will be unseen until the surface is rinsed and sealed. This may save you a frantic phone call around dinnertime.
Step Five
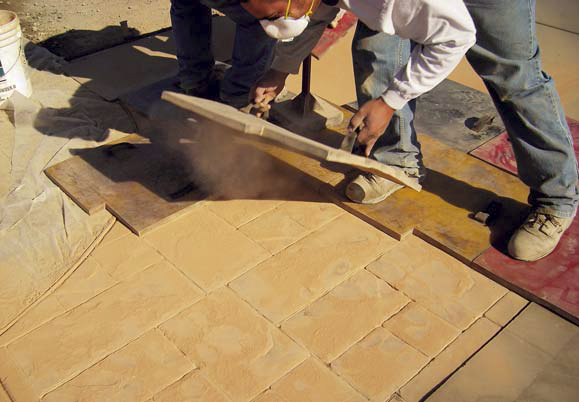
Detailing your concrete is usually the last step to a successful job. This process doesn’t really have a window, so it is more about patience and tenacity than anything else. Your first step will be to remove the release powder and dispose of it. As tempted as you may be to blow it into the neighbor’s yard, I highly recommend you don’t. Disposal of the release powder will be an issue, so be cautious about how this is handled. Pressure-washing the surface is the best method to clean the release powder from the surface. Some of the release will stay in the deep areas, and this will give the stamped surface depth when sealed. Leaving too much of the release will cause delamination of the sealer, so be aware. Some areas may require an acid wash to loosen the release powder, but be sure to neutralize before sealing.
Use a hand grinder to detail score lines and tool lines that need to be finished off. You may need to lightly color some areas or tint your sealer to blend colors together. The purpose of stamped concrete is to replicate an Old World look, so keep that in mind while detailing. Consistency is the word.
Most sealers should only be applied after the concrete has had a chance to cure out. My detail guy waits 28 days, and believe me, this can cause extra work, but it’s worth it. Most callbacks are sealer-related and most failures are moisture-related. Try to wait as long as possible and check with your manufacturer to find out what has worked best as far as timing. I like to use a pump-up sprayer to apply two light coats of sealer, with nonskid added, over the entire surface. Try cutting in around walls, rocks, and pool coping edges with a brush and saving the bigger areas for the sprayer. Most sealers want to go down with light coats and seem to handle the moisture better this way.