
 Adding pattern to concrete through the use of stencils was one of the earliest applications of decorative concrete. It is also the subject of some of the newest technology in the decorative field today. There are three distinct methods for adding stenciling existing concrete. These methods are: sandblasting, topping with an overlayment, and modifying the surface with gelled acid etching. All rely on stencils to mask certain areas and expose others to create a design, but beyond that commonality all three techniques are very different in both application and result.
Sandblasting
Sandblasting is one of the oldest techniques for etching patterns into stone, wood, metal, and, of course, concrete. This technique removes the top surface of the cured concrete that is not masked by the stencil, leaving behind a raised pattern.
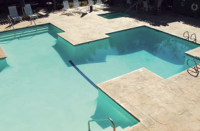
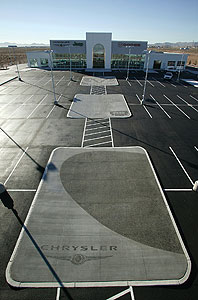
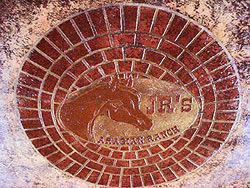
Sandblasting is truly a one-of-a-kind technique for high-end decorative concrete. While the designs can be and often are very contemporary, the technique has a traditional, historic, “carved-in-stone” feel about it. Since sandblasting is an elaborate, relatively expensive procedure, these designs usually cover a fairly small area and are almost always custom projects. “It is a way to get something unique,” says Lee Russell, foreman with Lowell Russell Concrete Inc., in Lakeville, Minn. Designs range from family crests on patios, pool decks, even the bottom of swimming pools, to company logos and graphics.
To start with sandblasting, you’ll need a sandblasting tank and an air compressor. You’ll also need a lot of safety equipment, Russell says, including an air-fed helmet mask that pumps breathable air, and various sizes of nozzles so you can adjust how much sand comes through.
Typically, the nozzle is directed straight down, shooting sand with pressure sufficient to remove the surface of the concrete. The nozzle must keep moving to avoid creating pits or deeper impressions in one spot. Another approach is “shading” — shooting the sand at an angle to create a more dimensional, asymmetrical look.

Of course, “you end up with sand all over the place,” Russell says. He directs sand to a central spot for collection with a backpack blower and then rinses off what is left. For obvious reasons, this technique is more applicable to outdoors and not often for rehabbing interior spaces.
 The concrete mix and finish have an impact on the appearance of the finished project. “I try to get in on the project from the very get-go,” says Clark Paepke, a contractor and international concrete consultant based in Sandy, Utah. “I enjoy that more because I know the personality of the concrete and how to finish it.” For example, if an acid stain will be applied before sandblasting, the concrete needs a tight finish.
Grit and pressure also determine the finished look. “If you use a 50-90 grit you can get a glassy look. Heavier sand exposes more aggregate,” Paepke says. Lowell says you may need abrasive blasting crystals, which are sharper and harder than typical silica sand, on concrete with a harder finish or if you want a more aggressive aggregate exposure.
So, what about the creative side of sandblasting — the stencil? “This is the cool thing about sandblasting — there are no design limitations,” says Glen Roman of Brickform Products. “You can get very fine detail sandblasting with a stencil.”
Stencils must stand up to pressure from the air hose, so they are typically cut from vinyl rather than paper. “Vinyl can be easily adhered in most cases. This allows for more detail-oriented designs,” says Heather Monroe, senior operations manager for Decorative Concrete Impressions LLC, in Webb City, Mo. “Vinyl also provides an increased physical durability for the sandblasting process. We manufacture stencils from 25 mil vinyl.” She cautions, however, that vinyl does stretch. “One must handle it carefully to avoid distortion to the material.”
Melanie Royals of Modello Designs recommends a stencil at least 10 mil thick for light sandblasting and says, “Deeper carving will require 25-mil green rubber.” Brickform makes custom stencils out of 40-mil latex rubber.
Adhesive is important to keep the edges from curling (so sand doesn’t infiltrate the design area). Brickform’s Roman recommends using adhesive-backed stencils rather than spraying adhesive on at the site, which can damage the stencil or compromise sealer performance. If a custom design is large enough to require more than one stencil, they typically do not overlap. Lowell recommends butting the stencils up to each other and attaching them with tape.
 Overlayments
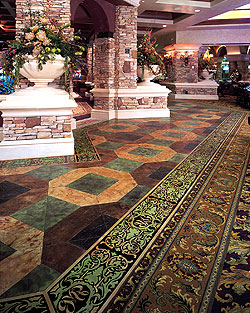
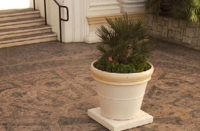
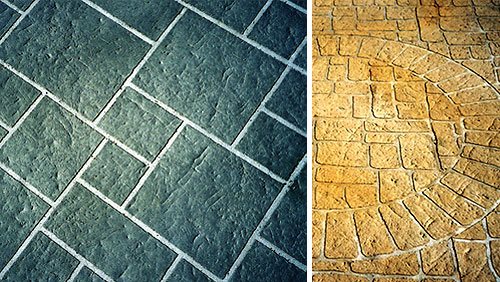
Stenciling with cementitious toppings produces a very different look from sandblasting. This technique is particularly well-suited to rehabilitating worn or discolored concrete. A stencil is placed over existing concrete, often over a base coat, and then a topping in a different color is sprayed or troweled over the stencil and finished. The result is a clean, fresh-looking pattern with a very tough, durable surface.
Stenciled cementitious toppings are most often used for repeated patterns such as brick, cobbles or stones for borders, pathways, driveways, patios and pool decks, to name a few applications. The most popular and successful patterns are “right angles” — bricks or cobblestones, most experts agree, whereas patterns intended to mimic natural stone are more convincing in stamped concrete.
When putting down an overlayment, the concrete underneath should be rough enough to provide “teeth” for a mechanical bond between surface and topping. Scott Thome, director of product services at L.M. Scofield Co., references the International Concrete Repair Institute (ICRI) SCP 3-5 standard. “This involves mechanical means of preparation,” he says. “Sandblasting, shot blasting, high-pressure water (4,000 psi or greater) or light scarification creates a surface that the topping can bond to.”

An existing slab can also be profiled with a gelled acid applied according to ASTM Standard D-4260. Profiling acid etches the concrete to create a rough surface. Tamryn Doolan, president and CEO of Surface Gel Tek, was a co-author of this standard. She says etching costs roughly 12 cents to 15 cents per square foot, compared to as much as $1.25 for mechanical surface opening.
When preparing the substrate, spalls and cracks must be addressed. Fill spalls prior to priming with a compatible repair material. If the cracks are dynamic (moving), they must be allowed to move and therefore be reflected through the system. “Remember, repair is not possible for all concrete,” Thome says. “Sometime it is better to rip out and replace than to place a topping to try to cover up defects. The first thing that should be done on all of these projects is determine if the substrate is sound and durable and will meet the intent of the owner for a long service life.”
Once the substrate passes muster, the next step is to install a bond coat. The bond coat is typically a fluid cementitious material (sometimes a dilute version of the topping material) and acts as a primer. You can spray it on, but Thome recommends working the material into the substrate with a broom after spraying. Doing this will minimize moisture loss and fill small pinholes in the substrate that might telescope to the surface.
At that point, apply the overlayment over the bond coat. Thome recommends finishing the first coat with a trowel to force the material into the concrete substrate. This improves bond strength and fills in imperfections in the concrete. This underlying layer is the color and material that will be exposed when the stencil is removed. In most patterns, it will have the appearance of grout lines.
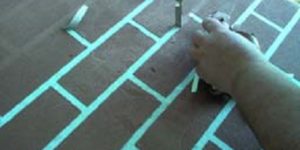
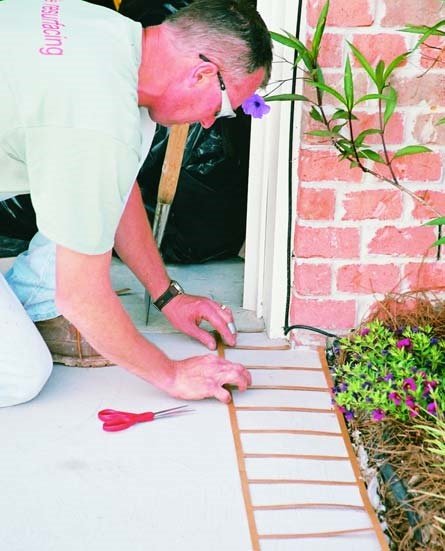
Next, apply the stencil. You don’t need a stencil that has an adhesive backing if the overlay will be spray-applied, says Howard Jancy, business development manager for Butterfield Color. He does recommend using an adhesive stencil to avoid stencil movement if you plan to trowel. This is also the recommendation for vertical applications. Brad Berg, vice president of Architectural Enhancements in Minnesota, believes that adhesive-backed stencils lend themselves better to more intricate designs.
If it requires more than one stencil, the second one should overlap the first at a grout line to keep these lines uniform.
 The top layer, in a different color, is sprayed or troweled over the stencil. Spraying leaves a “sandy” finish that increases skid resistance. Alternatively, knocking down the high points with a trowel, leaves small smooth areas on the top surface for better walking comfort. It also leaves enough texture to avoid slipperiness in wet areas. This finish looks similar to a spatter finish on a vertical surface.
Troweling the top layer delivers a smooth, flat look. Berg takes troweling a step further. He suggests pulling up on the trowel so the suction “drags” the material along the surface. This method has a goal of creating the uneven look of slate.
A stencil should be lifted as soon as the sprayed material on it dries solid enough to crack but is still somewhat moist. This will prevent pulling the topping and leaving the edges of the pattern ragged.
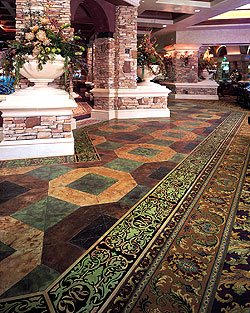
Modello Designs makes adhesive-backed masking patterns. She makes these in artistic designs such as vines, medallions and geometric pattern. These patterns are well-suited for creating raised designs and patterns on concrete — a process they call “embossing” — with troweled and sprayed overlayments. The overlayment is troweled or sprayed through the Modello pattern in a thin layer — just thick enough to raise a textured design. While many overlayment systems will perform well for this process, Modello Designs has worked closely with various companies and their product lines to develop processes for achieving optimum and durable results, including Colormaker’s Sgraffino, Concrete Solution’s Spray Top and Skimstone’s integrally colored hybridized portland cement.
Gelled acid etching
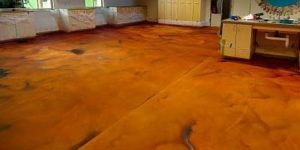
Acid-etching technology is challenging the artistic limits of stenciled concrete. In this case applying a vinyl stencil to an unsealed, clean, dry, grease-free concrete. Then, using a gelled acid, brush it on with a nonmetallic, acid-resistant brush. The acid reacts with the lime, calcium and salts in the concrete. Leave the material on for five to 15 minutes until achieving the design goal. Until removal of the stencil happens, reapplication of the acid may occur if adequate etching did not result. A power supply on the job site is not a requirement for this stenciling method.
Leave the stencil in place while you remove the material with a wet cloth or plastic or rubber trowel, such as a wallpaper smoother. Any material left behind is neutralized with a water rinse and then a second clean water rinse finishes the process. If you neutralize the gelled acid with water, it can be flushed into the sewer.
Remove the entire stencil or “weed” sections of it immediately. Doing so allows for additional color applications. The top surface of the concrete areas that are exposed to the acid is removed. The result is a textured, slip-resistant surface. Contractors can control the level of the etching by selecting a more or less aggressive gelled acid product. After application they must monitor how long they leave it on for the desired results.
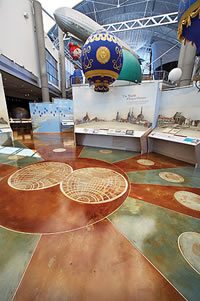
Doolan of Surface Gel Tek (the original manufacturer of gelled acid) says she spent so much time explaining the difference between this process and sandblast stenciling that she dropped the word “stencil” and coined the term “Flattoo” to avoid confusion. Gel Tek’s Flattoo stock patterns include a variety of borders, animals, petroglyphs, and plants. Doolan says 70 percent of the Flattoos Gel Tek supplies are custom. “This method delivers a dramatic stained look with unlimited graphic possibilities.”
According to Royals of Modello Designs, there are many variations to using the simple gelled acid technique to achieve different looks on cementitious overlays as well as directly on concrete. Royals adds interest to plain borders around her company’s intricate designs by dipping a piece of 1 mil plastic, such as a grocery bag, into a plate of gelled acid and then dabbing it onto the concrete in a staccato up-and-down motion. The result is a stippled, textured-looking effect. Adding colored stain only enhances this look. She also varies the intensity of the etching by sponging the company’s DesignEtch material through the design area and removing it almost immediately with a soft trowel. She then adds more color back into the etched area with acid or water-based stains thickened with a gel.

Conclusion
So how does one choose the right system for a stenciling project? “This really depends on the design or texture the owners want,” Thome says. “All of these systems have their place in the decorative concrete market but not one can do it all. The glory of these systems is that you can use most of them in conjunction with others. This versatility enables the contractor to be extremely creative and perform at a high level of craftsmanship.”
Products Mentioned in the Article
Offered by Concrete Decor Store Tek Gel for Profiling
by Surface Gel Tek Running Bond - Concrete Stencil Roll
by Decorative Concrete Impressions