

Concrete is a material with great strengths but portability is not commonly one of them. Great photography helps overcome this obstacle.
You can hire a photographer, but that gets expensive and requires discipline to photograph each project during and after completion. You’re already on the jobsite, so you’re in the best position to document your work.
Our goal with this article is to help you better market your business by becoming a more skilled photographer, starting with understanding image resolution.
Imaginary tiles and pixels
A camera captures a pile of information when you click the shutter. That pile — like a batch of concrete — is a fixed amount. You can use that batch to make a thick slab that covers a small area or a thinner slab that covers a larger one.
In digital photography, image clarity depends primarily on the amount of information recorded. Image resolution, or total amount of information in a photo, is most commonly expressed in megapixels, or a million pixels (1,000 by 1,000, width by height). Image size in pixels is a measurement of the amount of information it contains. A small number of pixels, low information. A huge number of pixels, a higher amount of information. The goal is to get enough pixels at the start and not lose them.
Digital photos are essentially long strings of numbers describing the color and brightness of each tile in a large grid of spots. Each spot, which can be thought of as square, is called a pixel, short for PICTure ELement.
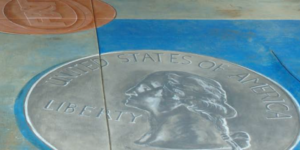
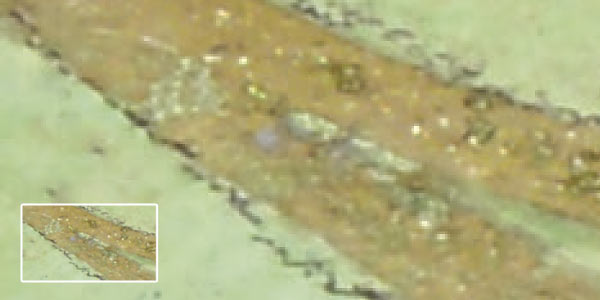
If this grid is displayed at a small size, the image can appear to be sharp, with lots of information. But enlarge it and, well, it doesn’t look so good.
Begin with the end in mind
Today, images can go everywhere — online, printed on photo paper, in newspapers, magazines and brochures, billboards or display booths. You can even have them printed on vinyl and mounted on the sides of your trucks.
You are likely to be asked for a “high-resolution” image, but what meets that criterion depends on its intended use. High resolution for a computer screen might be 1,920 pixels wide by 1,080 pixels high, or about 2.1 megapixels. For most online uses, your web designer would probably be happy with an image that size.
High resolution for a magazine refers to images that have 300 pixels per inch when printed on paper. So an 8-by-10-inch image, as printed in a magazine, would require the original image to be 8 x 300 (or 2,400) by 10 x 300 (or 3,000) pixels, for a total of 7.2 megapixels.
Camera up
You will need a camera capable of taking images with enough pixels for the intended use. Some smartphone cameras are good enough for posting images on a website. Do you intend to print a glossy brochure or compile a portfolio of images for prospective clients? You’ll need a much better camera for that.
Take your pictures at the highest resolution the camera allows, and if possible in a lossless format (such as TIFF or RAW). If your camera only saves in JPEG format, choose the largest file size it has. Larger images require more storage space, so be prepared to add storage to your computer and have several image storage cards on hand. Also, don’t use a time stamp on your images. This looks unprofessional and is difficult or impossible to digitally remove.
When an image is taken and digitally saved, it has a fixed number of pixels. Two megapixels of information can’t be magically converted to eight megapixels. You can make the image bigger, but the detail won’t improve in the process. For this reason, you can’t grab a small image off your website or cell phone and successfully enlarge it for printing purposes in a magazine or a brochure. It simply doesn’t have enough information to look good in print.
Lastly, buy and learn to use professional software. Adobe Lightroom is extremely powerful and quite affordable. It can be a bit daunting to learn, but it’s easier than many tools.
What about the photos you already have?
Assuming you’ve already taken some photos, how can you tell if they are usable? The best thing to do is determine if the images are big enough.
To save storage space on computers, various methods are used to reduce image file sizes. So simply looking at the file size on your computer won’t tell you how much information is contained in the image.
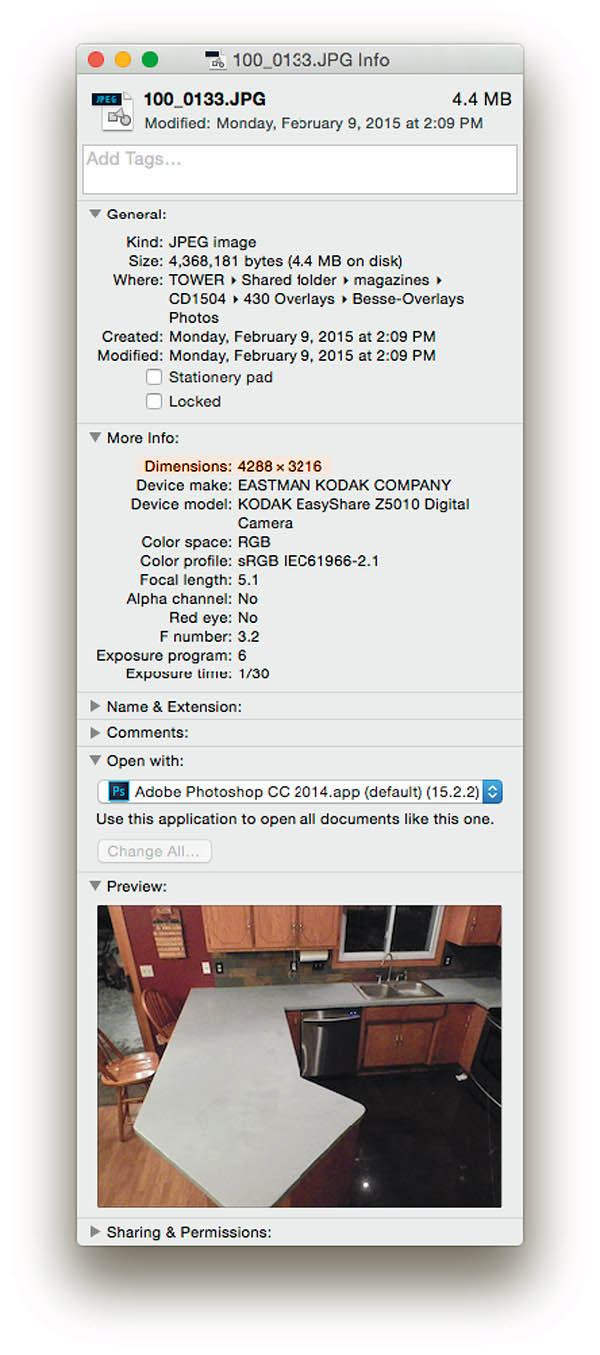
To see how much information is in a digital image, look in your image software for menu items such as “Image Size” or “Image Properties.” These let you see how many pixels are in the image. If you can’t find this menu, you may need to use your Windows or Mac operating system to get that information.
In Windows Explorer, or in any window with your photos in it, right-click on the image you are considering and from the drop-down choose “File Properties” or “Image Properties.” Here you will find the pixel dimensions of the image, listed among other items like date taken or camera model. Remember, the dimensions are width times height.
In the Finder on a Mac, you can use “Command+i” to “Get Info” about the file. Image size is part of that information displayed.
Tools like iPhoto and other free bundled or built-in image organizing programs can hide the size of the image and make it hard to know what you’re going to get as output. For this reason, use professional software instead.
Avoid things like resizing, cropping, rotating and re-saving your images more than once. It’s best to keep your images as close to original as possible and let the graphic artist, printer or web designer manipulate them as needed.
Preserving the information in your images will give you richer, more detailed photos that will help show the quality of your work. If you take pride in the quality of the finish of your concrete, take pride in the quality of your images. It will result in solid returns for your business.