

 |
 |
 |
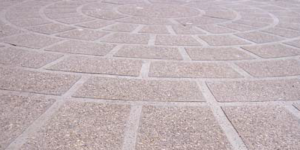
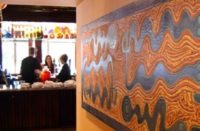
The Decorative Concrete Institute teaches faux finishing techniques and 3D illusions in decorative concrete.
Bob Harris is probably best known as founder and president of the Decorative Concrete Institute. But one of his side passions is faux finishing. “As far back as ten years ago, when I started researching faux finishing techniques, I often wondered why one could not create beautiful murals on a horizontal plane using decorative concrete mediums,” he says.
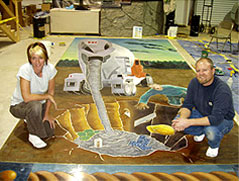
Faux finishing techniques have made it onto the syllabus of at least one Institute class, which covers “illusional concrete.” These photos are of work completed during the second-ever illusional concrete tutorial, and more classes are scheduled.
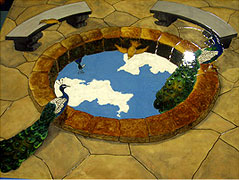
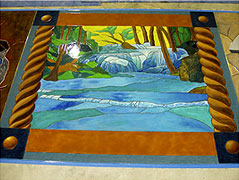
Harris and his colleagues have invited Julie Kirk, a street artist known for beautiful sidewalk art using pastels, to help teach the class. The work shown here was a collaborative effort between Harris, Kirk and seven or so students. Over four days, the class was able to finish three compositions from scratch. “The alliance seemed perfect for both sides to be able to share their passions with others,” Harris says. “It has been a wonderful addition to our teaching curriculum, giving our students many great ideas.”
A 1/8-inch cement-based skim coat was used as the canvas. The primary coloring medium was Rustoleum’s new water-based semitransparent concrete stain, augmented by DCI dyes and some tints. Different transferring techniques and high-end saw-cut techniques were used on the project.
The goal of the class was to teach several styles of perspective: single, double-point, and anamorphic, which is a distorted picture that appears to be in scale — and often three-dimensional — when viewed from certain vantage points. “Two of the three compositions were original artwork, while one was an image obtained from a book on stained glass windows,” Harris says. “Once the artwork was finalized, we then taught the students different techniques for transferring the artwork to the concrete substrate using projection and gridding techniques. Once transferred, we saw-cut the pattern into the surface using grinders with diamond-blade attachments.”
A variety of methods, such as wet-on-wet stains, prewetting the surface, shading and shadowing, sponging material off and on, and using cheesecloth for blending, were used to color the slab. “Many of the layout techniques are frequently used by faux finishers,” Harris says.
The work was topped with a clear coat of 100-percent solid epoxy for preservation.
(877) 324-8080
www.decorativeconcreteinstitute.com