
 Twenty years ago, the construction industry first used concrete overlays to repair cracks and other damage in existing concrete surfaces, from driveways to roadways. Since then, times – and tastes – have changed. More and more contractors make a statement with overlays for concrete
Decorative concrete has quickly become a choice material, for both interiors and exteriors of residential and commercial structures. From counter tops to floors, the reliable gray substrate has undergone a transformation. And overlays play a large role in the rebirth of this old standard.
Overlays – What Are They?
Like paint, overlays for concrete are designed to add a new look to the substrate they are applied to. They cover dull, drab concrete surfaces — or even wood substrates — that are otherwise poor candidates for decorative concrete staining and coloring. Applying an overlay atop an existing surface provides a new look or a fresh, smooth surface. This will deliver clean, consistent color and appeal. Aside from creating a new look or different finish, overlays can make it unnecessary to tear out an existing slab. This saves both costs and headaches.
Overlays, whether a commercial system or a custom-mixed blend, typically combine cement, various aggregates and polymer resins. These resins add additional flexural, abrasion and compressive strength. This virtually eliminates cracking, chipping, freeze-thaw damage, water discoloration and scuff marks.
Many contractors opt to blend their own overlays. Other contractors rely on propriety systems from overlay manufacturers such as Elite Crete, Bomanite, Increte Systems, L.M. Scofield, SureCrete, Miracote, QC Construction Products, Target, Artcrete, Concrete Solutions and CemTec, among others.
Some overlay manufacturers recommend formulas for mixing sand cement and pigment, using their resin or polymer as an additive. However, most offer bag mixes with color added, plus a powdered polymer. With such mixes, water is the only needed addition. Still other mixes may demand both a color and polymer additive. Critical attention is essential for mixing ratios. When mixed correctly for the job and environmental conditions, good overlay blends can render a mixture that can be spread as thin as 1/32-inch skim coat if necessary or sprayed, textured or troweled.
Doug Bannister of The Stamp Store in Oklahoma City mixes his own overlays and uses many different colors and techniques — from staining and dying to saw cutting and grouting — to enhance their look. Concrete contractor Ralph Gasser of Redding, CA also mixes his own overlays. Gasser has done work both for Disneyland and Disneyworld, as well as for overseas projects. This year, he won a decorative concrete pavement award for his 6,000-sq. ft. multicolored, dyed and saw cut overlay job at the Brenden Theater in Modesto, California.
Like Bannister, Gasser does not use the same design mix from month to month. Weather, the environment and other variables can drastically alter the workability of the blend and affect the setting process.
Application Approaches
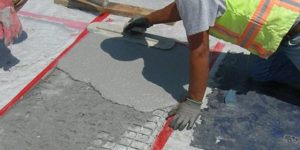
If you use commercial overlay preparations, you can either select products that are self-leveling or those that need to be spread with a trowel. If you mix your own, you definitely will need to use a trowel, as the chemistry behind self-leveling products is proprietary to the respective system manufacturers.
Self-leveling overlays, mixed to a specified consistency, seek their own levels when poured. Application is complete with a simple touch of a smoother, spreader or porcupine roller, depending on the desired thickness and texture.
Some contractors may choose to subcontract self-leveling thin overlay or stamping applications, and then enhance the new surface through staining, dying, sawcutting, stenciling and even stamping before sealing or coating the finished design.
Troweled-on overlays take experience and a steady hand – unless you’re shooting for a look enhanced by trowel marks on the finished surface. Some contractors purposely leave trowel marks in their overlay. Compare this technique to leaving brush marks on a smooth, high-gloss painted trim.
Surface Prep
Properly evaluate new and existing concrete before installing a coating or overlay system. A basic understanding of concrete sanding, grinding and surfacing techniques is essential to determining criteria for the adhesion of the finished product.
Existing surfaces must be free of oil, wax, grease, asphalt, paint, latex compounds, curing and sealing compounds and any contaminant that could affect the final bond between the substrate and the concrete overlay.
“The concrete must be opened up and clean,” says Bill Shorey of Spec-West — a Sacramento, California, concrete products distributor. “The more porous the substrate, the better the overlay adhesion you’ll get. There’s more of an angular surface to grab on to and there will be deeper penetration into the substrate.”
Shotblasting and sandblasting are two good ways to prepare a surface for an overlay, especially for concrete application. Some manufacturers also recommend scarifying (making small cuts into the surface) and acid etching to properly prepare a concrete surface for overlays and some methods of coloring.
You must clean over-watered, frozen or otherwise weak concrete surfaces down to sound, solid concrete by mechanical methods. Acid etching or the use of solvents is not an acceptable means of cleaning the substrate in this condition.
Surface irregularities require repair prior to application of coatings or toppings. Because thin-film overlays follow the surface profile of the concrete substrate, it’s important that the method of surface preparation creates a relatively smooth surface. A highly irregular surface will project through the coating.
Depending upon the type of overlay used and the manufacturer’s recommendations, repair of the existing concrete surface may vary. In general, toppings can fill and repair surface irregularities up to twice the thickness of the topping material. Repair materials for deeper irregularities such as bugholes, blisters, cracks, depressions, honeycombs, scaling and spalling can depend on the polymer product being used and the manufacturer’s recommendations. Some system manufacturers do not recommend repairing cracks with their overlay systems. Others have specifically designed crack-repair systems for use with their overlays.
“In its thickest use, our overlay is 3/8”- to ”-thick and is only as a good as the substrate,” notes Mike Lowe, Jr. of Increte Systems, a manufacturer of three different overlay products. “If you apply our overlay to cracks on a 4”-to-6” slab, those cracks eventually will show back through.
“You can prep a crack by grinding the loose and jagged edges to smooth it out. The crack still may resurface over time. That’s not to say you cannot put our overlay over a cracked surface. You can incorporate it into the grout line of a pattern to draw the eye away from it,” Lowe says.
Once you remedy any damage on the existing concrete substrate, you then need to thoroughly clean the surface. Make sure it is free of oil, wax, grease, asphalt, paint, latex compounds, curing and sealing compounds and any contaminant that could act as a bond-breaker. Mechanically clean the surface by shotblasting, scarifying or similar method.
Decorative Options
A thin-stained overlay is one of the more popular finish looks. Once you apply the overlay, you can use a chemical acid or water-base acrylic stain to color the surface with single or multiple translucent colors. Coloration can be relatively even or take on a faux look through the layering or mixing of coloring processes.
To further enhance the look of overlays, and make a statement with overlays for concrete, you can use stencils to create a design, logo, or borders. You can also score or sawcut the surface. Both scoring and sawcutting can add decorative effects to an overlay at a minimum depth of 1/8”.
Score the concrete with different diamond blades on a grinder or worm gear skill saw. There are also special power tools designed by manufacturers for this type of scoring work. Lines can be straight or diagonal to the edges of the flatwork. After the concrete is hard, create sawcut lines using a special rotary saw. Insert the sawcut lines either straight or diagonally to the edges of the overlay. Or, you can cut diamonds, stars, squares and other shapes into the overlay. Staining and coloring these shapes in a contrasting color to the one on the abutting surface will create a dynamic look.
Finishing Touches
Unlike plain, gray “standard issue” concrete, decorative polymer overlays most always should be sealed or coated. Do this to protect the surface and simplify the maintenance routine.
Dean Owen of Arizona Polymer Flooring in Glendale, Ariz. explains: “A typical sealer system would consist of two coats of a 20% to 25% solids material spread at 300 to 350 sq. ft. per gallon,” he says. “This would leave 2 to 4 mils of material in the pores of the substrate and have little effect on the surface’s original texture.”
Coatings, Owen notes, are applied more heavily than sealers and are designed to build a surface film. A typical coating system consist of 2 to 3 coats of 40% to 60% solids material. They are then spread at 200 to 350 sq. ft. per gallon, leaving a thickness of 5 to 12 mils.
According to Owen, coatings provide better substrate protection and are more easily cleaned than sealers. One drawback to coatings, however, is that the smoother surface they create can present slip hazards under wet conditions. Incorporating such components as aggregate particles in the mixture is a key part of coating system design, Owen says.
To protect the floor, his handiwork and his customers’ investment, Gasser applies six coats of sealer on projects where there is heavy foot traffic. He then specifies floor polish to go on top of the sealer for added sheen and protection. Before you apply a sealer, consider the condition of the overlay. Freshly placed polymer-modified overlays do not need surface preparation prior to sealing. Remind your clients that a seal coat does not eliminate the need for ongoing surface maintenance, Gasser says.
“Maintenance is still an important piece of these floors,” he says. “You still have to polish the floor. I recommend doing it once every four days. Mop it first and then put on a coat of polish. In 15 minutes, that floor will be dry.”
The surface should be free of unsound materials or contaminates before applying sealer. Such debris may weaken the overall adhesion of the sealing system. Mechanical or chemical profiling is not recommended, as such methods can alter the surface coloration or texture.
Reduce a good commercial cleanser scrub with water per the manufacturer instructions and apply it with a floor machine. Use an aggressive mylogrit brush with application. Do not let the cleaning solution dry on the surface. Be sure to rinse thoroughly, preferably with a pressure washer. You must neutralize acid-stained surfaces before receiving a water-based seal coat. Water-based coatings applied to improperly neutralized surfaces are apt to suffer premature failure.
Jumpstarting the Business
Understanding concrete, how various coatings and mixtures react to it, and how the coatings can be applied and maintained are just the beginnings of what you’ll need to know to grow a successful decorative concrete enhancing niche. This can be crucial in making a statement with overlays for concrete. You’ll also want to learn how to charge for a job based on your internal costs. Additionally, your time and the going rate in your area should be considered.
The typical cost of overlay applications for your customer should be comparable to the product alternatives or other types of flooring treatments (e.g. vinyl, carpet, tile, inlaid stone, etc.). The condition of the existing concrete, the type of work the customer wants performed and the amount of time and materials needed can all add to the job’s cost.
Many of the major overlay system manufacturers and their distribution networks offer training and certification courses. These courses teach new users how to mix the product properly and how to install it and finish it. Be prepared to learn and explore new materials, tools and techniques says Shorey adding, “read manufacturers literature thoroughly and test, test, test, so you can avoid doing R&D on an actual job site.”