
This is the first of several columns that I will have the opportunity to write for Concrete Decor during this year. “Polished Perspectives” will focus on providing simple, sound information on how to deliver a polished concrete floor to your customer — one that both you and your customer will be proud of. To me there is no better place to start than with the basics: your ability to use your diamonds to establish proper scratch patterns. All of the bells and whistles in your bag of tricks will rarely save you if you haven’t first performed your grinding and polishing correctly.
Scratch patterns and diamond selection
There is nothing more defeating when polishing concrete than to complete all of your polishing steps and then find scratches that you did not remove at the low end of your grinds.
When this occurs, I like to say that you are “paying tuition.” I don’t mind paying tuition once, but I hate paying tuition twice for the same thing. Providing proper scratch patterns requires that you have an understanding of the floor you will be polishing, the expectations of your customer, and the diamonds and equipment that you will use to perform the work.
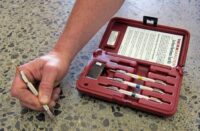
Prior to mobilizing for the actual project, it is smart business to perform a test patch, preferably with the equipment that you will actually use on the floor. Whether you are grinding and polishing wet or dry, you still have to deal with proper scratch patterns.
Each project is different; for that matter, even individual slabs within a project may be different. Ideally you want to know whether the floor is new or old; soft or hard; flat or wavy; sealed or not, before you even set foot on the site. Why is this important? All of these variables will influence which equipment and diamonds you will need to successfully perform the work, or even help you decide if the floor is a good candidate to be polished — because not all floors are. Some basic rules of thumb:
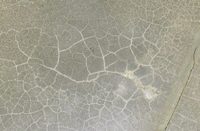
- Be wary of weather-damaged or carbonated floors, and discuss the possible ramifications with the owner.
- Always confirm that the floor does not have a topical sealer.
- If the floor is hard, you generally use a soft matrix diamond.
- If the floor is soft, you generally use a hard matrix diamond.
- Don’t move on until you have successfully removed the previous scratch.
- Have the customer or their representative sign off on your test.
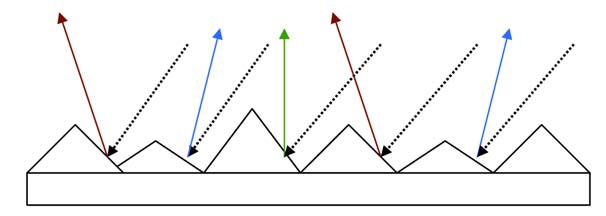
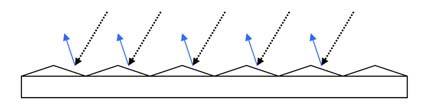
When starting with a new or existing slab, your initial evaluation will expose how flat the slab is and what scratches and gouges you will be required to remove. As you can see in Graphic 1, the floor surface is generally not consistent, either in flatness or in being void of scratches. An irregular floor delivers irregular reflectivity and clarity. The black arrows represent incoming light, while the colored arrows represent reflected, or refracted light. Notice that due to the floor irregularities, the light is refracted in a random pattern, as opposed to being reflected uniformly as it would be from a properly ground and polished floor.
It is necessary to understand the importance of creating a proper scratch pattern. Every pass of each diamond disk will impart a “scratch pattern” to the concrete surface. You must always take the proper amount of time for each pass so that the diamonds grind or polish every square inch consistently.
Once you have removed the objectionable scratches or irregularities in the slab with your lowest grit diamonds, you have performed nearly 90 percent of your work. The purpose of each successive diamond is to remove the scratch pattern of the previous diamond, to the point where you have produced an even scratch pattern, and the scratch pattern is so fine that the human eye will not be able to see it on the floor.
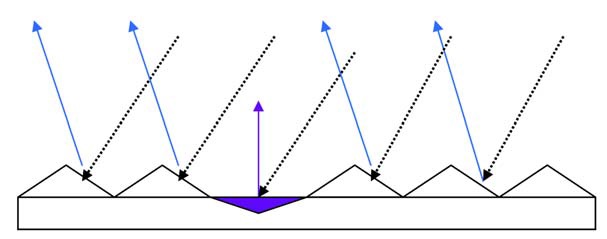
Whenever you leave a deep scratch or a “bird bath” (where the diamonds have not performed correctly), you will get refraction of the light, as opposed to a consistent reflection of the light. This creates a void, or dark area, in the reflection on the floor. Take your time with each grind and continually evaluate your work as you proceed. To fix a missed scratch after having moved on through the subsequent grits requires you to regrind an area far greater than the area of the immediate scratch. Graphic 2 shows how a missed scratch (purple) will change the direction of the light. This area will appear as a blemish or darker spot on the floor. Graphic 3 shows the reflection from a correct scratch pattern.


