
As we come out of the winter, I always deal with multiple polishing projects where the concrete was placed during cold temperatures. Although there are ACI standards for cold-weather placements, I still experience quite a few slabs that have issues related to cold weather.
The most common cold weather issues I see are troweling too early and placing in conditions where the top surface of the slab is allowed to freeze during the placement. The results of these issues are generally not structural, meaning that they will not affect the structural integrity of the slab. But they create slab surface issues that would affect any flooring type but are especially bad for polished or exposed concrete flooring.
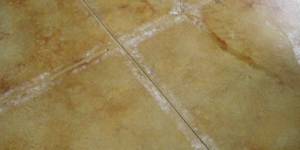
In this article, I will address the issue of freezing. Generally only the water in the top paste layer freezes, as the main slab has thermal mass and chemical reactions to keep its temperature up. That said, when the top layer, or bleed water, freezes, you see several results. Additional bleed water is trapped under the paste layer because it can no longer wick to the surface to be evaporated away. This causes blisters of water to form, which leads to surface delamination in areas after the water eventually does evaporate.
When this occurs on the majority of the slab area, it creates a situation where the surface layer of the concrete separates from the main body of the slab. Under normal conditions a slab placed under stress will break somewhere near the top surface of the large aggregate (so approximately 1/4 inch from the surface) but a slab that has surface failure will separate much more easily, right at the paste layer, especially with traffic. This causes issues for polished concrete, VCT, tile and even stained concrete floors as the thin top layer delaminates from the main slab body.
The second thing that happens when a slab freezes is that the water in that top paste layer expands as it freezes. When evaporation does occur, you generally see a lot of “craze cracking” due to the shrinkage of this thin layer. These cracks are not structural, but they are generally not ideal for most decorative concrete applications.
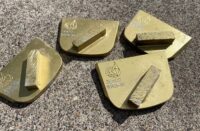
The last major issue I have seen is that because of freezing, the top layer does not experience the full chemical reaction, which means that it is generally soft and chalky. I was on a project recently where we were able to make fairly deep scratches in the slab very easily with a key. If this issue has occurred, the fix is generally to shotblast or grind through the paste layer until you get to a solid substrate layer. This is generally about 1/16- to 1/4-inch deep into the slab.
As the aggregate is exposed, a lot of air voids will also become exposed. The most common fix for these is using an epoxy or grout coat to fill and then grind off the surface residue.
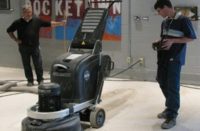
As a side note, there is a contractor in the United States who has the unicorn of floor prep machines. This is a ride-on unit with a massive vacuum that completed 40,000 square feet of surface removal at an average of 1/4 inch of concrete in just five shifts, or 40 hours of work. For retailers looking to maintain schedules, this is an invaluable tool for their contractor to have.
Why polishers can’t just start earlier
Another issue that I have encountered recently is the scheduling of polished concrete related to concrete pours. Almost every project built is on a schedule and they all seem to be behind from day one. I see the schedules getting tighter and tighter.
Polished concrete is one task that is always being questioned as to the speed that it can be completed. Generally, an experienced crew with two full-size grinders and five or six men will be able to complete about 1,500 to 2,000 square feet a day with a full polished concrete process. There are a lot of variables that go into this timetable, though, so do not count on every job going at that speed.
I get asked all the time why polished concrete can’t be done earlier. My usual answer is that based on the concrete mix design, the grinding or depth removal of the process can occur as early as 10 days after the pour date. This is nice, because large projects generally do not have a lot of work going on in the space at this time, so the contractor is able to capture time where the slab is not in use by other trades. Additionally, by doing the main grinds early, contractors can grind with large equipment under where walls will be, making edge polishing later in the project much easier.
However, at this early stage in the slab curing process, the cement is still releasing moisture through the surface. This causes issues with any higher-grit polishing, and the shine will not last. Additionally, the surface layers, while they may have compressive strength, have not reached their fully mature tensile strength (which relates to the structural bond of particulates and their ability to resist side-to-side pressure, like from grinding). This is especially important as the finer grits of diamond are used, because you can get regular rollout of sand aggregates and small particulates of cement. This leaves the surface pockmarked and fractured, and this surface profile hinders the clear reflective shine that customers are looking for.
Although I do recommend performing main grinds early, I do not recommend polishing within 28 days of concrete placement. It has been my experience that polishing done early does not hold and always has to be redone, usually from 100-grit resins on up.