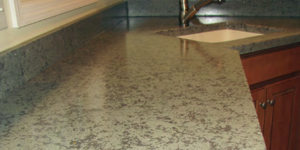


Fiberglass has been used in the precast industry for many years. The use of resin-and-glass mats to make master-mold plugs, keeper molds to hold the shape of rubber molds, and good old-fashioned production molds is standard in the industry. Now, the next use has been developed — fabric forming.
In this article, we will walk you through the basics of using polyester resin and different types of fabric to make forms and molds. We will cover standard fabric forming for creating a sink.
With just basic materials and a lot of imagination, you will find that you can create more than you ever thought possible.
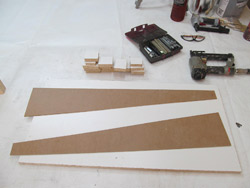
1. Gather Tools and Materials
To get started we have to get the tools and products we will need on hand. So, here is the shopping list. It includes several types of materials that you will need to make fabric-formed molds, plus some that you don’t need but are nice to have around.
Polyester resin. This is typically available at most of your box stores in quart and gallon size. However, if you can find it at a supply house you will pay a lot less for it.
- There are several grades of polyester resin, but for our purposes an inexpensive resin, usually called “boat yard resin,” will work. No need for the premium stuff as we are not building boats.
- Before buying at the box store, search for local fiberglass supply shops. If you cannot find one, you can call local body shops, boat builders, plastic supply shops and auto supply stores to find the supplies at lower prices.
MEKP (methyl ethyl ketone peroxide). This is the hardener for polyester resin. Be aware that regular MEK will not work. You must use MEKP. This is usually supplied with the resin when you purchase that. It is also a very nasty chemical, so wear protection.
- As a side note, you can get colored dye for your MEKP as well for your resin. Dye will help you see them blend, ensuring that you have a good mix.
Fiberglass matting. Though you will not typically need this for making these types of molds, it is good to have some around to strengthen certain areas of the molds. A 1-ounce mat material is best, as it will fit better into the nooks and crannies of the mold. Cut small pieces to fit into tight areas. Do not try to stuff a big piece in, as that will only frustrate you.
- Matting comes in different weights and can serve many uses. For example, if you want to make your fabric molds reusable, you can cast one and then make a standard fiberglass mold off of it with matting.
- You can in some cases back up your fabric mold with this matting, giving it much longer life.
Polyester-based filler. Bondo brand filler (or putty) is the most common, but there are several types that you can use. Finding one (often called lightweight filler) that is designed for easier sanding will save you a lot of sanding as you get into the process. Just make sure that it is polyester-based.
The hardener is typically furnished with the filler. You can get different colored hardeners for your filler. This can allow you to build up layers with different colors so you can see low spots.
Fabric. Most fabrics will work for making molds, but each will have different capabilities for forming and will work differently with the resin. Be wary of some materials, as they can “melt” from the chemicals or the heat of the chemical reaction. We will talk more about which fabric to choose later in this article.
- I try to get my fabric by shopping at the local thrift stores. They have a LARGE selection of material and it is available for a small fraction of the price you will pay at a fabric store.
Acetone. This is the cleaner for your brushes and messes. It is not a thinner for the resin. It has been used for this, but that is not a recommended practice.
Sandpaper. The grits you need will depend on the type of mold you make and the finish you want. I recommend having a stock of 60, 80, 120, 220, 320 and 400. You will likely not need the 60-grit or the 400-grit very often, but it is nice to have them when you do. Also, buy these at the auto-body supply shop — much more affordable than the box store — and buy in bulk, because you’re going to need it.
2. Design the Sink and make the Mold
Now that we have all our materials and tools, we can start our fabric-forming project. To do this, you have to first come up with a design and then build the armature, the part that will create the design under the fabric.
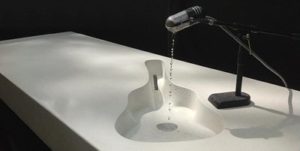
Fabric forming starts in the creative part of your mind. The armature is the most difficult part, as you have to be able to picture the negative space that will remain after the mold is gone. Beyond looks, you also have to make sure that your sink design will function. You have to make sure that it will drain!
Also, sanding should be considered in the design of your piece. If you create tight areas or a lot of movement, you will have a lot of hand-sanding to do and this can take some time and effort. The easy way to account for this is to make designs with simple lines and broad curves. If you get into more complex designs, make sure you charge accordingly to cover the cost of the added labor.
To make your mold, you will start with a flat board for the base. Melamine at 3/4 inch will be fine, but if you plan to reuse the mold, plywood will last longer.
There are several ways to build the armature. First, decide if the sink will be flush with the surface or drop down into the countertop.
 |
 |
 |
|
Flush design
If the sink is to be flush, you will cut the base to the size of the sink you desire, and leave the edges at 90 degrees.
You will cut a hole in the countertop mold and set the sink into it, securing it in place. Once this is done, you will seal the gap between the sink mold and the countertop mold with Bondo filler, sand it smooth, then apply a coat of Bondo-resin mix and sand that smooth. This is of course after the sink mold is complete.
Note: Another option is to pour resin over the top of the whole mold, sink and countertop, and let it level out. This will give you a flawless transition between the sink and the countertop in the final piece.
Drop-in design
In our example sink, we went with a drop-in style, tapering the sides of the mold so that it will release. For a sink that will drop down into the countertop (our mold is designed for this) you will taper the sides to a minimum of 5 degrees, which will give you a good release from the concrete after casting. If the sides are at 90-degree angles, you may have a harder time removing the mold from the casting. For our example sink, we cut to about 30 degrees to avoid the line of the base showing through the fabric.
Note: You can use a router to round over the edge of the base. This gives a nice curve at the sink rim. It’s a good look that offers an easy release from the concrete.
Note: Be aware that the board you choose needs to be strong, which is why a minimum thickness of 3/4 inch is required. As the resin cures on the fabric, it shrinks. If it shrinks enough it can pull the mold in and warp the base. This happens in normal curing, but it can be worse if you run your resin hot (use extra hardener). You can get low-shrink resin, but it can be harder to find and more expensive. If the mold does warp, just use screws to pull it down to the countertop mold and seal the gap with caulk or plasticine.
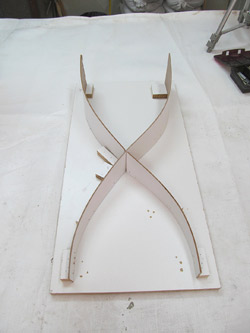
The armature
Once the base is ready, we can move on to building the armature. This is where really thinking outside the box can help you to come up with some unique ideas. The wonderful part of this process is that you can use just about anything to do it. I have seen wood, metal, plastic, junk from the thrift store, branches and even rocks used to make armatures. The design is only limited by your imagination.
Stretching the fabric
Once the armature is complete, it is time to apply the fabric. This is where knowing the design elements will help you choose what type of fabric to use. The three basic types of fabric you will use will either be nonstretchable (we don’t use this much), stretchable in one direction (fleece is like this) or stretchable in two directions (Spandex-type material).
For our sink, we will have the shape stretching in several directions, so we used a fabric that was stretchable in two directions with a tight weave (which helps keep the resin from soaking through). We used a Spandex-type material.
As I stated before, most types of material can be used for this process. Doing tests on different fabrics will give you an idea of what you can do with them. Even loose-weave fabric can be used, although it can waste a lot of resin. Fleece is most commonly used for regular sink molds but can be limiting as it only stretches in one direction and requires a lot of material to build up the surface.
Also, see if your fabric has texture or designs in it. The patterns may have to be sanded out to get the right finish. Or, they can be incorporated to the design.
Note: Do your tests. Some fabrics may seem perfect but do weird things when wet with resin. Some of the very stretchy fabrics can sag more than you want them to. They seems tight enough when you stretch them, but the resin softens the elastic and causes them to sag or wrinkle. Best to make sure that the mold is stretched very tight to help avoid this, unless the design allows for this movement.
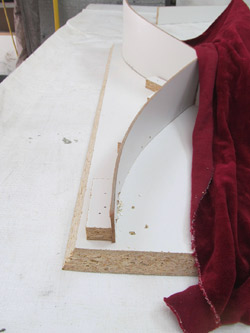
To start, lay your fabric over the armature and pull it a little tight. Cut off any excess fabric, but be sure to leave a minimum of 5 inches around the outer perimeter of the base mold so that you have enough material to pull and staple to the base. Any excess will be cut off after the material is stapled in place.
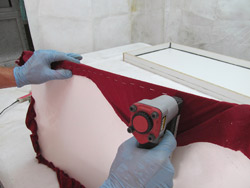 Now that the material is cut, we can begin stretching. As the material is stretchable in two directions, we will need to be aware of how we stretch it. If you pull from only one side it can affect the lines of the mold. Start by pulling from two opposite areas and stapling them. Then, pull the other opposite sides taut and then staple them. You now have the material stapled at four points in a “plus sign” pattern.
Note: Staple so that the staples are perpendicular to the direction in which the material is being stretched. Otherwise, the material may tear out.
Once the four points have been locked in, you can begin to stretch the remaining material and staple it into place. As you do this, be sure to continue to stretch adjacent sides evenly. Again, this will encourage uniformity in the fabric and the final casting.
 Staple the material just like you were doing upholstery, in a straight line and with all staples very close to each other. This will help prevent areas from sagging when the resin goes on or from wrinkling during the curing of the resin.
Once the material is all stapled, you can cut off the excess beyond the staples. This will be necessary before applying the resin, as it will be harder to cut off later if there is resin on it. It will also help your piece to sit flat, though some sanding will be necessary as resin drips will occur.
Your mold is now ready for you to apply your resin.
 3. Applying the Resin
Depending on the fabric, you will need two to four coats of straight resin before applying the Bondo-resin mix. The objective is to harden the material enough that it only flexes minimally when you touch it. If you do not apply enough resin, you run the risk of the mold not being strong enough and possibly pushing or cutting through the material when you are sanding.
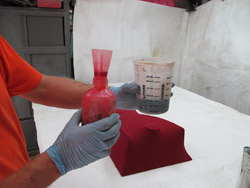
To start, you will mix your resin with 1 percent MEKP hardener — typically, 10 cc (cubic centimeters) to 1 quart of resin. Depending on the size of the mold, 1 quart may be needed for the first coat as the material will soak up the resin. Subsequent coats can be less thick, as you will now be building up the resin and it will not soak in as much.
After measuring the hardener, add it to the resin and stir very well. I recommend mixing by hand as opposed to using a drill mixer. This will help prevent heating up the mix, giving you a little more working time. While mixing, be sure to scrape the sides and bottom so that all your resin is mixed with the hardener. If it is not, you can have areas that will not dry. (If this happens, you can apply another coat of resin with a little more hardener on top of the last coat and this will help to heat up the wet areas that did not get mixed well.)
 Polyester resin cures with heat, not air. Air can slow the curing dramatically, so do not put a fan on sticky resin — it will not help.
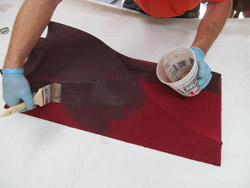
Once it’s mixed, you can apply the resin using a 3-inch chip brush. Try to use the 3-inch, as the 4-inch typically has more bristles and will not apply the resin as well. Work fast! The resin can kick off on you and you may lose the mix if it begins to set up too fast.
Note: For measuring the hardener, you can purchase a measuring bottle from a fiberglass supplier. This is much easier, quicker and more accurate than using the drop method (adding 10 drops of hardener to one quart of resin).
 Note: You can step up to 2 percent hardener for quicker curing or if the temperature is less than 60 degrees. Be warned — you will need to move quickly with 2 percent as the resin will kick off much faster. You can also run the risk of the fabric wrinkling on you if it is not stretched tight enough. As the resin cures, it shrinks. If it cures too fast it can shrink and warp the fabric. (If this happens, don’t worry — you can use Bondo to reshape the area.)
Note: Typically, it will take 15 to 30 minutes for the resin to kick off. For quicker setting times you can apply heat to the surface to get it to kick quicker. Or, set it in the sun if this is an option.
Note: You can also use a cup gun to apply your resin, but be aware that you will need a well-ventilated area to do this as the gun will create a cloud of resin that will get on everything. Best to do it outside if you can. This method is not always quicker, and you want to make sure that the resin is applied evenly or you will run the risk of wrinkling the material.
Note: When your resin starts to gel on you but is still brushable, you have only a few minutes left to work with it. Once it turns to jelly, you are done — throw it away. It is much harder to sand and touch up an area of jellied resin than it is to just apply another coat.
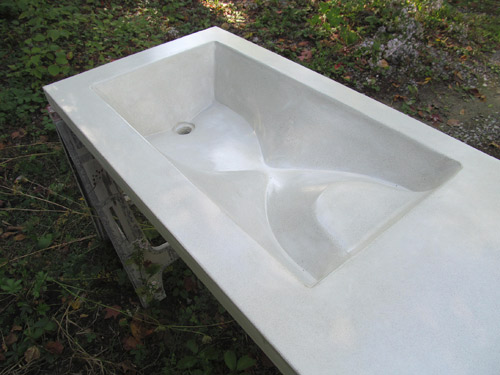
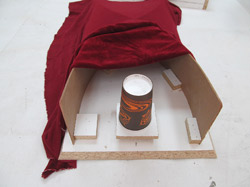
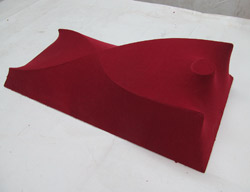
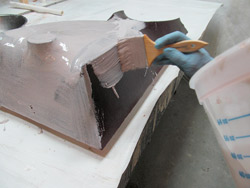
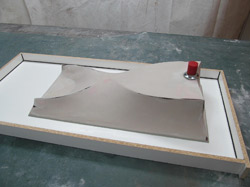
 For our sink, we decided to add another curved element. This is the reason we decided to use a fabric that stretches in two directions. Once the first coat of resin was applied, we created a soap shelf area by using a can with some weight on it to pull the fabric down to a circle. By using material that stretches in both directions we are able to tweak the design a little more than if we were using a one-way stretchable material like fleece.
The weighted can was allowed to sit on the fabric for the next three coats so that it would hold its shape. We waxed the bottom of the can with a mold wax and set it right into the wet resin during each coat. We used concrete blocks we had lying around to give weight to the can until the material was hard enough to keep its shape.
 4. Mixing and Applying the Sanding Coats
After the first coats of resin are on and hardened, you can apply your Bondo-resin mix to get a sandable and workable surface.
Here’s a recipe for making the mix:
Add one part resin to one part Bondo. Always add the Bondo to the resin — this will allow you to get an accurate measurement and will make mixing easier.
Mix thoroughly until the consistency is creamy. Make sure you scrape the sides and bottom to ensure all elements are thoroughly mixed. If you are worried about it all being mixed thoroughly, you can mix, then pour the mixed material into a separate container and mix again.
You can use a drill and a small mixing paddle to stir the two parts together, though doing it by hand with a stir stick works just fine.
Once the two parts are mixed together, add your resin hardener (MEKP, or methyl ethyl ketone peroxide) and mix it in good.
Once the resin hardener is in and mixed, add the Bondo hardener and finish mixing. Be sure that it is mixed in thoroughly or you can get soft uncured areas on your mold.
Adding the resin hardener first will give you a little more working time. The Bondo in the mix will firm up more quickly than the resin, which is why we mix its hardener in second.
Also, be careful with the amount of hardeners you use. This mix will kick off MUCH more quickly than the resin mix. Still, be sure to use enough, or it will not kick off and you will have a gooey mess. The resin mix will still be 1 percent to 2 percent hardener by measure, and the Bondo is also at 1 percent to 2 percent, but you have to eyeball this one. This may take a little practice.
Note: A surfacing agent (wax) can be used in some of your coats to help aid in sanding. The surface is designed to stay tacky so as to stick to subsequent coats. This can be hard to sand. You can add the wax to your sanding coats to help them dry — polyester resin is air-inhibited, and the wax seals off that air so the resin will cure tack-free. If you use wax, you will need to sand between each coat or use acetone to remove the wax, or else the subsequent coats can delaminate.
Once you have mixed that material, you can apply it to the mold. This can be done with a 3-inch chip brush. You want to build up the material on the mold, but be aware that it may run off of your vertical areas. If this happens, just wait a little bit and brush the material back up on the sides. As it cures it will begin to stiffen and hold to the vertical areas.
Note: You can also do a mix with less resin and more Bondo. This will give you a stiffer mix and allow the mixture to stay vertical better. However, building up several thin coats is the better option, though it may take you more time to get to the desired thickness. You can also add a fumed silica such as CAB-O-SIL to the mix for its thixotropic properties. This will also help the resin to hang on verticals.
Note: You can use a putty knife to spread the mix around. If you are getting brush marks, apply by brush and run a putty knife over the surface to smooth it out.
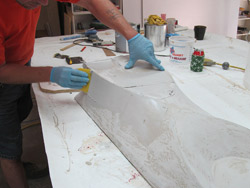
Allow the first coat to cure fully, then do a light sanding. The material underneath will have created a texture on the surface and we want to knock that down before we proceed. It is not necessary to sand all the way to a smooth surface as we will be building up more layers of the Bondo-resin mix and will sand each coat as we go. You can sand with 60-grit sandpaper to knock the surface down quickly.
After sanding the first coat, repeat the process and apply several more coats of the mix, sanding in between, until the mold is rigid, with minimal or no flex and enough material applied that you can sand without going through into the fabric.
 Sanding, sanding, sanding and done
Once all your coats are on, do a final sand to 120 grit. Then apply a layer of regular Bondo. This will allow you to fill in any low points or any possible wrinkling that may have occurred. When this coat hardens, you can sand to 120 again and work the surface into the final shape. Apply more Bondo if necessary to build up any area that is still too low or contains any imperfections.
Once you’ve sanded, apply one to two more coats of Bondo-resin mix and do a final sand to a minimum of 220 grit and preferably to 320 or 400. This is your final surface that you will cast against.
Concrete will mimic the casting surface. It will show any imperfections that are not fully sanded out. This includes sanding marks, dimples, run lines and so forth. Inspect the surface well before you think you’re done sanding.
 Tweaking the mold with additions
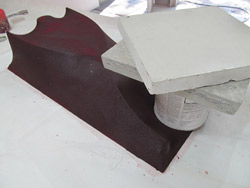
For our project we added “cross sections” at the drain area and Bondoed them in to keep the curve that we wanted for the design. This was only achievable this way. If the cross sections were put in under the fabric, we would have lost some of the curve that we wanted at the drain area.
We hot-glued the cross sections in, spread Bondo to transition the area, and sanded it to the desired form. This was done in several applications, building up the area each time until the desired shape was achieved. We then coated the cross-section installation with the Bondo-resin mix and finished it along with the rest of the surface.
Not all armatures you make for your sink need to be under the fabric. You can create a basic shape with fabric-forming and then add to that shape using other tricks like shaping Bondo.
Note: We applied the Bondo filler at the drain after our first coat of Bondo-resin mix. We applied about 80 percent of the total amount of Bondo we wanted to use, then applied another Bondo-resin coat over it. This allowed us to see where we needed more Bondo to even out the surface.
5. Wax
 If you feel the surface is what you want for a final result, then you are finished. You can place the sink mold into the countertop mold and attach it.
Then apply a layer of caulk or a bead of plasticine to the perimeter to seal the gap between the two molds. Apply your drain knockout, weather slit, and whatever else your design dictates and wax the full surface. You will apply two coats minimum of mold-release wax to assure that the mold will not stick. Be sure to buff the wax after it dries.
Note: If you do not have mold release wax, a 100 percent carnauba wax will work. Some waxes can melt under the heat of the curing concrete, so do a test first if the wax is not 100 percent carnauba.
In the next issue of Concrete Decor, we will go over the tricks of free-flow forming, allowing you to create those one-of-a-kind designs that previously you may have considered too difficult.
Tool List
• 1-inch, 2-inch and 3-inch chip brushes.
• 1-quart and 2-quart plastic mixing buckets. You can get these at the box store, but you can find them cheaper at the auto-body supply shop.
• Rags or heavy-duty paper towels.
• Mixing sticks. Plastic is best as it will not absorb your hardeners.
• Respirator.
• Palm sander or dual-action sander. There are two different types of backing for sandpaper: sticky-back and Velcro. Make sure that you get the right type of backing for your sander.
• Upholstery stapler. A simple pneumatic stapler that shoots T-50 staples is easy to get. A pneumatic stapler is much better than a hand stapler, which will work but leave you with sore hands at the end of the day.
• Boxes of vinyl gloves. Do not use latex, as they do not hold up well with the resin. The cheap vinyl ones are the best, as you will throw them away after each mix.
• Cup gun. This is not necessary for smaller projects, but it can be helpful for bigger molds. I would suggest getting used to the process before you run out and spend $150 on this tool, unless you are planning on doing larger projects right away.
• A couple of pairs of all-metal scissors. You will want one for dry cutting and one for cutting material that has resin on it. You can clean these with the acetone — just be sure to do it before the resin dries. Plastic-handle scissors may melt or soften from the acetone.
• Fiberglass rollers. These are also not necessary, but they are handy to have around for some projects.
• Metal and plastic Bondo knives. Get these at the auto-body supply shop or a tool store like Harbor Freight Tools. You’ll pay way less than you would at the box stores.