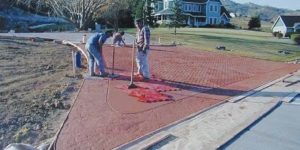

Stamped concrete can be a beautiful addition to any property. However, poorly textured concrete can be an eyesore for the owner and a headache for the contractor. Often, certain spots are simply “missed” while stamping, and contractors don’t realize it until they wash the slab before sealing. Other times, the concrete may have set up to the point where getting good texture is next to impossible.
Experienced contractors have seen these scenarios and many have learned from their mistakes. Over the years I’ve learned several tricks that will help achieve better texture. Some of them may seem crazy or contrary to what you normally do, but each was very valuable to me during my contracting days.
1. Stamp early.
In my 18 years as a concrete stamper, my crew only used a tamper a handful of times. We didn’t need it because we simply walked the stamps into the surface. Sure there was occasional stomping when things got tight, but in my last several years of contracting I didn’t even own a tamper.
Early on, I discovered improperly used tampers contribute greatly to “blowouts.” The sudden downward pounding action of a tamper, especially on tight surfaces, bows the stamp’s center down. This in turn flexes the stamp’s edges outward which pushes against the concrete’s surface, causing it to flake away (blow out). Stamping with only foot pressure eliminates this sudden flexing action. But how did we walk stamps in? The answer is simple. We started stamping early.
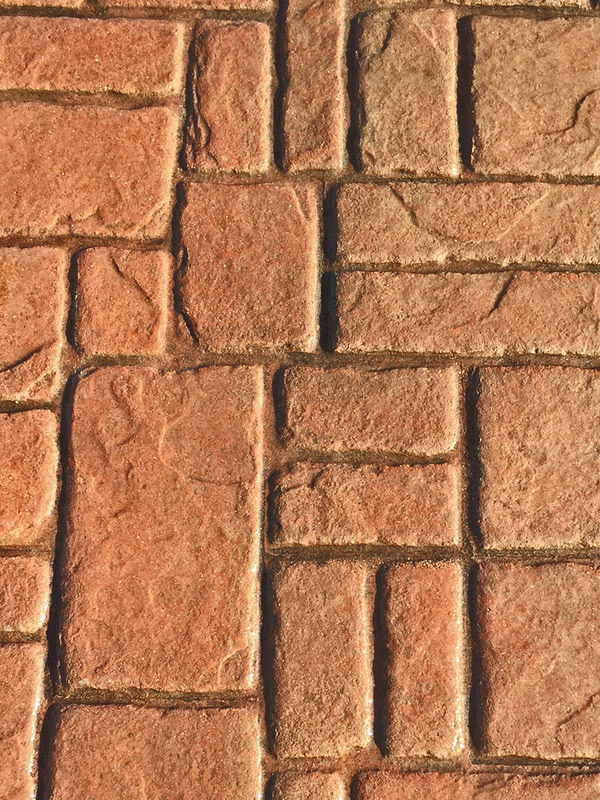
Most contractors wait too long to begin stamping. It would be better if they began stamping as soon as the concrete could bear their weight without creating “bird baths” (oval depressions in the slab which collect and pool rainwater). The finished stamped slab should exhibit almost all of the texture seen in the actual stamping tool.
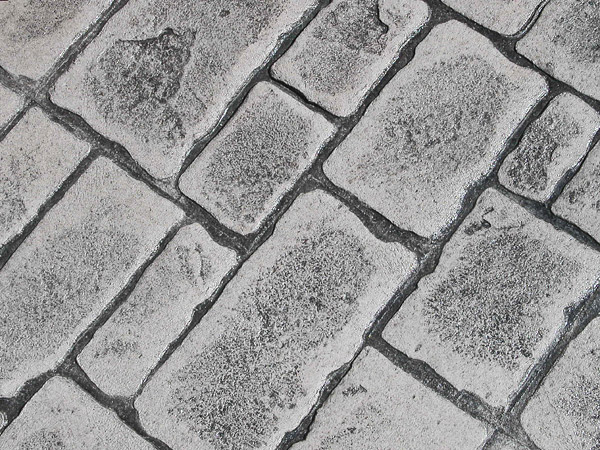
Most often, much less texture is seen on the finished surface than on the stamps, indicating the stamps weren’t properly “bottomed out” against the slab. Usually, it’s because the concrete is so hard that the stamp’s molded joint lines hold it above the slab’s surface, rather like table legs. When this happens, there’s ample texture in the middle of a stamped “stone,” but little to no texture at the edges. The texture should be evident all the way to the joint.
When concrete is still soft, it’s much easier to properly bottom out the stamps. However, there’s a fine line between stamping at the right time and starting too soon. If workers sink into the slab instead of just bottoming the stamps out against it, they have begun stamping too soon.
2. Use evaporation and set retarders.
Often, stampers are fooled into thinking the slab is hard enough to stamp because the top surface has crusted over. The concrete underneath, however, is still very soft. When they start stamping, workers sink deeper than expected and the surface exhibits a rolling, “pillowing” effect and the crust cracks.
To keep the top from drying out prematurely, apply an evaporation retarder such as MasterKure ER 50 from Master Builders, or a similar product. When sprayed on the floated concrete surface, this liquid forms a thin film which holds mix water in the slab longer. It slows evaporation, not set time. Evaporation retarders shouldn’t be confused with surface-set retarders, which are used for installing exposed aggregate or sand matrix finishes.
To keep the concrete from setting too quickly, set retarders can be batched into ready-mix trucks. They slow the set time which allows for additional working time. There are also products such as Fritz-Pak Mini Delayed Set which contractors can add to trucks onsite. When this is done midway through the pour, the remaining load’s set time is slowed, so the last half of the slab doesn’t get away from them before it can be properly textured.
3. Crawl the slab.
Many contractors don’t get out on the slab prior to stamping. They work the edges with hand tools, but the larger field is only bull floated or bull trowelled. This may provide a smooth surface, but bull floats and fresnos are so light they simply skim across the surface, glazing it over. They don’t really “work” the concrete. As a result, the top becomes crusty and hundreds of crusting cracks or just too-smooth texture occurs.
To really get the slab worked up, send a few guys out on kneeboards just before the stampers begin. Their weight, combined with the action of vigorously floating the slab (not troweling it), works up the surface. The concrete on top of the slab is the same consistency as the concrete throughout its depth, and it stamps much easier. This is probably the simplest way to achieve dramatically improved results. Hand floating eliminates crusting cracks and provides a slightly grainier finish, which is more attractive and slip-resistant when sealed.
4. Carry a textured roller in your truck.
If the slab starts to get ahead of you, it can often be saved by rolling the entire surface with a textured roller ahead of the stamp crew. This is a quick and easy way to get texture. Let’s face it, no matter how hard the slab is, you can almost always see the joint lines left by pattern stamps but often not any texture. If the rolled texture is already there before the lines are stamped, the slab will usually be acceptable.
5. Wear texture shoes.
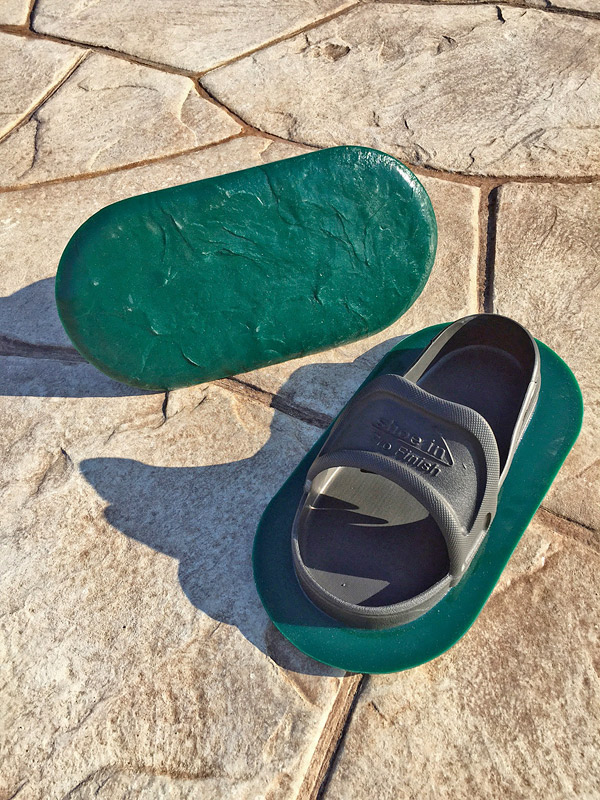
A great tool which allows a stamper to get out on the slab sooner is a pair of texture shoes. Butterfield Color manufactures the finest version of these shoes that I’ve found. These easily slip over a pair of work boots and are held in place by friction — no straps or buckles to deal with — and are like a pair of oversized sandals. The rigid molded bottoms, several inches larger than a man’s foot, act like a pair of snowshoes. They distribute the wearers’ weight over a larger area, allowing them to walk on soft concrete without sinking in. The molded shoe bottoms exhibit the same textures found in many stamping mats, so if workers accidentally step off of a stamp and onto the concrete, they don’t leave a telltale tread mark.
Texture shoes are especially effective when stamping with texture skins. Skins are so thin and flexible that it’s easy to get bird baths by stamping too early. Texture shoes alleviate this problem and allow one to get all the texture without creating bird baths.
6. Start in the middle.
I learned this most-unusual tip years ago from Steve Smith, a fellow contractor from Maryland. When he told me about it, I thought he was insane. However, once I began doing it, my stamping immediately became more uniform.
Starting on the center line of the pour, two people begin stamping in opposite directions. This eliminates the common problem of having drastically different texture on opposite ends of the slab (as often happens when concrete sets up too quickly). Often there’s great texture where the stamping begins, but almost none on the far end of the slab where the concrete was getting hard.
This unorthodox procedure of starting in the middle requires contractors to have more stamps than normal, but it’s a great way to get consistent texture throughout a slab. It’s especially beneficial on slabs which will be extended with more stamped concrete on a later pour.
7. Use liquid stamp release.
When stamping with powdered antiquing release, it often appears a particular stamp has been tamped in. However, when washing the surface the next day, contractors sometimes find the stamped impression was only in the release, not the concrete. By then, it’s too late to stamp any texture and they get a lighter colored, shiny spot surrounded by areas with good texture.
To eliminate this, try using a clear liquid release (often called bubblegum because of its smell). With clear liquid release, stampers can see exactly what texture was achieved. In addition, clear liquid is a vastly cleaner product with no unhealthy airborne dust.
The problem with this product is that it does not offer the added benefit of a secondary, antiquing color. Many contractors solve this problem by adding some powdered antiquing release to liquid release and using this mixture to antique the slab after stamping. This isn’t a good practice, as none of the antiquing color is embedded into the paste. It simply lies atop the slab, held in place by the sealer. When the sealer flakes or wears away, so does the antiquing color, leaving a blotchy surface behind.
A far better way to antique after using liquid release is to use something like Butterfield Color’s Perma-Tique, a pigmented, powder you mix with water. The day after stamping, apply it to a dampened surface, where it will puddle in low areas of texture and in the stamped joints.
Because it is applied to dampened concrete, the pigment flows off the high spots and colors only the low areas. This provides a well-defined contrast between the concrete’s antiquing color and the base color. When dry, Perma-Tique forms a tenacious bond with the surface that may withstand years of weathering, even on neglected, unsealed stamped concrete.
So there you have them — seven tips that can yield far better texture while stamping. Although I was reluctant to try some of them at first, these simple tricks took my company’s stamping to the next level. They can do the same for yours.