


 With its computer-based liquid coloring system, Solomon Colors assumed a lead role in using technology to make life better for the concrete industry. Even the concrete truck drivers like it!
The Largest U.S.-owned producer of iron oxide pigments is Solomon Colors. Based in Springfield, Ill., the company got its start in the 1920s. Robert C. Solomon, the operator of the Panther Creek Coal Mine Co., decided that the black, carboniferous slate that lies above the coal seams would make a good color by-product. Solomon Grinding Service got its start grinding the slate from the mines. As well as red iron ores from Michigan and yellow ochres from Georgia.
For some 50 years, SGS operated as a toll or contract manufacturer, its products sold by others. But in 1970, Solomon Colors began marketing its own name brand products. Then in 2000, the firm sold its pulverizing mill division to focus on color. Rich Solomon, vice president and grandson of the founder, explains that when the company was started it used 100 percent natural iron oxides.
Today, 90 percent of the color pigments Solomon Colors manufactures are synthetic iron oxides. And its colors come from around the world from countries such as China, Brazil and Poland. In addition to various locations in the United States. From a basic combination of four iron oxide colors — yellow, two reds and black — Solomon Colors has expanded its color catalog to more than “500 standard pigment shades and over twice that number have been made for architects and contractors wanting a special color,” Solomon says.
Finding success with liquid color
Integral color has always offered ready mix producers and contractors a good mark-up opportunity. But while dry pigment can give you very uniform color, it has its disadvantages and liability can be high. So, in the late 1990s, a team at Solomon Colors set out to use technology to make integral color easier and reliable. Bill Dube, general manager of Solomon Color’s Pacific Division, was part of the team, which also included systems analyst Mark Gray, company chemist Steve Brown and Vice President of Production Charles Kreutzer. Dube says the idea of liquid color pigments was not new. A system developed a decade earlier by another company failed. What made Solomon Color’s ColorSelect System different was that it was specifically designed with the ready mix producer in mind.
A New Systems Start
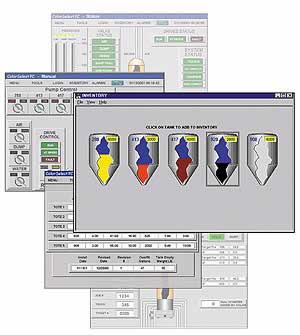
In 1998, the first two ColorSelect systems were installed in southern California. “We started with a programmable logic controller, which evolved into a PC-based system,” Solomon explains. “In the beginning it was a hard sell — there were skeptics. [But] the system has also made converts to integral colored concrete.” Both systems are still out in the marketplace, but the PC system has additional advantages, including the ability for a Solomon Color technician to access a ready mix producer’s ColorSelect computer via modem to deliver a custom formula. Today there are nearly 90 of the systems in use. “Liquid is not a miracle pigment. What the liquid system has done is give ready mix producers verification. The system does all the calculations, and the operator can see from the printout exactly what went into the truck,” Solomon adds.
Since its debut, Solomon Color’s ColorSelect product has been used in many residential and commercial projects. Such as flatwork, cast-in-place and tilt-up applications. Including high-profile projects like the Stardust Casino, Caesar’s Palace and the MGM Grand Hotel in Las Vega. Even Autopia at Disneyland, reports Dube. “We’ve done thousands of cubic yards with this system with very little trouble. We’ve taken as much human error out of [the process] as possible,” he observes. “The design mix is documented. It makes everyone accountable — the ready mix producer, the contractor and the homeowner.”
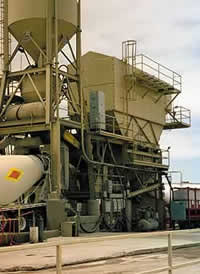
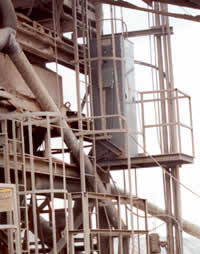
At the ready mix plant
The ColorSelect System went through some initial trial and error, but product demonstrations are winning over ready mix plants across the country. Because the pigment is pre-dispersed in a liquid form, no admixes are required for dispersion. “When it hits the mix, it’s ready to disperse — and it does it quicker than dry pigment,” Solomon says. Solomon admits, “Overall, dry pigment is less expensive, but you recoup the cost in the benefits and advantages of the liquid color.”
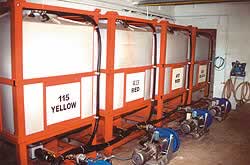 Craig Tieck, concrete plants manager, San Diego, of Hanson Aggregates Pacific Southwest, describes the self-contained system set up: “The color is stored in four totes. Each tote has a pump stationed underneath. A hose then goes from the tote to a pressurized container on a scale. The totes pump the color to the containers and then weighed cumulatively. A touch screen is used to enter the [color] formula, the truck number, the percent loading, the sack content and the yards. You push the start button and the computer does the work.” The color is then discharged into the truck. While the normal loading of rock, sand and cement takes place. “It takes two minutes to do the Solomon process [and] defaults are built into the system enabling you to make corrections if an error is detected,” he adds.
In Santa Ana, Calif., Rich Gibson, vice president of operations at Standard Concrete Products Inc., has been using the liquid ColorSelect System for about three years. He says, “The seller of the system is the saving on labor. We do a lot of color — the old process we’ve used for some 50 years, but with dry color there’s a lot of chance for error. [With ColorSelect], you have one person handling the color, so there’s less chance for error, as when drivers were involved.”
Multiple Benefits
 Accuracy, better quality control and timesavings are other benefits observed by Ron Reed, operations manager of Nevada Ready Mix Corp. in Las Vegas. “It’s cleaner, there are less injuries and we don’t have EPA issues or weather-related storage issues with the system,” he reports. Moreover, “Customers see a better color dispersement. We don’t get streaking. We can match whatever color [the customer] wants and there’s no leftover or shortage issues.”
“It’s a win-win for producers and clients,” according to Vince Bush, ready mix general manager with Rinker Materials Corp. in Las Vegas. From an inventory standpoint to consistency of the loads to safety advantages, Bush says, “We wind up with increased sales. We did an open house to introduce [clients] to the system. We offered an enticement to have them try it and they have kept buying. Whenever you can get enhanced value for the client, there’s an enhanced margin for the producers.”
Comments from the field
Advantages of the ColorSelect System also trickle down to the contractor. “I don’t have to call well in advance and I don’t have color left over — I just call in what I need and [my ready mix producer] batches it,” reports Frank Klemaske, executive vice president of T.B. Penick and Sons Inc. in San Diego, a firm that has been in business since 1905. Klemaske says you have to be careful with new products and go through a learning curve. But he hasn’t seen any failures since they began using the ColorSelect product.
Elden Peterson, president of Peterson Brothers Construction Inc. in Babrea, Calif., specializes in decorative concrete work. About 70 percent residential, the rest in commercial work. He doesn’t use Solomon Colors exclusively. However, he says he appreciates the uniformity in color he gets with the ColorSelect System. He also appreciates the supportive role Solomon Colors maintains in the industry. “Solomon Colors is a good ally for both the contractor and the supplier. The company understands the industry and the pitfalls. Often it may get squeezed between the contractor and the supplier, but Solomon Colors is diplomatic. The company goes above and beyond to get something resolved.”
A holistic approach
Its main product line is color pigment, but Solomon Color has expanded its offerings. These new items include stamped concrete stamps, color release products and dry shake color hardener to complement its color expertise. “We want to offer one-stop-shopping. There are a lot of new techniques for concrete and we’re always looking for ways to make the job easier for contractors,” Solomon says.
Working hard to be an industry leader is a lot of work, but Solomon says, “Sometimes you’re at the right place at the right time. In 10 years, we hope to have ColorSelect systems in every state, so when an architect specifies a specific color it will be readily available.” With demand for its many products spreading beyond the United States and Canada, Solomon Colors is scheduled to open its second full-production facility, in Rialto, Calif., in April 2002.
Technology. Isn’t it great for business?
For more information about Solomon Colors and its ColorSelect System, call (800) 624-0261 or visit the Solomon Colors Web site.