

Concrete is one of the most revolutionary building materials of modern times. It has given the human race the ability to build sound infrastructures for the masses and has reshaped the world as we know it.
Steel, another revolutionary building material, has played a key role in aiding the performance of structural concrete in industrial building practices.
It’s no wonder these two industrial materials complement each other so well in a more refined sense, too.
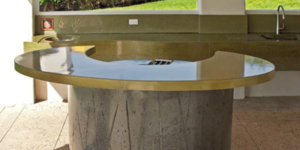
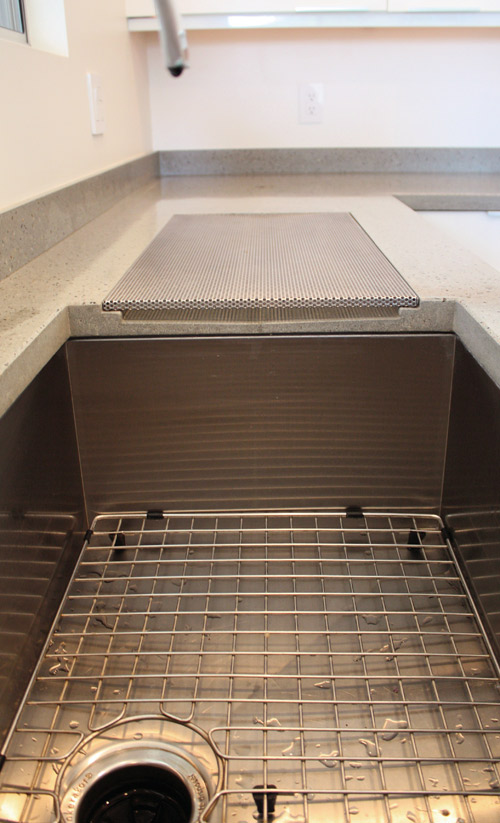
Combining concrete and steel aesthetically and architecturally to create furnishings and accents opens up new opportunities. Steel can enhance the natural beauty and characteristics of decorative concrete just as concrete can enhance the natural beauty and characteristics of steel. Even small detailing, such as a stainless steel drainboard and straining shelf in a concrete kitchen top, can change the entire look of a kitchen while at the same time protecting your concrete from wear.
I have always jumped at any opportunity to couple these materials, as it gives me the ability to get more creative with my concrete. This flexibility in design can open up a whole new avenue for getting jobs.
More than likely, potential clients that show interest in concrete are also open to incorporating other materials, such as steel, into a job. At least 50 percent of my jobs include some type of steel fabrication.
Getting familiar with the basics of steel fabrication is far easier that most think. With the pass of a welding tool you have instant permanence, unlike with the multiple-day processes required in concrete fabrication.
Getting to know your arc welder
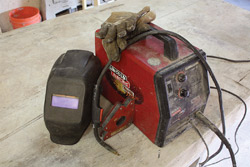
I can remember the first time I gave welding a shot. I had a home project that involved some steel and required some welding, so I set off to a home improvement store and purchased a Lincoln Electric 3500HD 110-volt flux-cored arc welder (FCAW). As usual, I was anxious to get started. I knew waiting until morning would have been more rational but my curiosity got the best of me. So, stubborn and anxious, I found myself welding for the first time in the dark in spitting rain. This did not make learning any easier, but I did get the job done.
The truth is most people can get professional-looking results after just a few hours sitting behind the trigger. However, I strongly recommend you make your first attempt in a controlled setting. The welds on my first attempt were sound, but far from beautiful.
I recommend starting with a 110-volt FCAW (flux-cored arc welder) that can handle material thicknesses up to 5/8 inch. Flux-cored arc welding creates an arc between a continuously fed consumable electrode and the work. The heat of the arc fuses the surface of the base metal with the melted end of the electrode.
Good brands to look for include Miller and Lincoln Electric. Replacement parts and equipment will be easy to find locally. The smaller 110-volt FCAWs are a good portable size for field welds when necessary, and they will also work well for small projects and details.
With flux-cored arc welding there is no gas required, unlike with metal inert-gas welding. Some of these FCAWs are convertible into a MIG welder, and some come with a conversion kit.
The wire used in FCAW contains a small core of flux in its center. The wire melts when welding and the flux liquefies and floats to the top of the weld to shield the weld puddle from the oxidative effects of the atmosphere. This is also the purpose of the gases used in MIG welding, which is why it will not work as well in windy field conditions — the gases will be blown away from the weld puddle.
FCAW will require a little scraping and brushing when done to remove excess flux spatter, but that’s easy. When you’re FCAW welding, an antispatter spray will lubricate the surface of the steel to help block the bond between the excess spatter and the steel. This makes cleaning off the excess spatter much easier. MIG welds tend to be cleaner due to the nonflux cored wire used.
I recommend wearing a long-sleeve shirt to cover your arms to limit spatter and UV burns created by the arc during welding. I have burned myself many times, and still do on occasion. I would also highly suggest stepping up to an autodarkening welding helmet, which will make positioning your gun to your weld points a lot easier. Magnetic squares are very important in aiding, positioning and holding your steel in place before welding. Clamps are also needed to hold your steel in position and square.
Here are some other important tips:
The wire type you need for general decorative use: flux-cored, 0.03-inch diameter.
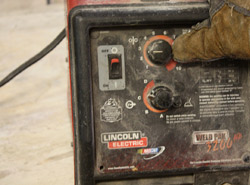
Welding wire speed is crucial, followed by arc strength. I never set my wire speed above 3 and have found my sweet spot to be around 2.5 with my unit, but this may vary by welder.
To set the right arc setting for sheet metal, start at the lowest setting and work your way up as the thickness of the weld increases until you get a good weld puddle moving across the material with no burn-through, which is common in very thin steel.
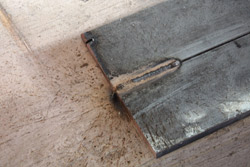
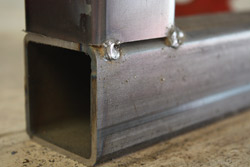
Tack all four corners of the piece to be welded before making full welds. The weld will heat the material and pull it in the direction of the weld, warping it out of proportion. The tacks will prevent this from happening.
When welding for the first time
When you attempt your first significant weld, there are some very essential details you will need to know. One is to make sure you ground the welder to your steel with the welder’s ground clamp. Also, you will need to set the wire speed and arc strength. Make sure you are wearing welding gloves and a welding helmet. Never look into the weld without the proper lenses as this can damage your vision. Use your magnetic squares or clamps to set the position of your steel.
The arc strength you want is determined by the thickness of the steel being welded (and not the thickness of the weld). If the setting is too high and the steel is too thin, the arc will just burn through. So start out low with thin metals and try higher settings with thicker metals.
You will want to start off with about 3/8 inch of wire leading out of the tip of your gun. Try to hold your tip to this distance when welding, so you get maximum arc for better weld penetration. Make sure you do not touch your gun tip to the material that you are welding, as that will short out the arc and stop the weld. If you hold the tip too far out you will not get a good arc either, which will lead to a poor weld, so stay steady and tight.
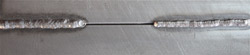
It will feel a bit strange looking through your mask at the weld your first time, so bring your face in close and focus on the weld. Squeeze the trigger, and the wire will arc once it comes in contact with the material. You will be looking for a nice silvery puddle of molten steel lying alongside the bright orange arching point. Take a bit of time to get a feel for these visual references.
When I start my puddle, I like to hold still for the first second. Once my puddle is started, I move it slowly across my weld joint. Remember, this is not a race, and you need to move your gun SLOWLY across the surface.
If you have the wire speed too high, the wire will not be fully molten and will want to lightly kick the gun back and away from the weld. When you’re doing it properly, you should be hearing a nice consistent crackling sound from the arc while making the pass.
Your weld should be free of holes. If it has holes and gaps, you need to slow down your movement across the material to ensure proper infill. It may take just a while to find your welding sweet spots, proper passing speed, wire-feed speed and arc strength.
Just keep at it and practice. Before you know it you will be able to hone in on that puddle and open up a whole new door of creative possibilities.