 Industry experts agree:Knowing what you’re working with — both internally and externally — is a key to successfully preparing a concrete surface for accepting cementitious toppings.
A slab may look clean and sound, but that doesn’t necessarily mean it is.
If unfamiliar with the original pour, contractors almost have to be concrete detectives before they can begin a job that involves applying toppings.
Even if the surface looks good, what lurks beneath, if left alone, can break the bond between the concrete and toppings and, eventually, cause long-term headaches for contractors. The solution is to prepare well and eliminate surprises.
“Your system will only be as good as the surface underneath,” notes Dean Owen, president of Arizona Polymer Flooring. “As with all specialty coating applications, proper surface preparation is a crucial element of success.”
“It doesn’t matter how pretty the finished job is, if the topping doesn’t stick, who cares?” adds Charles Leland, vice president of SureCrete Design Products. “If you don’t do the best prep work you can, you risk losing the job or having lots of callbacks.”
Start with a walk
Depending on its condition, every concrete surface requires some preparation to create a proper texture, or profile, for applying coatings. A visual evaluation is the first step in determining any problems or concerns with the existing slab and determining the profiling method to use.
“Usually a visual examination will tell you a great deal about the slab,” says Bill Glynn Jr. with Sawtec. “But the most important elements of inspecting a slab are common sense.”
“Walking the floor” to carefully note differences in surface cleanliness, grade and condition is a must. Look for any existing sealers, grease, oil, effervescence, curing materials and dirt that need to be removed. If you find excessive laitance or a weak layer of cement on the surface, the material must be removed down to solid concrete. Coatings and overlays will simply not bond properly to weak concrete.
 A few easy tests can help gauge the slab’s structural integrity. Take a tool, such as a screwdriver or nail, and pry up test areas of the surface that appear loose or soft. Strike a ball peen hammer against the concrete surface to indicate hardness. Hollow spots can be determined by sweeping a surface with a metal chain or golf club and listening for pitch changes.
“They will perfectly mirror what’s below,” contends Leland.
“Invisible problems” below the concrete can be especially perplexing. Some indications do exist. “Cow patches,” black and white patterns in the slab, can be a signal that moisture problems are present.
Evaluating moisture and vapor transmission Determining the moisture content and vapor transmission is critical to maintaining the structural integrity of the slab before any toppings or coatings can be applied.
“Moisture is a huge problem when it comes to surface preparation,” notes Matt Casto, vice president of technical services for Bomanite Corp. “It is extremely misunderstood and must be understood to ensure a long-term mechanical adhesion. Moisture can destroy that concrete stability.” Moisture can basically do three things to concrete. It can hurt the concrete itself when the alkalinity reacts with the aggregate. It can destroy certain polymers, and it can expand to remove toppings from the surface.
Excessive vapor transmission occurs when a water source under the slab is combined with concrete that is unusually permeable. That source could be a high water table, broken water pipe, landscape sprinkler or rain. Overly permeable concrete usually results from a water-to-cement ratio that is too high. The excess water leaves the slab during the curing process and creates capillaries that serve as a pathway for water vapor to be drawn up through the slab.
This vapor collects condensation at the bond line, and that condensation attracts salt and dirt. Eventually, it leads to lessening of the bond. Notes Casto: “Moisture really isn’t the problem. It’s the alkaline salts that it carries. They react adversely to coatings and toppings and can expand or blow them off, no matter how good the mechanical bond.”
The most cost-effective method of determining if moisture vapor is passing through the slab is the calcium chloride test. The test gives a measurement of the pounds of vapor passing through a 1,000 square foot area in 24 hours. Three or less is considered safe. Other methods exist, but they are often cost prohibitive.
In recent years, manufacturers have begun to introduce products onto the market that can help with solving moisture problems. Applied Concrete Technology Inc., for example, now sells its Protecrete Densifier that penetrates into the concrete to form a permanent gel-like barrier which can never be worn away. In one application, the product holds the hydrates in, thus waterproofing the concrete internally as well as externally.
“Basically it’s a do-all product,” notes David Johnson, president of Applied Concrete. “It’s essentially fixing the concrete.”
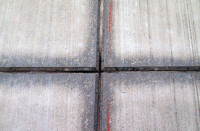
Honor the cracks
It’s a fact of the business: All concrete surfaces crack. Improper sub-base compaction, jointing practices, poor finishing and unsuitable curing can contribute to unsightly random cracks. It is important to repair cracks because, if left, they will spread and cause concrete to become unstable. Coatings, too, will fracture along joints or cracks that are not properly addressed.
The key in making repairs is to determine the kind of crack you’re dealing with. A cosmetic crack, which does not go all the way through the slab, will be addressed differently than a structural one.
Cosmetic cracks are usually easiest to handle. The contractor should “v” cut the crack and seal it with a hard filler material. Structural cracks are more difficult. Contractors often square cut the crack, and then apply a flexible epoxy resin or sealer. Because there are so many variables to a structural crack, these should be diagnosed on a case-by-case basis, as those in the industry recommend.
Most cracks that occur on slabs are not moving cracks, but some do move or vary in size because of seasonal differences in temperature, moisture levels, stress loads and other factors. Contractors should “honor” those moving cracks by designing their system around them.
“You should let the floor move,” says Sawtec’s Glynn. “Fighting a live crack, attempting to prohibit its movement or, worse, ignoring the fact that it will move, is a losing battle.”
Be a clean machine
Once you’ve got a handle on the slab’s character and condition, and have repaired and solved any problems, the next step is to clean and condition it thoroughly. To ensure a bond between the topping and the concrete, the slab must be absolutely free of dust, dirt, oil, grease, paint, curing components, coatings and all other contaminants.
To determine if a surface is clean, use the “water drop test” by applying a small amount of water onto the floor. If the water doesn’t penetrate into the pores, neither will a coating.
Sometimes cleaning a slab may be as simple as scrubbing the surface with an aggressive nylogrit brush and then applying a commercial cleaner. The surface can then be rinsed with a pressure washer and allowed to dry.
Pressure washing works well for chemicals and oils. Degreasers worked in with a floor scrubber/polishing machine can adequately remove dirt and grime. Detergents and cleansers can also be effective as long as the grease and contaminants are water soluble or emulsifiable by the detergent or cleanser. They work best for removing superficial grease, although more than one treatment is often necessary. High levels of contamination may require grinding.
The use of water in cleaning concrete should be kept to a minimum. Using excessive amounts of water will generally cause unacceptable time delays on a project because of the extended drying time needed before any coating application can begin.
Get a handle on what you’re removing
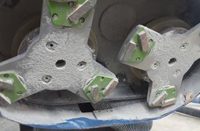
Removing previous coatings and flooring products depends on the type and nature of the material to be removed. Sometimes a mix of different methods can be especially effective. For thin sealers, concrete grinders or brush blasting with a shot blaster are appropriate. For epoxy, mastic and thick coatings, concrete grinders with aggressive cup wheels or scarifiers can be used.
Machines with carbide-tipped slicers can quickly remove thick coatings. Hand-held or ride-on floor scarpers can effectively remove such materials as carpet, parquet flooring and other thick materials. If the surface has delaminated, shot blasting, scarifying or other chipping methods must be used.
Shot blasting works well as long as the material is not rubbery. If it’s too elastic, the shot will bounce instead of fracture the coating. A boon to using shot blasting to clean the slab is that it also provides a profile to receive the bond coat.
Muriatic acid also can be used to clean and profile concrete surfaces. When using acid, it’s safest to start with a minor dilution of about 20 parts water to one part acid, then work up to more concentrated solutions depending on the type of concrete surface you’re washing. Through advancements in technology muriatic acid is now offered in a gel. This gel keeps the acid on top of the slab where the profiling is obviously needed. Remember, when concrete is acid washed, it must be properly neutralized before putting a topping on.
Create a profile that meets the grade
By most standards, creating a proper “profile” is an essential ingredient in the job’s eventual outcome. It basically creates more surface area for the topping to adhere to.
“Profiling is real important in our book,” notes Leland of SureCrete. “It’s one of the keys to getting the cementitious topping to bond.”
To secure that bond, the concrete surface should be rough enough so that a “tooth,” or series of peaks and valleys, feels similar to a 120 grit piece of sandpaper.
A deeper profile than that, however, does not necessarily mean a better bond, cautions Al Slater, product specialist with Blastrac.
 “The bonding process can in some ways be considered a microscopic event,” he says. “A deep, coarse profile can contain micro-fractures that can weaken the integrity of a slab, depending on the preparation process used. Some deeper profiles also have the potential to bleed air as the overlay is being applied, causing fish eyes and pin holes that are ugly and difficult to fix.”
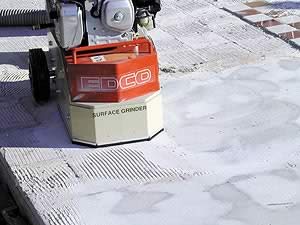
Although many in the industry are split between the benefits of roughing the surface mechanically or chemically, Casto, says each has its place. Profiling the surface mechanically includes grinding, sandblasting, shot blasting and using other tools. Chemical profiling includes acid washing, chlorine washing and other chemical methods to remove surface imperfections.
The preferred method for large or difficult surfaces is mechanical profiling, however. Shot blasting is one of the most popular and cost-effective methods of creating a profile, and is most suitable for 1⁄8-inch or thicker toppings. Scarifying can resurface horizontal surfaces and smooth faulted joints, and cut deep groves into the concrete to create non-slip surfaces. Grinding creates less of a profile but is often used for edges.
Not surprisingly, costs depend on the job
Although a critical component of the job, concrete preparation can cost widely depending on the job type, size and geographic location. On average, however, when the expense of equipment is excluded, the cost in preparing concrete for cementitious toppings can cost anywhere from 5 cents to 30 cents per square foot.
As many in the field well know, in the long run, it’s well worth the money spent.


