


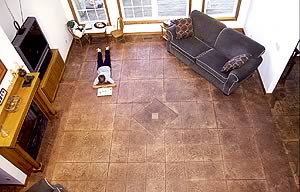
Demand for decorative concrete is booming. Potential customers are learning about it in consumer magazines, on HGTV and at home and garden shows, inspiring them to think of adding features such as stamped driveways, faux rock walls or polished concrete floors to their homes or businesses. If you haven’t received a request for decorative concrete yet, chances are you soon will.
And if you are thinking about expanding into this lucrative niche, stamped concrete is a good place to start. There is a learning curve, but the techniques of imprinting can be mastered if you have a good grasp of the placing and finishing skills needed for basic concrete.
Start off on the right foot
Site preparation and placement of concrete is the same for stamped concrete as it is for any slab. “The base preparation should be the same as for any concrete application,” observes Clark Branum, area manager for Rafco Products. But remember, your sub-base is an important foundation to your decorative work. You want a “compacted crushed rock base with no standing water,” Branum says.
The type of mix and aggregate will vary with the regional requirements for freeze and thaw, as well as structural requirements. Don’t feel shy about asking the experts. “Most people do not realize how many experts they have available to them,” says Steve Johnson, director of marketing for new product development at Solomon Colors. “The first person you should talk to is your ready mix producer.”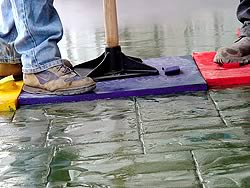
The thickness of the slab depends on the intended use, but typically it is at least 4 inches. Reinforcements should be placed according to standard concrete practices.
Placing the concrete
The framework for stamped concrete should be installed the same way as for traditional concrete, with a couple extra considerations, says Richard Cofoid, national sales manager for Increte Systems Inc. If you are stamping a square pattern, make sure your framework is square. Be sure to drive the tops of stakes even with or below the top of the framework so your stamping tools don’t get hung up. And, very importantly, protect all adjoining areas by masking them off with duct tape and plastic. Then place, screed and float the concrete as you would a standard slab.
If you’re new to stamping concrete, be careful not to bite off more than you can chew. While an experienced crew can stamp 800 to 1,000 square feet in a day, novice stamping crews should limit their pours to no more than 400 square feet on average. “Skill, job access, weather conditions, manpower, stamp pattern and color hardener choice are all considerations,” says Doug Carlton, owner of Carlton Concrete L.L.C.
Also, keep in mind that walls and protruding obstacles will slow the process down.
Start with simple patterns
The easiest stamps to start out with are borders along a broom finished job, Johnson says.
If the whole surface will be textured, choose random patterns. “Beginners should start out with textured stone or larger patterns with no detail,” says Russell Rodoni, owner of Sierra Design Concrete.
Texture mats that leapfrog over each other are easier than ridged tools that fit together like a puzzle. Most experienced contractors say to avoid interlocking patterns until you get a feel for the imprinting process.
Renting imprinting tools is a good option if you’re just starting out, because some patterns and tools can be costly. “Rent twice the amount you think you will need,” Carlton recommends.
Coloring the concrete
Does integral color add value to the stamped concrete job? It depends who you talk to. On one hand, integral color offers limited color choices, and it is hard to match from pour to pour and day to day. But, on the other hand, it is faster and less messy than other coloring techniques. In addition, contractors just starting out in stamping may find imprinting colored concrete is easier. “Not because it is better, but there are fewer steps to be concerned with,” observes Scott Thome, director of product services with L.M. Scofield Co.
What it seems to boil down to is personal preference. “Beauty is in the eye of the beholder,” Johnson says. “Realistic to one may look eclectic to another.”
Most contractors use dry shake color hardener to add color to their stamped concrete. Available in a wide variety of colors, it is easy to match if repairs are needed, and it increases the surface strength of the concrete. But be aware that use of color hardener adds time to a job, requires more labor and can be messy.

Color hardeners are typically applied in several passes after the bleed water has evaporated. Many contractors broadcast by hand, though Rodoni recommends broadcasting with a splash brush to avoid streaking. Broadcast the powder evenly, allowing it to wet up, and work it in with a bull float. After the final pass has been applied, finish-trowel the surface.
According to Cofoid, a 60-pound bucket of color hardener will generally cover 80 to 100 square feet; for lighter colors you’ll need to use more. Make sure you follow the manufacturer’s recommendations, as each manufacturer has a prescribed rate of application for certain colors.
Another method of coloring the surface is to use chemical stains, but this is “definitely not for beginners,” Rodoni says.
The importance of release agents
The primary purpose of release agents, which come in powder and liquid formulations, is to ensure your imprinting tools do not stick to the concrete. Liquid releases are clear and not all can accept color, so they are not used as frequently as powdered releases.
“Powder antique release is the most popular method of releasing the tools from the fresh concrete,” Thome reports. “It also offers you the option of adding one or multiple colors into your work.”
R. Michael Potts, owner of Ideal Construction Inc., says the release should go on very thin. “You are just looking to make a barrier between the concrete and the stamp. Don’t put too much down, or your pattern will only be in the release powder and not in the concrete.”
Don’t work too far ahead either. Cofoid recommends broadcasting only one or two rows ahead of stamping and cautions, “Never trowel release agent.”
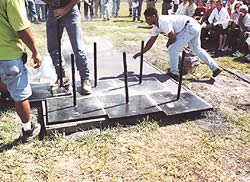
Stamping the concrete
When do you begin stamping? The concrete has to be firm enough to support the weight of the stamper and the tools, but plastic enough to accept the imprint. With rigid tools you can usually start sooner. Soft tools will require you to wait a bit longer, and then you’ll likely need to use tamping tools. Some contractors say you can judge the concrete by pushing your finger into the slab. If it goes in about 1⁄4-inch, it should be ready to stamp.
Typically, you begin stamping where you began the pour. But there may be exceptions. For example, Branum says he prefers to start against a wall line or edge that is adjacent to any structures.
It’s also important to know what parts of the pour are in the sun and shade. Concrete in the shade takes longer to firm up, while areas in the sun will stamp sooner.

Keeping grout lines crisp and eliminating squeeze lines is a matter of properly placing, aligning and lifting the tools. But Cofoid says not to worry if things aren’t always perfect. “The stamping process is not perfect. Slight imperfections make it look more natural — stones are not perfect, bricks are not perfect.”
Plan the job out in advance. For example, if you have a crew of five (three finishers and two laborers), Thome says, “During the imprinting process you will need one person moving the imprinting tools, one person tamping or walking the tools in, one person on each side of the pour handing the tools to the tool setter and cleaning the tools as needed. The final person is probably the most important person — the detailer.”
Finishing the job
Many experienced stampers recommend waiting until the next day to wash off excess release agent. Many caution against beginners using pressure washers, especially if you want some release agent to remain in the grout lines for additional color. (But be advised that release agent needs to be removed completely from the wear surface for a sealer to bond properly.)
“I like to first broom off the excess release, cut all my joints, and then wash it down with water from a hose,” Potts says.
Cofoid likes to rinse off release before cutting joints.
Like traditional concrete, stamped concrete needs control joints. In order to hide them you can try to line them up with grout lines in the pattern. With random stone patterns you might consider incorporating accent strips to accommodate the joints. If you use embossing skins for a continuous texture, joints usually are not distracting.
Proper curing time before applying a sealer is important. Follow the directions provided by the manufacturer.
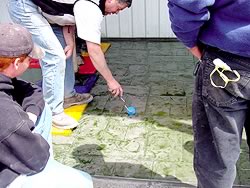
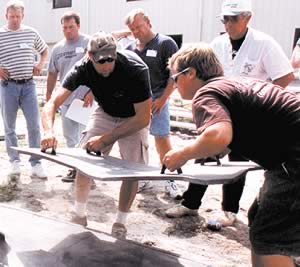
Getting the right training pays for itself
Contractors and experts agree that practice, practice, practice is the way to go. Working alongside an expert is a great way to get comfortable with stamping, and having your crew practice in sand is a good way to familiarize them with a new pattern.
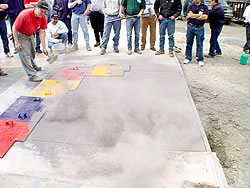
Carlton suggests that contractors take advantage of training seminars. “Paying for training by someone with 10 years-plus experience is money in the bank,” he says, “and creates a list of satisfied customers.”
Training satisfies several needs, Thome points out. “As someone interested in obtaining a better understanding of the business and how it can fit into their marketing program, the demo or introduction workshop might be enough. …To become familiar with the process and actually imprint a slab, the comprehensive workshop is the one to attend.”
Training classes are offered by manufacturers, independent schools and industry organizations. “Organizations such as the ASCC Decorative Concrete Council are an excellent training resource for contractors looking to improve their business and their skills,” Branum says.
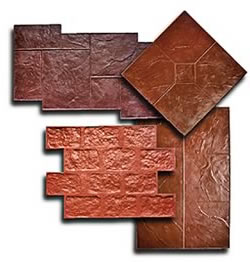
One other piece of advice comes from Cofoid, who says to sell your work using actual samples. Form up 12-inch by 12-inch samples, but don’t worry about them being perfect. “A perfect sample may give you trouble because the customer will expect perfect color. … [and] if you sell off photos you may have trouble because the color may not match up,” he says.


