


Concrete is an increasingly popular material for countertops because it is versatile, durable and environmentally sound. Building molds and precasting countertops in a studio allows designer/fabricators to cast and cure slabs under controlled temperature and humidity conditions.
The mold is a critical component in the success of a precast project. “Remember, moldmaking is an ancient art and craft,” says Fu-Tung Cheng, principal at Cheng Design in Berkeley, Calif. “So many things we have around us are made out of molds, and most of the molds are made of the most prosaic stuff. In the end you won’t recognize the material of the original shape. Just use your imagination to invent something that is an understudy for concrete.”
There are many factors involved in a successful precast countertop — the mix, coloring techniques, workmanship, creative design and more. But they all depend on the mold being right. “A good mold forms the backbone for the rest of the forming,” says Jeff Girard of The Concrete Countertop Institute in Raleigh, N.C.

Choosing your material
While melamine is probably the most widely used material for making molds, contractors actually use a surprising variety of materials. Here are some questions to ask when choosing a material.
First, is it strong? Can it withstand the pressure of the concrete without distorting? Strength and rigidity are some of the advantages of melamine. If a less-traditional mold material is going to be used, it must be properly supported. “The most important factor is that whatever you’re casting on has to be flat and rigid,” says Girard, “The weight of the concrete will cause a suspended form to sag.” If your shop is producing countertops regularly, he recommends investing in a dedicated casting table.
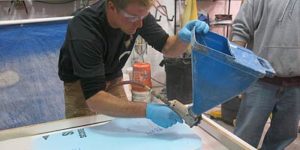
Second, what is the desired finished look? Concrete will mirror the surface it is cast against, so if the slab will be used with little finishing, the mold should imprint the desired surface (usually very smooth). If the counter will be ground and polished, other considerations, such as economy and reusability, become more important in choosing a mold material. Buddy Rhodes of the Buddy Rhodes Studio in San Francisco often casts “right-side-up” so the molded surface will be the bottom of the counter, finishing the top by hand troweling for a hand-crafted, burnished look similar to a cast-in-place counter. In any case, it is important that the mold release easily from the green concrete without ripping the surface.
Third, is the mold material affordable and ecologically sound? Almost every expert interviewed for this article cited “green” reasons for choosing the mold material they use. They look for molds that can be reused or materials that can afterwards be used for something else.

Pros and cons
Wood: Wood is the easiest material to tool, cut and assemble. It is also relatively inexpensive. The drawback is that the wood grain is mirrored in the finished slab.
Melamine: Melamine is particleboard faced with a plastic laminate. It releases more easily than wood and does not telegraph the grain. Michael Dahl, of Michael Dahl Concrete Designs, likes melamine because the molds release easily. When Buddy Rhodes uses melamine, he uses each side of the board one or two times and then cuts it down to use as crates so the material is not wasted.
Melamine does have a slight texture, so the finished product might need light polishing, according to Michael Karmody of Stone Soup Concrete in Northampton, Mass. “The texture of melamine gives a place for the finest particulates to settle in.”
Brandon Gore, of the Gore Design Company, Tempe, Ariz., cautions that melamine can torque when the mold is screwed together, resulting in “waves” in a long span. Even so, fabricators who use other materials to cast slabs often use melamine for smaller details because it is easier to cut and tool.

Rigid insulation foam: This material is most often used for corners and knock-outs because it is easily shaped. The edges of the foam need to be sealed to prevent adhesion to the concrete. Dahl recommends sealing with a silicone or epoxy resin. Cheng lines the edges with a soft foam rubber taped with packing tape. (He cautions that the tape must be smooth to avoid causing wrinkles in the concrete.) Girard leaves the foam unsealed because he grinds the concrete to finish it, so any foam residue is removed in the process. Foam is soft enough to accommodate expansion and contraction of the concrete so it is easy to remove after cure.
Formica, Mylar and glass: These materials give an exceptionally smooth result. Rhodes prefers Formica to melamine because it is denser and lasts longer. One drawback of Formica and plastic sheeting is they must first be adhered to a stronger board for support.
Steel: Jeff Girard is an advocate for steel molds. “Steel is infinitely reusable,” he says. “I have some molds five years old and I expect I could get 15 more years out of them.” Steel has other appealing attributes as well. “It comes in standard sizes so there is little work cutting it to size,” he says. “It is straight and smooth and forms good right angles.” Release agents make steel forms easy to release and they contain a corrosion retarder so the molds are unaffected by moisture. Steel does not give as smooth a finish as some of the other materials listed, so it may not be suitable for certain designs. Girard’s technique is to fill air holes with a compatibly colored material and then grind and polish the surface.
Rubber: Polyurethane or neoprene rubber is used to create molds for sinks and other three-dimensional shapes. Cheng uses found objects like a light fixture as the basis for creating a rubber mold for a smooth, round sink. “The last thing you want to do is make it from scratch,” he says.
Rhodes sometimes uses sinks found at yard sales or architectural salvage companies. He takes a mold of the sink, uses it to make a plaster cast and then creates a fiberglass mold that can be used hundreds of times. He says he prefers fiberglass to rubber because rubber is soft and can distort under the weight of concrete.

Using caulk
Concrete poured into a mold with right angles will come out with a sharp edge. Caulk tooled into the angles softens that edge. Karmody says this is important because the particles that make up concrete begin to segregate at a corner that is too sharp for the larger ones to fit in. This means the concrete at the corner is weaker and more vulnerable to breaking. Formliners or rubber molds can also be used to create a round or textured corner.
Most recommend 100 percent silicone caulk. Silicone adheres well to the mold but releases easily from the concrete. Acrylic caulk can leave a residue that will discolor concrete the next time the mold is used. If water cleanup is desired, latex caulk can be used.
Caulk also keeps molds watertight and prevents concrete from seeping through seams. However, most experts interviewed for this article use a stiff, dry concrete mix. “Bleed water is a symptom of segregation, which means a less than optimal mix,” Girard says. “If you need a watertight form, you have other problems.”

Caulk is often used to adhere objects to the bottom of the mold so they will be embedded in the top of the counter when it is turned over. Dahl puts a drop of silicone caulk on the mold, uses a straight edge to draw it out, and then scrapes it off to a thin layer. The caulk keeps the object in place while the concrete is poured and prevents concrete from seeping over the object.
Some use additional mechanical fasteners to keep the object in place. Gore attaches a piece of wire mesh to the back of the object to act as an anchor so that it won’t pop out when the mold is removed or loosen later as the concrete expands and contracts.
Rhodes uses rubber cement instead of silicone caulk to adhere embedded objects to melamine. He says, “(The adhesive) can’t be so strong that it pulls the object out when the mold is removed, but it can’t be so weak that it allows concrete to seep around the edges.” Rhodes also attaches screws to the object so the screw heads act as an anchor.
If the embedded object is a flat, regular shape, like a ceramic tile, Karmody prefers to attach it after the slab is cured. He uses the mold to leave a void, using foam insulation or plywood covered in plastic — “anything that doesn’t pull moisture from the concrete.” When the slab is finished he uses grout to attach the tile and make the transition between the object and the concrete around it.

Tips from the experts
The artisans who contributed to this article came to concrete countertops down a spectacular variety of paths. One started in the industry building concrete skateparks. Another was an engineer who still has an eye for structure. A third was an artist who discovered concrete during his search for the ideal sculpting medium. From this rich background come some nuggets of wisdom, things that might help you avoid costly mistakes. Here is a sampling:
Don’t be afraid of mistakes. “Unless you’ve done it 500 times the key lessons aren’t going to sink in,” says Michael Karmody. He recommends making 2-foot-square samples. This is enough concrete to test the mix design and see how it will react in a full- scale pour while giving the customer an accurate picture of the finished product. Buddy Rhodes offers a corollary: “Experiment in your shop, not in someone’s kitchen.”
“Don’t bite off more than you can pour.” Fu-Tung Cheng recommends starting out on small projects. Larger ones can get away from an inexperienced fabricator.

“Use the right mix for the job.” Michael Dahl stresses controlling the water-to-cement ratio to avoid weak countertops and cracking. Most of these experts use a dry mix to avoid seepage and excess bleed water. Tom Ralston stresses using well-graded aggregate. “I always use angular aggregate because it can lock itself together, where round can’t.” He sometimes uses a shrink-reducing admixture such as Eclipse from Grace Construction Products or Tetraguard from Master Builders.
Double-check everything. “The smallest mistake in the field will prove agonizing in the end,” says Brandon Gore. He cites the story of an employee who trimmed three sides of a template in the field but missed the fourth side. The result? A slab ten inches too long.
Label templates carefully. Everyone agrees on the importance of remembering to turn the template upside down so when the precast is turned right side up the sink will be in the right place. Gore specifically recommends avoiding mix-ups by labeling templates carefully to identify which job they belong to.
You want your countertop to be perfect and beautiful, but you still have to keep your business in the black. “Don’t sacrifice quality, but keep the bottom line in mind,” says Jeff Girard.
All the experts agree on one piece of advice: get all the training and practice you can. “Study what’s out there and then make up your own mind,” Karmody says.