Like any craftspeople, concrete contractors are always looking for new ideas and new inspirations for their next project. While we hope that all the work we showcase in Concrete Decor serves that purpose, once a year we like to provide some striking effects with step-by-step instructions in this, our annual Color Recipes feature.
We reached out to industry manufacturers for their favorite effects and asked them to walk us through the process of creating them. We hope you’ll use these as a resource, whether you decided to recreate one of the effects directly or just incorporate some of the techniques into your own projects.
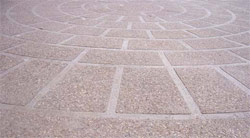
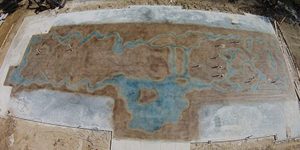
Exposed Aggregate Faux Paver Effect – Butterfield Color
www.butterfieldcolor.com
This simple textured look is very versatile and easily achieved with just a few ingredients.
Ingredients
Stencils
Butterfield Surf Etch Top Surface Retarder
Butterfield Clear Guard Cure and Seal or Butterfield Clear Guard H2O Cure and Seal
Instructions
– After bull-floating and hand-floating your concrete surface and allowing excess bleed water to dissipate, cut and place your chosen stencil over the new concrete.
– Use a stencil roller to lightly embed the stencil. Do not embed the stencil so that it is covered with cement paste. The stencils should be placed before the concrete surface starts to dry. (Make sure the stencils have complete contact with the concrete surface. This will prevent the Surf Etch Top Surface Retarder from bleeding onto the mortar joints.)
– Mix Surf Etch Top Surface Retarder and apply an even coating of it to the concrete’s surface. (You can use a pump-up sprayer, brush or roller to apply the product.) Apply material evenly to achieve a masking, consistent blue color over the concrete.
– Within six to 24 hours after the application, remove the stencils, and expose the aggregate by washing the surface using a garden hose and a new, clean broom or a pressure washer. Work one small area at a time before moving on to the next one. (If the depth of reveal is too deep, stop washing and allow the concrete to cure and harden further.)
– Allow the concrete to dry for 12 to 24 hours.
– Apply the liquid curing compound. Use Clear Guard Cure and Seal for exterior applications or interiors when a strong odor is not a concern. For interior applications, the water-based Clear Guard H2O Cure and Seal system is a better choice. Multiple light coats are necessary over the roughened, etched surface.