
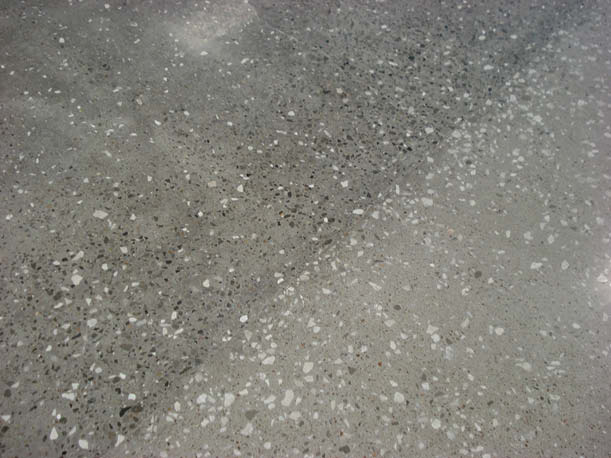
For both new construction and remodel projects, polishing contractors face similar issues when trying to get concrete not poured at the same time to aesthetically match. This is a major problem in the world of construction.
From tile to epoxy, every other flooring material can easily cover the differences in concrete placed at different times. Not so for polished concrete. I’ll address common issues and recommend ways to overcome them to the customer’s satisfaction. These issues must be addressed for polished concrete to succeed and continue to grow.
Colorful component variations
I think most people realize concrete from different manufacturers will look different, but the reason for this isn’t common knowledge. Concrete is basically made of four components: cement, sand, large aggregate and water. The water doesn’t cause an issue.
Cement from different manufacturers is usually a different shade of gray. Some manufacturers have lighter or whiter cement while others have much darker materials. When placed next to each other, concrete containing different cements has lighter and darker tones.
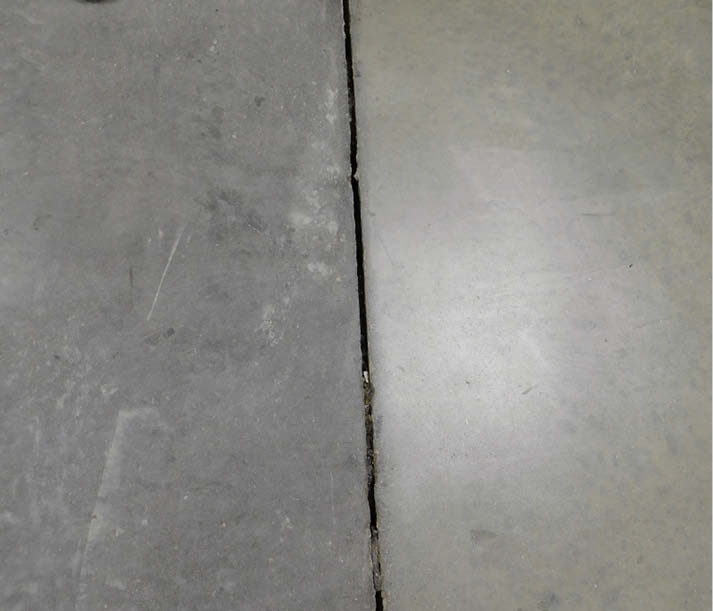
The second component, sand, differs in color because it’s mined in different areas. Sand can range from white to dark brown. When we polish, we typically expose the sand layer, so different colors of sand are extremely noticeable.
The last component that affects the color is the rock. It’s typical to think that the rock is deeper into the slab, so it shouldn’t matter. The reality is that when you remove the paste and expose the sand layer you also expose the top edges of the rock. Therefore, the color of the rock will affect the colors you see. For example, if one area of the slab has river rock as the large aggregate, it will have red and brown tones. If the next section placed contains a local inexpensive traprock, it’ll have gray and white tones.
Ready-mix suppliers have a sand pit and a couple of rock quarries where they source their raw materials. Since each quarry pulls material from different areas, the rock and sand are various colors. Suppliers don’t consider the appearance of their product like decorative concrete contractors do. Their job is to provide a structurally sound foundation that meets specification requirements for compressive strength. All thought and testing are focused to achieve these goals. Ready-mix suppliers aren’t concerned about concrete’s color or aesthetics after it’s been placed.
New construction
Typically, concrete is placed in 10,000- to 20,000-square-foot sections. For smaller projects, this means the concrete can be placed in one pour. Larger projects, though, can be broken into however many pours are necessary to allow the placement contractor to manage the concrete properly. For your typical grocery store, that’s usually between two and four pours.
Sometimes, if no one is involved on the front end to let the contractor know any different, the concrete can be sourced from two different suppliers or from the same supplier but from different plants.
The standards for construction for at least the last 20 years have been to leave column blockouts where the building steel can be erected after the concrete has been placed. Sometimes the blockouts are filled months after the base slab has been placed. This allows for concrete to be sourced from a different supplier or the materials used to make the concrete can come from different areas. These are the typical ways that column pour-backs can come out looking completely different than the standard floor.
Other considerations in new construction
Other options for new construction that cause problems are errors in the placement of plumbing or electrical components. A plumbing break also can cause correctly placed concrete to be cut out and removed to facilitate a repair. When these trenches are eventually filled, the concrete used can easily come from a different supplier or plant.
In the preconstruction meeting, I emphasize to the general contractor and the concrete contractor that we must get all the concrete from one supplier and from the same batch plant. It’s common practice for a supplier to deliver concrete mixed at two different plants because of local traffic at the time of the placement, the capacity of that plant or the workload of orders that the plant must fill.

Having two different plants supply a project is problematic because it’s highly likely that the plants are getting their sand and rock from different quarries or maybe the same quarry but different areas. Either option makes the finished product look different from section to section.
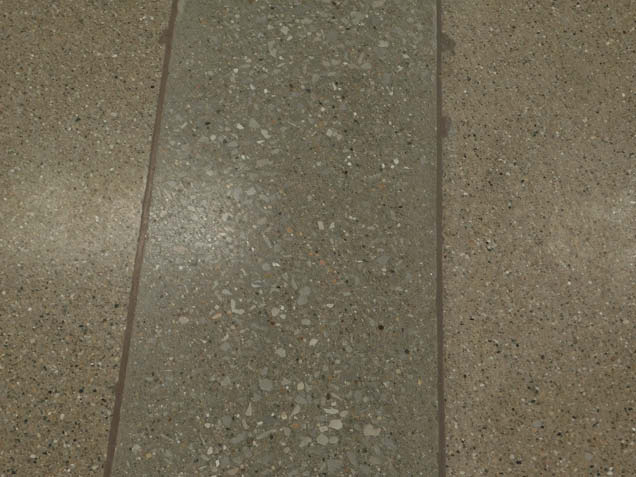
Pour-backs
When we get to talking about the pour-backs at the column blockouts, I very carefully and specifically say: “Everyone knows that the pour-backs will be a different color because they are poured at a much later date and won’t be cured as long as the regular slab. For us to get the best appearance and the closest match, these blockouts should be poured with the same concrete mix from the same supplier and plant. You must tell the supplier we need the same sand and aggregate that was used on the main floor.”
Even though the concrete won’t be mechanically troweled in these small areas, the concrete finisher needs to get these areas as tight and smooth as possible with a hand trowel. The concrete in the blockouts needs to be at the same elevation as the surrounding concrete. Any height variance, high or low, will show large aggregate after the grinding is complete.
Remodels
Remodels are always more interesting since the concrete is already in place.
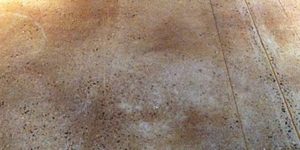
If, after grinding, there are slab areas that don’t match by the time we get to a 400-grit resin, I’ll typically recommend using a heavily diluted black dye on the lighter slab areas to make them closer in color to the darker slab sections. This is done before any other dye is installed. By getting the concrete closer to the base color, any additional color will match much better.
In the preconstruction meeting I ask if any trenching is necessary or if any areas of concrete should be removed and replaced. If the answer is yes, I have a very specific list of points that I review. After that, I then provide it to the GC via email after the meeting.
Sand and aggregate
First, I discuss the sand and aggregate issue. I request that when the concrete is cut, a section be cleaned and retained so the sample can be given to the ready-mix supplier so he can source and match the sand and large aggregate. This isn’t typically an issue if the materials are quarried locally. It may not be the standard materials used at that time by that plant.
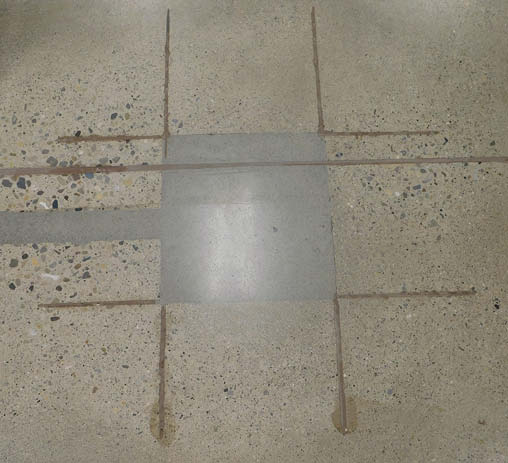
Second, I discuss the method of removal. Typically, a cutting contractor doing a trench removal will cut the long lines. They will then do the cross-cut chop lines over those so the concrete can be removed in smaller, more manageable chunks. This method leaves tails at every crossing cut which must then be filled like joints.
If they pop a chalk line showing the requested width and do the crossing cuts first, the long lines can be cut to a width that includes all the cross cuts, removing the tails sticking out on both sides. This method leaves clean straight edges which most owners prefer. The concrete with the matching sand and aggregate can be poured back. There is a much higher likelihood that the color will be a close match.
Consolidation and troweling
Third, I discuss consolidation and troweling. Without discussing it, trenches and small pour-back sections are typically just troweled by hand. Without knowing that this will cause a different look, this is the easiest and fastest way to get the work completed.
I request that the concrete be troweled with a standard walk-behind trowel. Hand-troweled concrete has a very thin layer of paste at the surface. When any grinding occurs, this thin skin is removed and the concrete below is extremely porous. This makes the concrete look almost white because the pores can’t be polished. It’s like trying to polish pumice stone. By using a walk-behind power trowel, the concrete gets consolidated to a depth of 1/2 inch or so.
I also ask the contractor to let the trowel go over onto the existing concrete a couple of inches all the way around. This serves two purposes. First, it allows the concrete to be mechanically finished along the edges. Second, it serves as an additional precaution to make sure the concrete is at the same elevation as the surrounding slab.
Typically, people are concerned that the trowel will scratch the existing concrete. I remind everyone that the concrete will be ground which will remove the possible minor scratching. I also ask the contractor to cure the trenches, a step often overlooked. If they’re not curing, there’s a much higher likelihood that the trenching will have shrinkage cracks.
Water curing
I either recommend a water cure with moisture-retaining blankets for seven days or a subsurface film-forming cure (like Skudo Cure) which is sprayed at the time of installation. Just like regular concrete, the pour-backs are ready for grinding at seven days and ready for polishing at 28 days.
As a side note, I’ve found if the penetrating cure is used the concrete will hold a polish as early as 18 days versus the 28 typically required. I’m regularly asked why we have to wait the full 28 days before polishing. The answer is because the slab is still curing and blowing a lot of moisture. Any polishing will look good at the time of installation. However, the gloss disappears within a few days as it is attacked by moisture and dissolved minerals coming out of the concrete.
Repairs
There are times when standard concrete can’t be used in repairs or trenches because the area being remodeled is high up in a multistory building or in the middle of a mall. In these cases, I typically request that the steps for removal mentioned earlier be followed. But, I don’t worry about matching aggregate, sand or cement. Instead I’ll get the sand and aggregate myself from a ready-mix supplier and use those materials with a polishable overlay.
There are several good overlay manufacturers that make fantastic products. Taking these and adding the aggregate and sand per the manufacturer’s instructions, along with the diluted dye to get the tonal value of the base concrete colors to closely match, will provide the owner with an acceptable surface.
You can then use the same materials anywhere that you need to use a polishable overlay. Typically, I see this at broken joints, large areas of delaminated concrete or where old walls were placed and there is a long line of spalls where the wall base was pulled out. The additional benefit of using a polishable overlay is that the surface will be dense and tight. This allows for a good polish.
A better look
Armed with these tips and tricks, I hope you can educate the owner, the general contractor and the concrete placement contractors. Your knowledge on how to provide a better overall polished concrete finish will prove very helpful.
In most cases, the owners are understanding when you explain these issues on the front end. The general contractor and the architect will be glad you were able to help get an appearance that the owner finds acceptable.