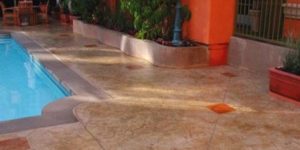

 The Look of Cork
Gaye Goodman, Faux Real LLC – Albuquerque, N.M.
www.gayegoodman.com
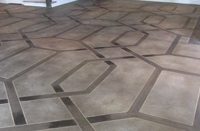
Creating a look reminiscent of cork or aged hardwood floors, this technique requires plastic sheeting and some well-coordinated teamwork.
Ingredients:
- Bix Trisodium Phosphate (TSP) Substitute Concentrate
- Quikrete Concrete Bonding Adhesive
- Lyons Manufacturing Super Flowcrete self-leveling cementitious filler
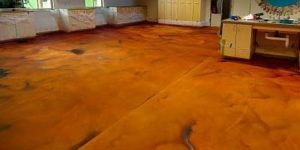
- L.M. Scofield Lithochrome Chemstain Classic: Dark Walnut, Weathered Bronze (or possibly, Fern Green and Antique Amber)
- Acid solution, 10:1 water to muriatic acid
- Ammonia solution, 1 cup ammonia to 5 gallons water
- Envirosafe Trojan Masonry Sealer
- Harvard Chemical Sheen C-40 water-based acrylic sealer
- Special equipment: paint filter (or nylon stocking) in a large plastic funnel, a roll of 0.31 mil (very thin) painter’s dropcloth plastic sheeting
Directions:
- This application is designed for a brand new, smoothly troweled (not burnished) slab. If you’re working with a preexisting slab or a slab with a different finish, your results will vary.
- Mask walls of room up to at least 24 inches from slab, and do the usual slab preparation. Remove paint and glue spots, scrub with TSP substitute and repair any holes or cracks using a coat of Bonding Adhesive followed by the Super Flowcrete. Before you start, make sure floors are clean and dry with no dusty concrete residue.
- Prepare plastic in advance: Unroll and unfold plastic to 6 feet longer than the room and 6 feet wider. Allow 3 feet for overlaps if multiple pieces need to be used to cover the floor wall-to-wall. With one person on each end of a large piece to maintain tension, roll it up loosely and lay roll on the floor parallel to the wall where you will begin staining. The loose edge of the plastic should be on the bottom of the roll, pointing towards the wall.
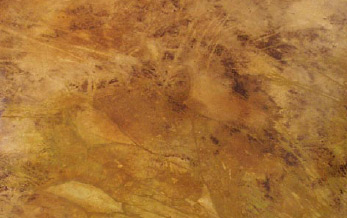
- Using the funnel with the filter, fill a sprayer with one part Dark Walnut diluted with two parts acid solution, or whatever dilution you have determined will create a light “paper-bag brown” color on the slab you’re working on. Typically, one gallon of this mixture should cover around 200 square feet.
- Test the spray volume outdoors or in a bucket. You need a medium-mist round spray pattern that can be applied in circular motions to put down a very wet but even coat of stain.
- If you discovered, during testing, that your concrete reacts to the Weathered Bronze stain with green and brown tonalities, then fill a second sprayer with undiluted Weathered Bronze. If it does not, then mix equal parts Fern Green and Antique Amber in the sprayer. You’ll need roughly a quarter gallon for every 200 square feet.
- Starting in the far corner of a room, Worker A applies the Walnut mix to approximately 80 percent of a 3-foot by 4-foot area. Worker B sprays the Weathered Bronze (or the Fern Green substitute) over 20 percent of the same area. The two sprays should overlap about 3 inches where they meet. Spraying is done quickly and heavily, so the floor is almost as wet as if the stain had been poured. Spray patterns should be in random puddle shapes with varying proportions to look natural: no straight lines.
- Worker C unrolls enough plastic to cover the wet stain and then kneels on it, making sure the plastic covers up to the edge of the floor. Then, Worker C stands facing the stainers, holding the plastic roll up and out of the way as they continue staining an adjoining area of about 20 square feet. As soon as the slab is soaked with stain, Worker C drops to his knees and pats plastic into place over the newly soaked section.
- Do not stretch or twist the plastic in any way. Let it fall loosely as it may. Worker C can walk on plastic-covered floor following behind the sprayers without fear of leaving footprints. Gas will lift large sections of plastic into bubbles. Do not try to eliminate them, as they will contribute to the design.
- Establish a rhythm, working quickly to stain and cover the entire floor. It helps to cut smaller sections of plastic in advance for indented areas like closets and around toilets. Carry a knife to split the plastic where necessary to go around protruding elements.
- Leave plastic down for the entire cure time of the stain (four hours). Note: This technique cannot be used on an absorbent slab, and it can’t be done outdoors in windy conditions, as the plastic must stay in same position for the entire time in order to get the desired results.
- After four hours (or overnight, as convenient) lift away and discard plastic, even if large sections of floor are still gooey with stain, and then proceed with post-stain scrub using a white pad on the power buffer to remove all chemical residues. Vacuum with a wet-vac and rinse with a microfiber mop and the ammonia solution.
- If the patterns left by the plastic seem too stark, the floor can be lightly misted with the same colors or with one preferred color in a second staining. This step needs only 30 to 40 minutes of cure time before scrubbing. The plastic patterns will recede into the background under the second stain.
- Seal using one coat of Trojan Masonry Sealer as a primer and let dry. Then mop on three coats of Sheen C-40