
You can fine-tune your concrete polishing bid by figuring out before the job begins how the concrete is going to grind, what diamonds you will need and how to prepare. Walk on the slab, pour some water on it, scratch at it and put a diamond on it.
Finally, do a polishing mock-up on the slab. Answers you get from the pre-polish investigation and mock-up will give you the advantage every time.
Does the concrete absorb water? This will tell you whether it is sealed or if it is just unsealed and dirty.
Is the concrete reactive? Place a drop of etching acid on the floor to see if it fizzes and reacts. “Yes ” means the concrete is unsealed. “No ” means that the concrete has sealer or densifier that inhibits absorption, which directly affects densification.
Does the concrete scratch easily? The answer will determine what diamond grit and bond to start with and whether heavier densifier application is needed.
Are cracks visible? Cracks and holes can be invisibly corrected with a silicate-based repair material like Certi-Shine Fusion during grinding.
Put a straightedge down on the slab – how much light is shining through underneath it? Plan more time to cut the floor flat if needed.
Strip it good
Removing coatings from concrete before polishing it demands expertise in removal, and technique depends on the coating chemistry, thickness and condition. Is the coating made of acrylic, enamel, epoxy, urethane, layers of multiple products, or something else? How thick is it? Is the coating worn through or intact?
Trowel-down coatings often contain fillers that are harder to remove. Sometimes the owner knows the details, but if there is no information at all, trial and error and your own experience will ferret out the secret combination to remove that particular coating.
Chemical stripping methods excel in some circumstances. Chemical stripping will not affect the cut of a formerly coated floor, reducing the chance of random scratches. When the owner worries that mechanical methods will increase the risk of aggregate exposure, chemical stripping is ideal. Also, chemical stripping allows a head start on a project when all your equipment is tied up on another job.
During mechanical removal, coatings that cannot tolerate the heat and friction of grinding may melt and gum up the cutting surfaces of tools. Again, chemical strippers may help with these kinds of coatings.
Different strippers are effective with different coatings, so it is important to test samples of various strippers during the mock-up to find the most effective product for each coating.
Most chemical strippers are either oil-based or solvent-based. Oil-based chemical strippers are extracted from soybeans, pine, or citrus (D-limonene) sources. These are often less of a safety concern for workers and can be easier to dispose of. Check with local authorities regarding disposal, and comply with all federal, state and local regulations.
Oil-based strippers require time to work. Scoring the surface of the coating can be helpful. Apply the stripper to the entire surface and allow it to work for 20 to 30 minutes. After the coating has softened, scrub using a floor buffer with a brush like a Nylo-Grit or Strata-Grit brush. Manual pole scrapers and blades are fine for small areas, leftover edges and around drains, but they are impractical for large areas. Scrub until the coating fully releases from the concrete.
Remove the softened coating and stripper waste by shoveling it into concrete dust, sawdust or kitty liter. After stripping, the floor must be cleaned and degreased.
Solvent-based strippers are usually based on xylene, toluene or methylene chloride. Certain coatings will respond better to one type of solvent than another. Acrylic sealers, enamels and many other paints can be removed with aromatic solvent strippers, but industrial coatings such as epoxies and urethanes will often require chlorinated solvents.
Solvent-based strippers require more worker safety gear and ventilation measures but can offer faster working time. Apply the stripper to one small area at a time. Allow the coating to soften, then scrape it up and remove it. Clean up before moving to the next area and repeat the process until the entire coating has been removed. Degrease and clean the floor, then proceed to the initial grind.
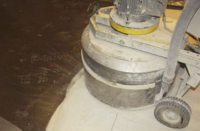
Mechanical removal of coatings
If you choose to remove a coating mechanically, it can be accomplished with several different types of equipment, including ride-on floor scrapers, scarifiers, shotblasters and surface shavers. Diamond grinders can be outfitted with coating removal tools, including polycrystalline diamond (PCD) cutters, scraper discs and metal bond tooling.
Use an equipment manufacturer or rental company as your resource. Knowledgeable representatives will recommend appropriate equipment. On-site demonstrations can prove equipment effectiveness before renting or purchasing. Figure out ahead of time what surface profile the equipment will leave behind, as some equipment may leave too severe of a profile. Mechanical methods are also effective for removal of floor coverings, which can offer plenty of surprises. Was the carpet installed directly to the concrete or is there VCT under it, and what is underneath that? Most floor coverings are installed after the application of cementitious leveling compounds. In these cases, the floor may not be as flat as it may have first appeared.
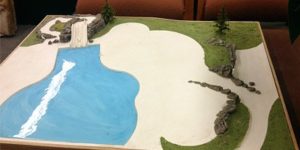
Definition of a mock-up
The mock-up will indicate which diamond bond and grit should be used for the first cut and help you estimate diamond consumption. It will give you a plan A and a plan B. All of this information is required before you can tell the owner, “Yes, I can polish your concrete, this is the price and it will take me this many days. ”
A mock-up is defined as a full-sized (typically 10-foot by 10-foot) physical model performed to spec. The mock-up should be done with the same machines, diamonds and chemicals that will be used for the actual job.
Install the mock-up in an area where you and the owner have the lowest expectations – in other words, where there is staining, cracking or discoloration. Create two halves on the mock-up. On one half, fill the cracks, apply a finish coat or use a stain. Finish the other half with densifying and polishing only. The differences between the options will be obvious to the owner when both are viewed side by side.
Make sure that the mock-up is procedurally complete, but do not spend all day doing a flawless mock-up that cannot be reproduced on a real production schedule. A residual grease stain or a trace of a footprint can help condition the owner to not expect miracles on the full project. We all want to get the contract, but realistically we need to be able to afford to duplicate the mock-up when the contract is awarded.
Finally, charge for the mock-up. You are an experienced craftsperson and your time is valuable. When the mock-up is approved and the contract is signed, deduct the mock-up price from the final invoice. This way the owner will not waste your time and will have an investment in the outcome. It is easier to work with committed customers than tire-kickers.