


Prepping a concrete floor for polishing is one of the most difficult tasks we face in this industry. We cannot be aggressive like we can when prepping for a coating system, because there will be no coating to cover up the deep scratch patterns. We must take care to remove the surface materials while causing as little damage as possible to the concrete. We must be aggressive while being cautious.
There are so many removal and prepping scenarios a never-ending book could be written about them. For the sake of this article we will focus on the most common materials we typically need to remove, mastics (glues) and epoxy.
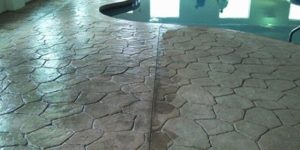
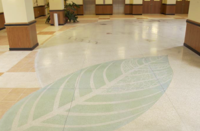
When it comes to prepping for polished concrete the first and most important question is: What is the desired outcome? Is it a cream polish or a heavy aggregate exposure? Is it a full mechanical polish or a chemical polish? Knowing the answer to these questions will determine how to proceed.
First, set expectations
Many clients ask me where to start when it comes to removing a surface material for polished concrete. I tell them the most important place to start is the sales meeting. The salesperson plays a major role in the successful completion of a polished surface that needed additional prepping.
This probably sounds strange, but let me elaborate. The salesperson’s job is more than just selling the project. They must set up the project to be successful by educating and controlling the client’s expectations. If the client has a blasted surface with epoxy on it and wants a cream polish you need to explain to him why that will not happen. (It will not happen because you will have to blast the surface aggressive enough to remove the existing epoxy, removing most or all of the surface cream.)
By controlling the client’s expectations through education, you set the project up to be successful.
The salesperson must explain that in order to remove the epoxy you will need to take a relatively aggressive approach. The tooling will leave an aggressive scratch pattern, and when you use it, you will create a heavy salt-and-pepper type of aggregate exposure.
Imagine using a PCD (polycrystalline diamond) tool on a surface where a client would like a cream or light salt-and-pepper exposure. A PCD is a synthetic diamond that is many times harder than a carbide and has high fracture strength and excellent wear resistance. We all know that when that PCD rips through the material, it will leave nice, aggressive scratches in the concrete. That will be a problem.
The salesperson must identify what is on the surface, what it will take to remove it, what condition the surface is in, and the most likely scenario for removal. If it is VCT (vinyl tile) mastic, the salesperson must prepare the client for the possibility of tile lines or “ghosting.”
If you cannot see the surface because it still has tile or carpet on it, the salesperson must explain to the client that all anyone can do is make an educated guess about the concrete’s condition. Everyone must reevaluate after the floor covering is removed. Setting proper expectations is the key.
Lest assume our salesperson set us up to deliver a mottled salt-and-pepper full mechanical polish. We know our parameters and expectations, so we can decide how to approach the surface. Should we use PCD tools, 60-grit metal, a carbide scraper, hybrid tools or what?
Removing carpet and carpet mastic
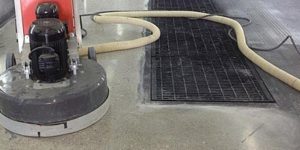
In the case of carpet I prefer to utilize a ride-on removal machine like the Innovatech Terminator. This is a heavy machine with a flat blade attached to the front to rip off the carpet. It will serve two functions — it can remove the carpet and, after you change to a thin flexible blade, it can scrape away the bulk of the carpet mastic. The key here is to remove as much of the mastic as possible. This is always the challenge. It likes to gum up diamond tooling and spread around instead of coming off.
The removal of the carpet mastic can be a two-stage removal process. Stage one is to remove the bulk of the mastic without damaging the surface, and stage two is to remove the thin residual glue and introduce your first scratch pattern.
To remove the bulk without damaging the surface I do not recommend using PCD tooling. It is too easy to create a very deep scratch pattern that must be removed by a 16-grit tool — this is not the road to a salt-and-pepper finish. If you have no choice I highly recommend using a lightweight machine and running a set of nine PCD tools along with a set of nine metal-bonds, reducing the total down pressure on the PCD tool and hopefully not creating a very deep scratch.
Another option can be to utilize a carbide scraper attachment to cut the mastic. It will leave a thin layer that can be cut with a 60-grit metal-bond.
A little sand or kitty litter scattered in front of the machine can help. It gives the sticky material something to get mixed into so it does not keep melting back on.
Some companies are introducing new segments for removal of this bulky material. This coming year, we should see the introduction of some new tooling for this purpose. These segments are promising but new to the market.
Attacking VCT mastic
When it comes to vinyl composite tile (VCT) mastic, the removal process can also be your first step in setting the EL (exposure level) of the surface. A 30/40 grit metal-bond diamond (sometimes wet) is a great option. The addition of some wet sand can be a great help.
You could drop to a 25-grit metal bond and the mastic will cut off pretty good, but you must consider what the final finish needs to be. Don’t cut so aggressively that you cannot deliver the desired outcome. If the black mastic is too bulky, I recommend using the same methodology I described with carpet mastic — scrape the bulk first. PCDs are typically not an option to consider for black mastic, as they are normally too aggressive.
When removing VCT or black mastic always be on the lookout for asbestos. An 8-by-8 or 9-by-9 tile pattern is a good indicator of asbestos — those sizes were typically manufactured before the 1980s when asbestos was used in tiles and mastics. Ask if the mastic has been tested, especially on a surface in an older building. If the tile was installed in the early 1980s or earlier, chances are the mastics and tile contain asbestos.

Removing epoxy
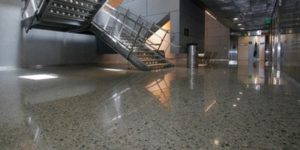
The removal of epoxy is a completely different animal. If the epoxy surface was installed properly, the concrete underneath was more than likely shotblasted or ground aggressively. A cream polish or light salt-and-pepper may be out of the question.
Thin epoxy under 10 mils can be effectively ground with a 30-grit metal bond. Depending on variables, this could be a great start. Epoxies that are more than 10 mils thick can still be ground but time and effort come into play. You also must remember epoxy can be an aggressive material and cause tooling to wear excessively fast, so be sure to utilize the proper bond.
Removing thicker epoxies is where PCD tooling can really help. You typically have already explained to the client that he or she will end up with a heavy salt-and-pepper or mottled aggregate appearance. So getting at the material aggressively is OK. There are so many types of PCD tools available — you will just need to find which ones work in various situations. The full round heavy-duty PCD tooling works well for thicker epoxies of about 20 mils. For a thinner epoxy some of the smaller double-PCD or spilt-PCD tools work well. Note that each distributor or manufacture uses different terminology to describe the PCD tools they sell.
As with all materials, the better the mastic install was prepped, the harder it will be to remove, so plan accordingly.
The scratch pattern of a PCD tool can be difficult to get off. The goal should be to remove that pattern with the use of a 30/40 grit tool, but you could have to go as low as a 16-grit tool. Make sure to include enough time into your bid for this. Selling your time short creates a lot of pressure to skip steps and use guards to cover up your mistakes in the beginning.
As with every project a mock-up is the best plan of action. Not only will this give your customer a real look at what the end result will be, it gives you a chance to try a few techniques. I highly recommend doing your mock-up the same way you plan to complete the project, with the same equipment and tool. Going into a mock for a 10,000-square-foot project with a hand grinder is not going to give anybody good information.