I’ve always been curious why certain decorative systems and finishes take hold only in certain regions of the country, while others are universal in their appeal and demand. The answer lies somewhere between perception, demand and what the market is offering. A few years back I was introduced to limestone-based overlays, also known as carvable limestone overlays. Never heard of them? Well, until then, neither had I.
It turns out that a limestone overlay is one of those systems that’s very popular in some areas of the country, while almost completely unknown in others. First developed in the early 2000s, limestone overlays are not even 20 years old, but in certain areas have developed quite a following. So, what is it that makes this system so different and unique?
Aggregate makes a difference
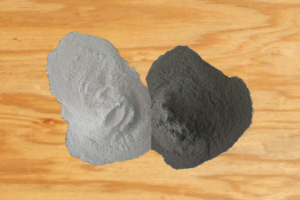
Like their much better-known and more widely used sister product, stampable overlays, limestone overlays are a powder blend made up of aggregate, cement and polymer, packaged in bags and activated with water. That’s where the similarity ends. Limestone overlays are brilliant white in powder form, and once cured they are strong, durable and take on a very natural white limestone color, all without the addition of extra pigments or colorants.
“It’s the natural limestone aggregate that provides the distinctive look and performance that separates these systems from other overlays,” says Don Dutwiler, an independent contractor who provides training and technical assistance nationwide on limestone-based overlays.
This claim of enhanced performance is backed up with actual test results. The limestone overlays I looked at had an average 28-day compressive strength (ASTM C-109) of around 5,000 psi at ¼ inch thick when placed over a sound 4-inch concrete substrate. This is significantly stronger than most stampable overlay systems.
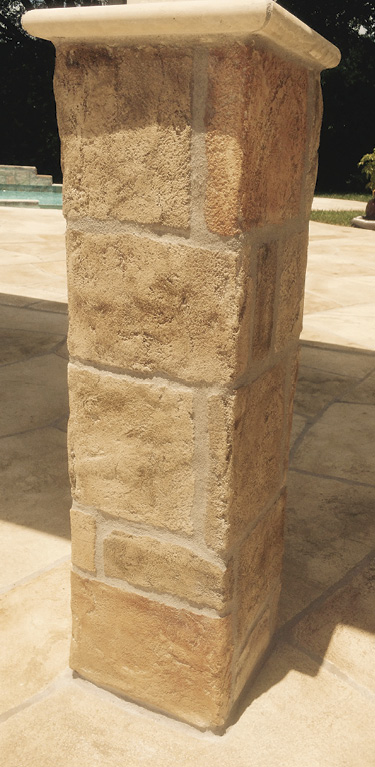
The limestone aggregate also plays a part in creating the distinctive look these systems produce. The distinctive shape and size of the limestone aggregate, along with the unique application method, create a natural finish that can range from soft and smooth like polished stone, to that of rough-cut limestone blocks.
Another advantage is limestone overlays are just as easy to apply on vertical applications as horizontal. No matter the method of application or the brand, the combination of natural limestone with the right amount of cement and polymer makes for a unique and durable product.
Laying it down
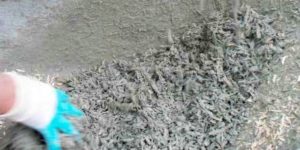
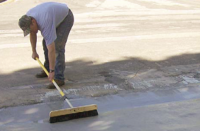
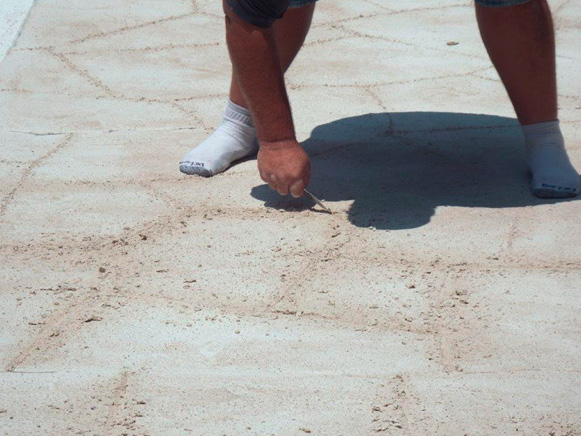
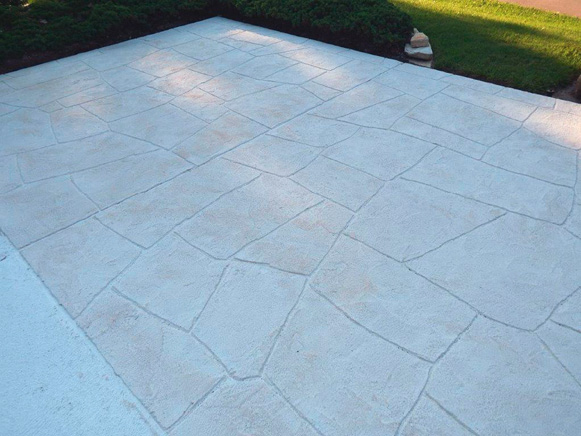
When I first discovered limestone overlays, I was intrigued how such a realistic large stone pattern was produced without any repetition. It was as if the patio had been carved in place to fit the surroundings. I’d soon find out that’s exactly what was done. No stamp tools are used during installation. In regard to equipment, a mixer, 5-gallon pail, pool trowel, carving tool and sponge are all that are required. The texture is achieved by trowel and sponge, and the pattern is cut or carved by hand, making each job one of a kind.
I was skeptical that anyone other than a trained artist could hand carve a pattern, but after a short 30-minute tutorial from Dutwiler showing me a few key points, I was comfortably carving patterns that looked pretty good. I have now attended multiple trainings and witnessed firsthand where first-time installers were carving patterns successfully within a few hours. I am by no means an artist, so if I can do this, anyone can!
There are about a half-dozen manufacturers offering limestone overlay systems. Some are franchise or licensee based, others sell direct or through distributors. Depending on the manufacturer, the products vary in that they are blends of silica sand and natural limestone.
No matter the system you use, good surface preparation and working on a sound substrate are critical to long-term success. Some systems promote a resin-based primer, while others use a thin scratch coat of the limestone overlay or another cement-based system. The overlay is applied by trowel to an average thickness of 1/4 inch, but can go thicker as needed. On vertical applications, the material can be applied by trowel or hopper gun up to 3/4; inch thick.
“Because of the thickness of the hand-carved limestone overlay it can be used over brick, pea gravel, exposed aggregate, and other vertical or horizontal prepared surfaces,” Dutwiler says.
As the material is applied, the amount of troweling determines the roughness of the texture. For me, this is one of the selling points, since working overlays to a smooth finish can be frustrating. With the limestone overlay, a rough finish is just fine. Once the material has set enough to solidly hold your weight — which ranges from 30 minutes to a few hours depending on conditions — the sponging begins. A set of homemade knee boards made from 2-inch foam can be used to allow the finisher on the surface. Smooth the entire area with a damp sponge to achieve the desired look which can range from rough-cut stone to a smooth travertine.
Carving it up
Once the sponging is done, the artistic part begins. This is where the “carvable” comes into play, and these systems really differentiate themselves from other overlays. To score the material, Dutwiler recommends using a small metal cutting tool such as a cement-board scoring tool.
Timing is important. For a clean-cut stone look, carve early. For a chiseled or rough-cut stone look, carve the material when it’s a bit harder. “Hand-carved overlays can be installed to replicate flagstone, Roman stone, travertine, slate and tile, as well as many other natural stones,” says Dutwiler.
Each project will be unique since the pattern comes to life as the installer carves the material. Dutwiler says he uses the surroundings and environment of each job as inspiration to assure its uniqueness.

Coloring, grouting and sealing
After the material is dry, it can be left as is or colored. Dutwiler typically uses a color wash made from dry pigments and water applied with a sponge. Other methods include acid stains, water-based stains, antiquing color washes or tinted concrete sealers. There really is no wrong way to color this material, and each method produces a unique effect. As soon as the coloring is done, apply a coat of sealer to lock in the color and keep the grout from staining the surface. The same limestone overlay is usually used to grout the pattern. Dutwiler says he’s partial to a grout bag, but a grout float can also be used. This process is no different from grouting tile or natural stone.
Originally, I was skeptical about grouting an overlay, but once I saw the before and after it really made a difference in the final appearance. “Hand grouting makes it look like real mortar-set stone,” says Dutwiler.
Once the grout is dry and the surface is cleaned, apply a final coat of sealer. Limestone-based overlays tend to be more porous than traditional overlays, so sealing is always recommended. Most any sealer system can be used. To lock in color, you should seal with a film-forming sealer, especially if a topical color-wash system is used. A penetrating sealer is an option on uncolored material if a “natural,” zero-gloss look is desired.
Regional popularity
Limestone overlays are primarily found in the Sunbelt states of Texas, Arizona, California and some parts of Florida. The primary uses include pool decks, driveways, walkways, patios and entryways for commercial buildings. After watching these systems grow in popularity in those regions over the last five years, I’m convinced they could be popular in many other markets.
Like many of the other decorative finishes that have become universally popular, the install side of the business needs to give limestone overlays a try in undeveloped markets. When you consider there are many areas where limestone overlays are completely unknown, it could be a great opportunity for entrepreneurs looking to be first in their area or established contractors expanding their offerings.

For those interested in learning more about carvable limestone overlays, I recommend attending a training with a distributor or independent trainer who can get most anyone up to speed in a few days.
www.carvablelimestonesystems.com