 When time is of the essence, fast-drying, self-leveling toppings can be the ideal solution, but don’t be lured into thinking that time-saving equates with easy-to-use. In truth, the stakes are raised when these products are employed.
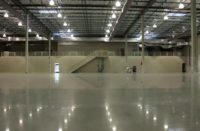
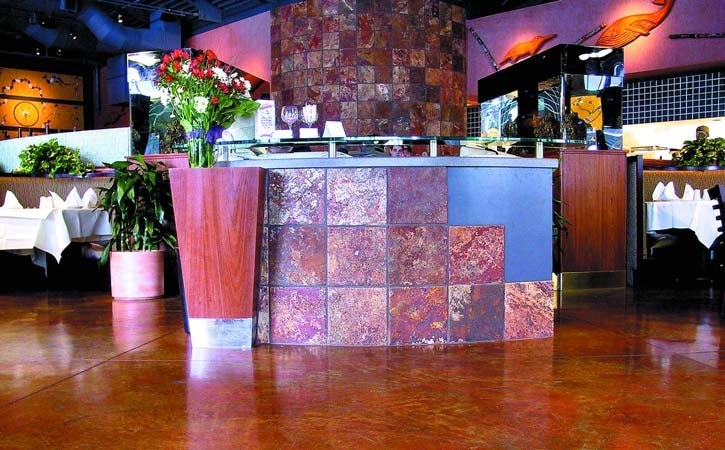
Fast-drying, self-leveling products are often the product of choice when leveling and topping new construction concrete floors — or resurfacing old concrete floors — in a fast-track environment, such as malls, retail spaces, restaurants, hotels, casinos, museums, showrooms and warehouses. But these products have advantages and disadvantages.
“These products are wonderful — excellent for quick turnaround jobs,” exclaims Mark Donaldson, owner of Skookum Floors USA Ltd. in Seattle, Washington. “They allow you to turn over jobs a lot quicker; allow you to get in and out within three days.” But they are not for the novice. “We definitely recommend manufacturer training,” he says. Technique and properly trained manpower is essential.
Fast-drying, self-leveling toppings need a solid, rigid substrate. Concrete substrates are recommended. “A self-leveling topping is only as good as the substrate it’s put on,” cautions Matthew Casto, vice president of technical services at Bomanite Corp. in Madera, California. “It is not advisable to put [these toppings] over any material that has flex, though some do.”
When cured, these toppings will easily handle compression loads of 6,000 pounds per square inch or more. Will there be heavy foot traffic and moderate forklift traffic? No problem. Small hard loads are another issue; use another product or stick to rubber wheels.
Fast-drying, self-leveling toppings are designed for interior use. Constant exposure to moisture, such as rain and ground sources, can be problematic, so, for exterior applications other products are recommended. Even in interior applications, moisture is an important consideration. Always perform a moisture test first. These products are not going to be a solution to moisture problems; you’ll have to solve those first, though waterproofing membranes can be used.
The technology is relatively new
ARDEX is credited with introducing the first fast-drying, self-leveling topping seven years ago (not to be confused with the self-leveling underlayment the firm introduced in 1978 when it began doing business in the United States). The self-drying technology of the fast-drying, self-leveling topping “means that virtually 100 percent of the water mix is cured internally within the cement matrix,” explains Dave Fabyonic, national accounts manager for ARDEX Engineered Cements in Aliquippa, Pennsylvania. “The benefit that it provides is time saving on the job site — you can apply water-based sealer in as little as 2 to 3 hours following application of the topping.”
For topical color, you can apply stains after 24 hours; though, as a general rule, the longer you can wait before applying the stain the more true a color you’ll get, advises Fabyonic.
Fast-drying, self-leveling products also are available from other manufacturers, such as MAPEI, which introduced its self-curing product six years ago. Products from different manufacturers are not identical, so be sure to read and follow the manufacturer’s directions. Mixing ratios and application recommendations vary. It is also advantageous to use the topping manufacturer’s primer.
Prep that substrate!
As with other concrete projects, preparation is the key when using fast-drying, self-leveling toppings. Even if you don’t see a lot of problems with the substrate, don’t skimp!
“Prep is 90 percent of the job [and] you’re only as good as your prep,” says Richard Smith, president of Richard Smith Custom Concrete in West Hills, California.
Shot blasting is the No. 1 method recommended by fast-drying, self-leveling product manufacturers and contractors alike. Use grinders for the hard to reach edges. But when you’re done, be sure to get up all the particles and dust.
“From prep to sealing — no dust!” cautions Peter Golter, product manager for MAPEI in Deerfield, Florida. “You don’t want primer sticking to concrete dust or drywall dust instead of having direct contact with the substrate. Same for the sealer; if there’s dust on the topping, it’ll be a rough topping and the sealer may delaminate.”
After shot blasting, Smith patches and repairs the substrate where needed then applies the primer, which he typically lets cure a little longer than what’s required. “What troubleshoots cracks and failures,” he says, “is the preparation.”
The substrate preparation and primer give you the benefit of two bonds for the topping, observes Fabyonic. “Shot blasting profiles the substrate for a physical (mechanical) bond. You achieve a chemical bond through the use of primer.”
Follow the manufacturer’s directions for the primer. The mix ratio, recommended number of coats and dry times differ among products. Applying the primer with a broom ensures the primer is worked into all the nooks and crannies of the substrate. And be sure to completely cover the surface. Not only won’t you get the desired chemical bonding on those unprimed spots, they also will allow air to come up from the substrate and create pinholes in the topping, which can become an aesthetic problem.
Perfecting the perfect pour
This part of the job needs to be planned out perfectly.
“Have your mixing area ready, bags ready and have one guy mixing while the other installs,” recommends Ron Garamendi of Recreation Development Co. in North Las Vegas, Nevada. In addition, “you have to be careful you don’t work an area too big.”
What’s the big deal? The “fast-drying” properties of the products mean you have mere minutes of working time. At 70 degrees Fahrenheit and 50 percent relative humidity, you have about 10 minutes before the topping begins to gel. The hotter the temperature; the less working time you have. The minimum recommended temperature of the substrate for application is 50 degrees.
Don’t neglect considering the temperature of the topping materials, either. Preconditioned material is important. In the wintertime, make sure you’re using products at room temperature.
When pouring fast-drying, self-leveling toppings, one-quarter-inch is the minimum thickness recommended and 2 inches is the maximum. A thicker pour does not increase performance. Also, if a thicker application is required these toppings may not be the most cost-effective products to use.
At the time of application, “turn off the air conditioning, heat and avoid direct sunlight where you pour,” advises Golter. “Airflow will cause ripples, which can crack and it’ll look like a dried mud bed.”
 Another cardinal rule: Honor expansion joints throughout the process. “For saw-cut control joints, you can self-level over them, but map them in and make saw cuts in the topping to mirror them,” says Fabyonic.
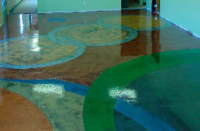
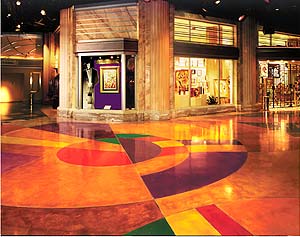
Go ahead and decorate!
There is virtually nothing you can’t do decoratively with fast-drying, self-leveling toppings. “It’s the artisan’s dream come true — the perfect canvas,” Golter says.
For coloring, the options mirror those for traditional concrete: integral colors, acid stains and color dyes. Be sure to consider UV resistance if the topping will be exposed to sunlight. While not widely recommended, acrylic stains can be used when the surface is properly profiled. “New technologies in micro emulsions allow better adhesion and penetration of the topping,” reports Golter.
Use custom inlays of aggregate, crushed glass, metal, even wood. Use leaves and other objects to create relief impressions. Create a stencil and sandblast a logo or design into the topping’s surface. Incorporate saw cuts into the finished design. Consider using grout in saw cuts for distinct lines. Be creative!
Sealing and finishing your work
Use a sealer appropriate for the environment. For example: sealers approved for retail applications may not be approved for restaurant use. If slip coefficiency is a concern, adding floatable aggregates or fine sand to the sealer might be considered at this stage. Some sealers already contain micro-aggregates. Consult the manufacturer of the topping product for recommendations. And, again, read and follow the directions for the sealing product you use.
Ongoing maintenance protocols will vary from facility to facility and are affected by the traffic load. Use a sacrificial wax on the sealed surface to take the brunt of the abuse and extend the time period between resealing. “They may be less maintenance, but these floors are not maintenance-free by any means,” reports Fabyonic.
Smith says he monitors a job for six months to a year to determine proper maintenance intervals.
The folks at Skookum recommend recoating floor finish products at a rate of: every four to five weeks in high traffic areas, every three to four months for moderate traffic, and every six months for low traffic areas.
Navigating the critical path
Golter suggests, “When contractors are putting together the critical path for the project, the contractors have to mark in that no other trades are there” during the prep, application and finishing of the fast-drying, self-leveling topping.
“A lot of the time you have to make the general contractor, or whomever is in charge, aware how temperamental the product is and what’s needed prep-wise,” explains Garamendi.
“Sometimes I set it up so we do the job in the evening. Sometimes we’ve worked around the clock, with two shifts, to get the job done.”
Smith says, “Instead of planning, we orchestrate.” We pre-lay the groundwork for subs before us and behind us.”
One other important aspect of the job is doing an on-site mock-up. “Use the exact technique, coloration, sealer — even timeframe — and get that approved before you begin the job,” advises Donaldson. For commercial projects, create a 10-foot by 10-foot sample. Include it as part of the floor, or in a closet or smaller room. For residential projects, an 18-inch-square sample should suffice.
For radiant floor applications, check with the topping manufacturer first. There may be concerns if the underlayment is gypsum-based instead of Portland cement-based.
Fast-drying, self-leveling toppings are not for the faint of heart, Fabyonic points out. “You’ve got one shot to do it right.”
Smith agrees. He says very rarely does something go wrong, but if something does goes wrong you can’t fix it until everything is said and done, and then you probably have to fix the whole floor. “Concrete is an unstable material anyway. This stuff is like working with dynamite. It either goes off well from the beginning or it doesn’t.”