
Many public building projects have money set aside for art. Why not make it decorative concrete?
Images in Concrete does a lot of work for individual customers, both in creating original floor murals and in basic staining. But we also work with businesses and schools via grants to produce public art. Many states have “Percent for Art” or “Art in Public Places” programs where 1⁄2 percent to 1 percent of building costs for publicly funded buildings must be set aside for art.
I would encourage concrete contractors to seek out the artists in their communities. These may be people who are graphic designers, painters, or — like me — an art professor. If you find compatibility and team up, the design skills of the artist can elevate your decorative concrete to a whole other level. Public art can be so much more than hanging a painting on a wall. In my opinion, the most successful examples are when art is integrated with architecture, so what better foundation could you have for success than concrete floors? The only difference in working with individual clients and community art leagues is that public art requires many more people, more meetings, more research, more patience, and a lot more time.
Time consuming? Absolutely, and your fee for this type of service must reflect the time you spend doing research and planning as well as the square footage you will install. Gerald and I discovered that the deciding factor isn’t always the money. This is as true for our clients as it is for us. It is whether they appreciate the uniqueness of seeing their own ideas manifested beneath their feet and how art can express values and engage people in dialogue. If the design works well, the funds will follow.
For some contractors, having clients actively involved may sound like your worst nightmare. Some may think we are crazy for inviting our clients to work alongside us.
For us, the closer we work with the client, the easier it is to make changes during the process. What! Who would do such a thing? Me. No matter how many hours or days it took for the ideas to evolve into a good design, there is always that opportunity to make it better. It may be after a good night’s sleep or during the process of laying out the image: New ideas can and will occur. If I strongly believe the change would strengthen the work, it would be a disservice not to run it past the client.
As an artist/educator for over 23 years, I don’t recommend public art as a venue for just anyone. Whether you are a contractor or an artist, you must truly believe in the creative process via committee and have an honest respect for all those involved. If you see it only as “loops to jump through” in order to get your work out there, then you are in the wrong field. Secondly, you can’t have much of an ego, if any. When I serve as a public artist, I see my job only as the facilitator that merges ideas into images that express the intentions of the people who live, work, and play in this environment. Hopefully, the people in that community will proudly say, “This is ours,” and it will reflect who they are as well.
A workshop in site-specific team design
Recently, the art teachers from the Magnolia Public Schools in south Arkansas asked me to conduct a workshop in decorative concrete. As you know, most schools have an abundance of concrete, and after they thumbed through a few magazines and got a glimpse that there is more to life than grey, they were immediately on an aesthetic mission.
Our design team consisted of three art teachers, an applied arts/drafting instructor, and the high school principal.
Here are the steps we took:
1. Research the environment. Measure, record, and make note of anything and everything in the chosen site. Sketch and/or take photos of surrounding design elements that may be incorporated later on. We don’t know how much of this will be used, but you can’t take too many measurements. The details you find in most environments don’t appear to be cohesive. Through design, you can pull all of this together. When the job is finished, it fits, it makes sense, and it feels right to most people even if they don’t know why. Most of the designing I do is miles away from the site so these pages of sketches and numbers will save you mileage and time in the long run.
2. Make scaled drawings. With the help of the drafting teacher, scaled drawings were made of the site, including architectural structures. Copies were made and distributed among each member of the team.
3. Purpose for the design. Most people only desire what they have seen before, but since our goal is to create original pieces, copies were not an option. Not only does this avoid copyright issues, it assures our clients that they are getting something special with a real sense of ownership. I posed these questions to the group: what do you wish to communicate and what do you want your students and outside guests to understand when visiting this space? How do you want this design to function? Will it represent the creative skills taught within this room or will it set the stage for a desired attitude even before they enter? Decorative? Yes, but we want more that decoration; the design must express meaning.
4. Creative process. It is important to be very observant and listen carefully to every member. Of course everyone has opinions, but many who are unfamiliar with this approach are unsure or timid about expressing them. In team designing, as with the individual creative process, you are not striving for the best solution at this time. You are looking for as many possibilities as the mind can generate. If you become negative and begin editing out “what you can’t do,” nothing new will evolve. Editing is a very important stage, but it comes later. Even the most bizarre, off-the-wall comments from one member can evoke new ideas, conjure up lost memories and help others redefine their goals and bring the images closer to focus. When each member understands that their point of view is crucial to the dynamics of this process, they begin to relax, have fun, and allow their brains to play.
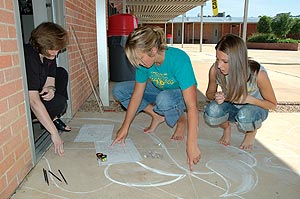
5. Individual designs. Each member was allotted a few minutes to work individually to develop concept sketches onto the scaled drawings of the site. When finished, each one presented his or her ideas and explained where the designs came from and how they evolved.
6. Edit and team design. The group chose what they felt were the best elements from each of the concept sketches and together, we composed the final black-and-white draft. More copies were made of the draft and colored pencils were handed out for some of the members to work on color schemes.
7. Slab prep and wrapping it up. The rest of the group was assigned to scrape off gum and prepare the slab with a degreaser, an acid etch and a neutralizer. Others worked to develop and label a Smith’s Color Floor chart on grey matte board. The products from each stage of the workshop were collected and arranged onto presentation boards and photographed.
8. Presentation for approval. Now they had to sell this idea to the superintendent. When you can illustrate to a client your thought process and how the final design evolved, you are much likely to get approval. Some of the rationales, or tactics for preparing for this presentation were: “The success of this project and its documentation could lead to future grants to fund more concrete art on campus. The publicity generated by this design will inspire local sponsors to become active in the beautification of our campus.”
The superintendent approved it.
9. Design transferred to slab. The high school students took the drawing, placed grid lines over it and transferred it to the slab. This is where designing to a scaled format really pays off; there are no surprises. A couple of the students made minor changes and informed us of the “improvements.”
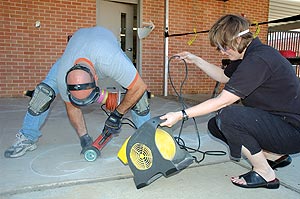
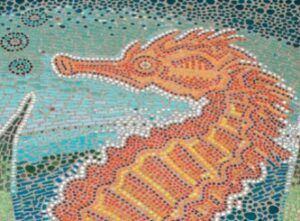
10. Engraving the lines. That afternoon, after school was out, Gerald Taylor engraved the lines with a Hilti angle grinder fitted with a diamond crack-chasing blade. We like using the crack chaser because we can achieve a wide range of calligraphic line qualities. When the lines flow from thick to thin, they catch the light and shadows to achieve a variety of depth. The slab is cleaned again using TSP and scrubbed with brushes. From this point forward, it is sock-feet only for quality control. There is a chance that body oils could cause a resist when using water-based stains and when it comes to sealing, the surface must remain clean. It was my oversight to realize that most teenaged girls don’t wear socks.
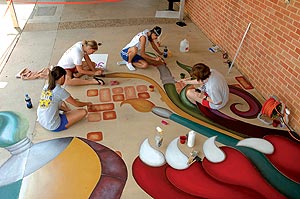
11. Students apply color. Using Smith’s Paints water-based floor stains, flat washes were brushed in. Once they were dry, other layers were applied to create the illusions of texture and volume. Dry-brush, wet-on-wet, airbrush, dobbing, glazing and many other painting techniques were used to create the desired effect and to achieve surface variety. This was one of the first jobs where we had the opportunity to use some of Smith’s specialty colors: green to gold flip-flop pigments, iridescences, and metallics.
12. Sealing. On this job, we used a one-part aliphatic polyurethane called Xymax. We started by lightly spraying the cut lines. This way, we can roll on the first layer very thin and tight without worrying about pooling. If the sealer is too thick, it will turn cloudy white. Here is another plus for the crack-chaser: if you want your lines black, a permanent marker slides smoothly along the sealed “V” cut without grinding away the felt tip and without bleeding into your work. After the lines are finished, lightly spray them again to lock them between the layers. Wait for the lines to be completely dry before rolling on the final layer with non-slip grit. Even though Smith’s Color Floor has excellent UV resistance, it is nice that this work is covered and has full shade from about 11 a.m. on. When this wear coat is maintained, this design and its colors will last for many years to come.
When we finished, this 12-foot by 12-foot floor mural took teachers and students 98 hours combined.
13. Photo documentation. This is a very important part of what we do. These photos are used in our portfolio to share with prospective clients, placed on Web sites, sent to publishers, arranged into promotional DVDs and mailed out as public art proposals. A high-quality camera and a tall ladder are well worth your investment. It is also important to acquire photo-release forms from everyone in your photos, especially if they are less than eighteen years of age.
In the case of this workshop, the story and images will be packaged together as a grant proposal to help schools enrich their environments with decorative concrete. It is much easier to obtain financial support from industries, grants, and individuals when they know their funds will yield a quality product. Talk is cheap, but when you can show sequentially what can be done, you can establish credibility and trust.