 Easy Antiquing
Submitted by David Stephenson, American Concrete Concepts Inc., Springdale, Ark.
www.acci-us.com
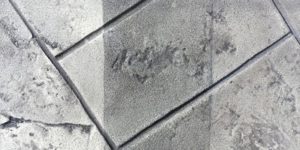
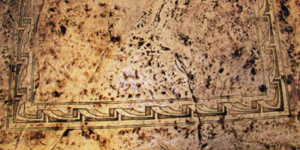
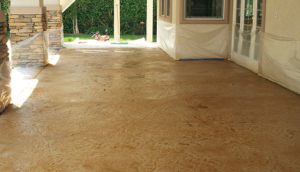
Ideal for distressed floors with lots of cracks, pits, chips or gouges, this versatile technique can be used to turn a fixer-upper into a masterpiece.
Ingredients:
- Prosoco Consolideck LS, Ashford Retroplate 99, AmeriPolish SureLock Densifier, or your preferred densifier
- Prosoco Consolideck LS Guard, Ashford Retro Guard, AmeriPolish SureLock Stain Protector, or your preferred semitopical stain protector
- AmeriPolish Water-Based Dye: Walnut or Midnight Black
- Special equipment: pump sprayer, soft-bristled broom, shop-vac with squeegee attachment, high-speed burnisher
Directions:
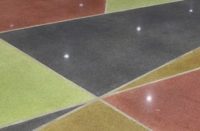
- Grind your surface to the point where you’re ready to densify, then apply your densifier of choice. You can also choose to add base colors or any detail work to your slab at this point.
- After you’ve finished coloring, detailing and densifying, polish the floor to a 1,500-grit shine.
- After cleaning the surface, apply an even coat of your stain protection. Let it cure thoroughly.
- Mix enough AmeriPolish dye to spray-coat your entire slab liberally. Depending on your color scheme, you can use the Walnut (for an earthier look to your highlights) or Midnight Black (for a starker contrast). (You could, technically, use any available color for this step, but experience has taught us that only Walnut and Midnight Black achieve the contrast necessary for this technique to work.)
- This next step of the process should move fairly quickly, as the dye should only sit on your surface for a few minutes. (If your color sits any longer it will start to change the base color slightly as it soaks into the slab and migrates.)
Spray out your dye and broom it if necessary to ensure even coverage. Make sure that any large defects are colored well. - Let the dye sit for 2 to 5 minutes and then shop-vac all the color off the floor. Because of the initial coat of stain protection, the only areas that will take color will be the cracks, chips, pits and score lines, which will give the floor the gorgeous, antique-looking patina we’re after.
- Once you have all the dye residue cleaned off with your shop-vac, there will still be a slight haze on the polished surface. This is best removed with a burnisher and a good burnishing pad.
- As a final step, to protect the newly dyed areas from collecting dirt, apply another coat of stain protection, let it cure, and then burnish the surface again to finish. he polished surface. This is best removed with a burnisher and a good burnishing pad.