

Submitted by: Larry Ross – Richard Smith Custom Concrete, Canoga Park, Calif.
This recipe is for those clients who call you complaining about a stamped or textured patio that’s become lifeless and dull. With just a few steps and a freshly mixed batch of tinted liquid release agent, you can bring color and depth to those sad surfaces.
Ingredients
W.R. Meadows Ultrite Degreaser
White Mountain Wet Look Lacquer sealer
Matcrete Liquid Release Agent
Matcrete Dustone Antique Release Agent: Walnut (or whatever color you prefer)
Special Equipment needed: hand-held buffing machine and a range of abrasive pads
Directions
![]() Clean the stamped or textured surface aggressively with your buffing machine. Depending on how the original surface was finished, use either a coarse abrasive (if you have to remove a substantial coat of sealer) or a fine one (if there’s not much or any sealer left on the surface).
Clean the stamped or textured surface aggressively with your buffing machine. Depending on how the original surface was finished, use either a coarse abrasive (if you have to remove a substantial coat of sealer) or a fine one (if there’s not much or any sealer left on the surface).
(NOTE: You may be tempted to clean your surface with a pressure washer rather than buffing it. The reason the Richard Smith team opts for the latter is because they prefer the way the buffer lifts material out of the surface, as opposed to the pressure washer pushing it in, and because when using a pressure washer, you run the risk of leaving marks that can later be accentuated by the sealer.)
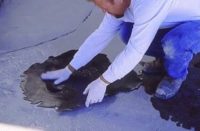
![]() Once you’ve buffed the surface thoroughly, and you have a nice, open profile, apply the degreaser evenly across the surface, and scrub it with a stiff-bristled broom.
Once you’ve buffed the surface thoroughly, and you have a nice, open profile, apply the degreaser evenly across the surface, and scrub it with a stiff-bristled broom.
![]() Rinse the surface thoroughly and let rest for 24 to 48 hours, until completely dry.
Rinse the surface thoroughly and let rest for 24 to 48 hours, until completely dry.
![]() Using a pump sprayer made for solvents, spray a light coat of White Mountain sealer across the entire surface.
Using a pump sprayer made for solvents, spray a light coat of White Mountain sealer across the entire surface.
![]() Let cure for several hours or overnight until completely dry. (The cure time will depend on weather and temperature.)
Let cure for several hours or overnight until completely dry. (The cure time will depend on weather and temperature.)
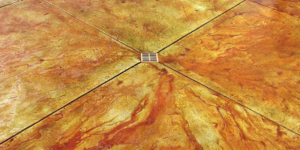
![]() Mix 1/4 cup of Dustone release with 1 gallon of the Liquid Release Agent until well-incorporated, and pour it into a pump sprayer. The thickness of your coat will depend on the type of texture or stamp pattern your surface has. If you’re spraying a stamped surface with very deep crevices, for example, you want a fairly heavy coat of release so it coats all the three-dimensional surfaces of the pattern well. On the other hand, for a surface with a low-profile pattern (like the one pictured) you’ll want to spray a very fine coat of colored release, so it coats the surface lightly and evenly and doesn’t pool in any low points. (If you’re not sure which thickness you should be shooting for, do a small test patch.)
Mix 1/4 cup of Dustone release with 1 gallon of the Liquid Release Agent until well-incorporated, and pour it into a pump sprayer. The thickness of your coat will depend on the type of texture or stamp pattern your surface has. If you’re spraying a stamped surface with very deep crevices, for example, you want a fairly heavy coat of release so it coats all the three-dimensional surfaces of the pattern well. On the other hand, for a surface with a low-profile pattern (like the one pictured) you’ll want to spray a very fine coat of colored release, so it coats the surface lightly and evenly and doesn’t pool in any low points. (If you’re not sure which thickness you should be shooting for, do a small test patch.)
![]() Let the release set overnight and make sure it is completely dry before continuing to the last step.
Let the release set overnight and make sure it is completely dry before continuing to the last step.
![]() To finish the surface, add a final coat of the lacquer sealer and let cure completely.
To finish the surface, add a final coat of the lacquer sealer and let cure completely.