
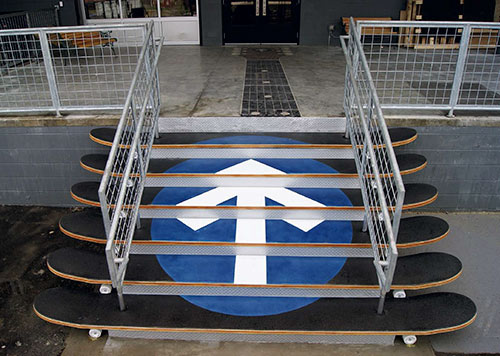
In September 2010, the staff at Deco-Crete Supply and I were asked to take part in a design meeting for the 2011 Concrete Decor Show & Spring Training. After an afternoon spent walking around the Rocketown campus, we saw a great opportunity to not only enhance the area but also showcase the unlimited possibilities of concrete.
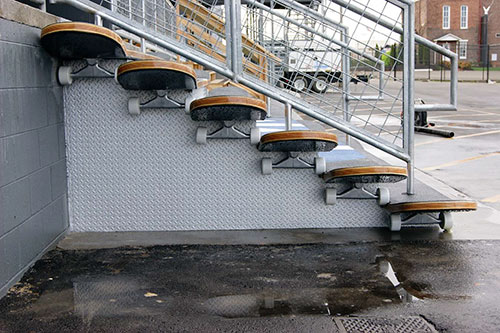
After leaving Rocketown that night we mulled over ideas gathered throughout the day, taking into consideration a main concern that Rocketown staff members voiced — the coffee bar entrance steps were too slippery. Knowing that I wanted to incorporate skateboarding (Rocketown’s most popular activity) into the project design, I got the idea to pour the steps out of concrete and have them replicate skateboards. Upon returning to Ohio, we made a few rough sketches and began working out the details with Rocketown. After receiving approval for the project, we began working on the skateboards.
 In order to make a skateboard 12 feet in length, 16 inches in width and 2 inches thick out of solid concrete, we had to pull our resources together. We had a vision of what we wanted the boards to look like — it was just a matter of making it a reality. We purchased a skateboard and removed the base plate and axle (together they are called a truck) and wheels to get a closer look at how everything fit together. Every part of the boards except their length would be double the size of an actual skateboard. (Our concrete boards would be proportionally more than twice as long as real boards.)
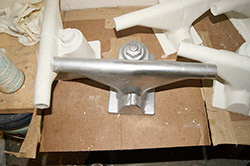
Our journey led us to a company called Online Solutions, which helped us make a CAD drawing that doubled the size of the actual skateboard wheels. After the drawing was put together, a plastic master of the wheels and trucks was made. We then contacted Rick Mast and his staff at Rock Décor, an Ohio-based producer of precast stone, to help make rubber molds that encased the plastic wheels and trucks. These molds would ultimately be what we poured the concrete?into.
We had determined that we would need a total of six skateboards, and with two trucks and four wheels per board we knew making this could take a large amount of time. Using enCounter mix with enFlow water reducer, we were able to pour one truck and a set of wheels each day.
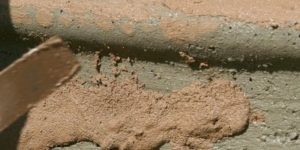
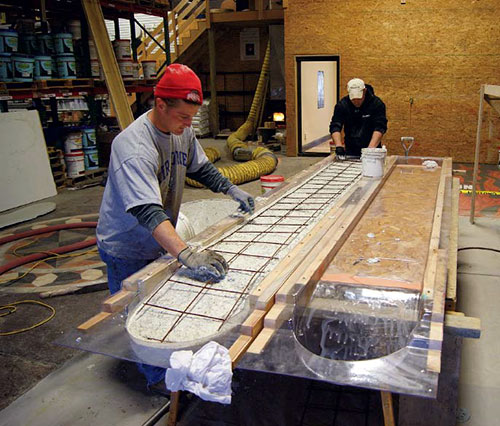
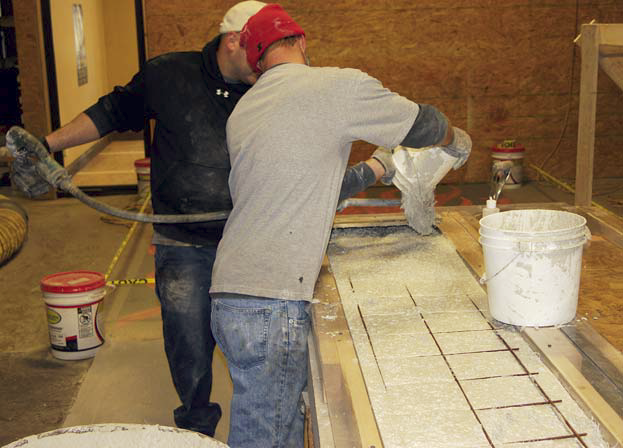
While the trucks and wheels were simple to pour once the molds were made, we knew it was going to be difficult to make a total of six skateboard steps, each weighing over 400 pounds. We began by forming and pouring a master, face up, out of concrete. To make each step identical we had to have a clean master, which required a lot of detailing. Working with Hendricks Vacuum Forming Inc. (again, based in Ohio), a sheet of 1/4-inch polycarbonate was placed over the skateboard master and then heated and compressed to make the mold. In order to expedite the process, two molds were made. Like the wheels and trucks, the boards were poured using enCounter with enFlow water reducer. EnForce fiber and six-gauge wire were used as reinforcement. In order to speed up the cure process, we used hot water and nonchloride accelerator in the mix.
After removal from the mold the next day, the boards were placed on a table that was under a heated tent. By the time all of the kinks were worked out, we made our first pour on Wednesday, March 2, only eight days before we needed to leave for?Nashville.

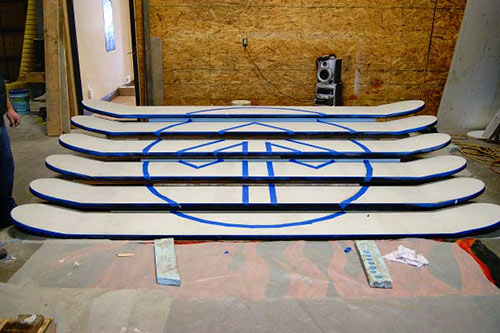
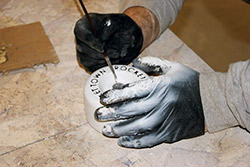
After the boards had cured over the weekend, we dry-stacked them onto cement blocks in the position they would sit at Rocketown, and we taped out the facility’s distinct logo. After the logo was down, the boards were laid on one level again, and we applied Surface Koatings’ Exterior Kolour Dyes with a HVLP (high-volume low-pressure) spray gun in colors corresponding to the Rocketown logo.
Once the dyes had dried, we coated the tops of the boards with a polyaspartic and immediately broadcast blue, clear, and black tumbled glass that also matched Rocketown’s logo. This achieved two things: One, it made a slip-resistant surface, and two, it gave the tops of the boards the same texture as an actual skateboard. To lock the glass in, three more coats of polyaspartic sealer were applied.
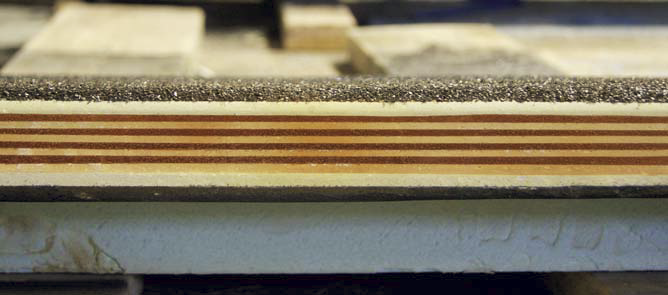
Now that the tops of the boards were finished, we had one last thing to do to add more detail to the boards. On the 2-inch faces of the boards, we used multiple layers of Kolour Dyes along with a pinstriping tape technique to give the look of compressed wood. The sides were then sealed using a polyaspartic that was applied with an HVLP gun. The finished boards, plus one spare, were loaded onto a trailer, and it was off to Nashville, making sure we avoided any potholes.
|
|
|
|
|
|
Even though the Concrete Decor Show did not start until March 15, we had to get to Nashville early to pour the base steps that the boards would sit on. During our walk-through in the fall, we noted that Rocketown had an industrial theme. To incorporate this feel, Polytek liquid rubber was poured on a section of diamond plate donated by Metal Dynamics to make a liner for the sides and risers of the base steps. Accelerator was used in the mix to speed up cure time. After the forms were stripped, we applied a water-based epoxy primer to the diamond plate and coated it with a metallic paint. This was the only way we found to replicate the look and color of steel for a vertical application.
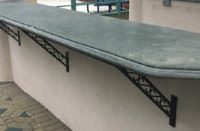
A five-minute epoxy was used to mount the wheels to the trucks, then the trucks to the boards. The boards were set on top of the base steps using concrete glue to fasten them. The last step in the process, and the part we dreaded most, was core-drilling the boards to reinstall the steel handrail.
Overall, the entire project from inception to completion spanned six months. While it only took about a month to form and pour the boards, there were countless hours spent beforehand talking with different people to help bring this project to life.
The project would not have been possible without the help of Rod Weaver, of Blue Sky Concrete, Centerburg, Ohio. Weaver, along with Jordon Shrock, donated countless hours to help make this project a reality.
While there were some stressful moments along the way, the reward of seeing all the kids from Rocketown come and stare in awe made everything worthwhile for us.